
Difficulty: Advanced | Steps: 15 | Time: 35 to 45 minutes | Age: 13+
Unicorns are one of my favorite mythical creatures to draw because I can get creative with their spiral horns, flowing manes, and magical details. In this tutorial, I’ll show you how to draw a cute unicorn step by step, starting with the head and working toward a fully colored drawing. Some details need a little patience, but I’ll break everything down so you can follow along at your own pace.
What You’ll Need to Draw a Cute Unicorn
Before I begin my unicorn drawing, I like to keep all my supplies nearby so I don’t have to stop halfway through.
- Drawing paper or sketchbook: For a smooth drawing surface.
- HB pencil: To sketch the first outlines lightly.
- Eraser: To remove extra lines and correct mistakes.
- Black fineliner or marker: To trace the finished outline.
- Colored pencils or markers: To bring the unicorn to life.
- Pastel colors: Pink, lavender, soft blue, and yellow for the mane, tail, and magical details.
You don’t need expensive supplies for this tutorial. A pencil, an eraser, and a few colors are enough to get started.
How to Draw a Cute Unicorn Step by Step
I’ll draw a standing unicorn with a rounded face, a flowing mane, and a long tail. Follow each step in order, and keep your pencil lines light until the outline is complete.
Step 1: Draw the Unicorn’s Head Outline

I start by sketching a large, slightly tilted oval near the upper-left part of my paper. I keep the top wide and rounded for the forehead, then gradually narrow the lower part to form the base of the face.
I tilt the bottom of the oval a little to the left, since my unicorn will be facing that direction. I also leave plenty of space above the head for the horn and to the right for the neck and body.
My tip: Don’t press too hard with your pencil. We’ll adjust the muzzle and cheeks in the next step, so it’s helpful to keep this first outline light.
Step 2: Shape the Muzzle and Rounded Cheeks
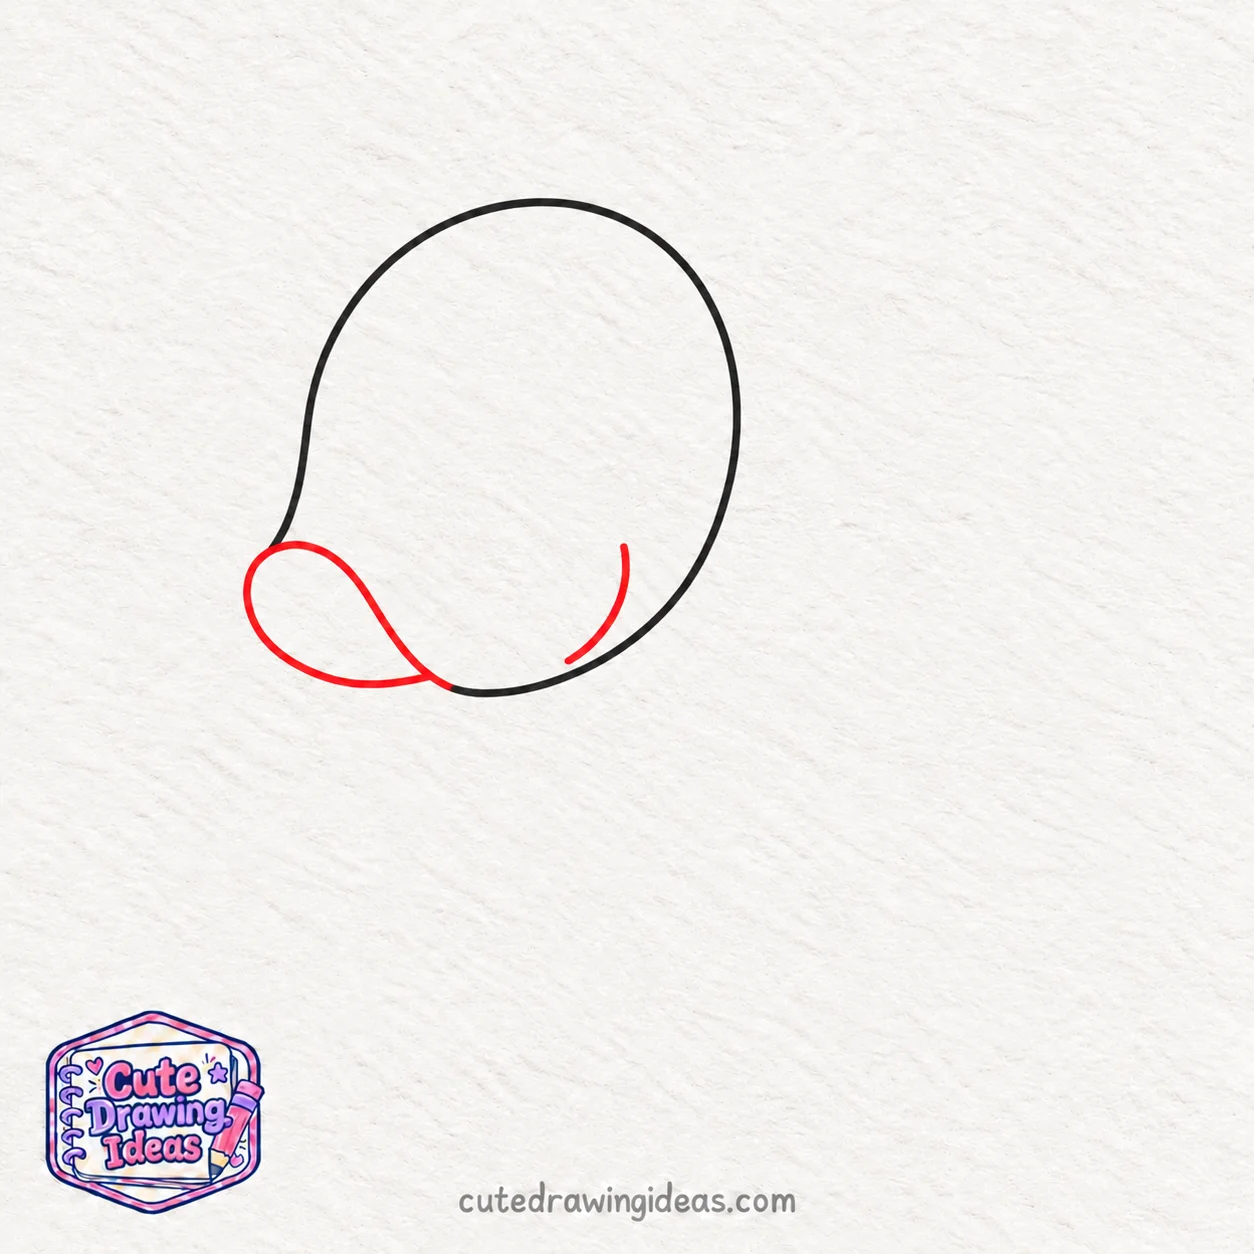
On the lower-left side of the head, I draw a small, rounded curve to shape the unicorn’s muzzle. I start near the left edge, curve gently downward, and bring the line toward the chin.
Next, I add a soft curved line inside the lower-right part of the face to give the cheek a fuller look. I keep the original head outline in place.
My tip: Keep the muzzle short and rounded so the unicorn has a sweet, gentle face rather than a long horse-like snout.
Step 3: Add the Unicorn’s Pointed Ears

I draw the first ear on the upper-left side of the head using two slightly curved lines that meet at a pointed tip. Then I add a second, slightly smaller ear on the upper-right side, tilting it gently outward.
Next, I draw a smaller curved shape inside each ear to show the inner ear details. I leave enough space between the ears for the unicorn’s horn.
My tip: Keep the ear tips softly pointed rather than too sharp. This gives the unicorn a gentle, friendly appearance.
Step 4: Draw the Spiral Unicorn Horn
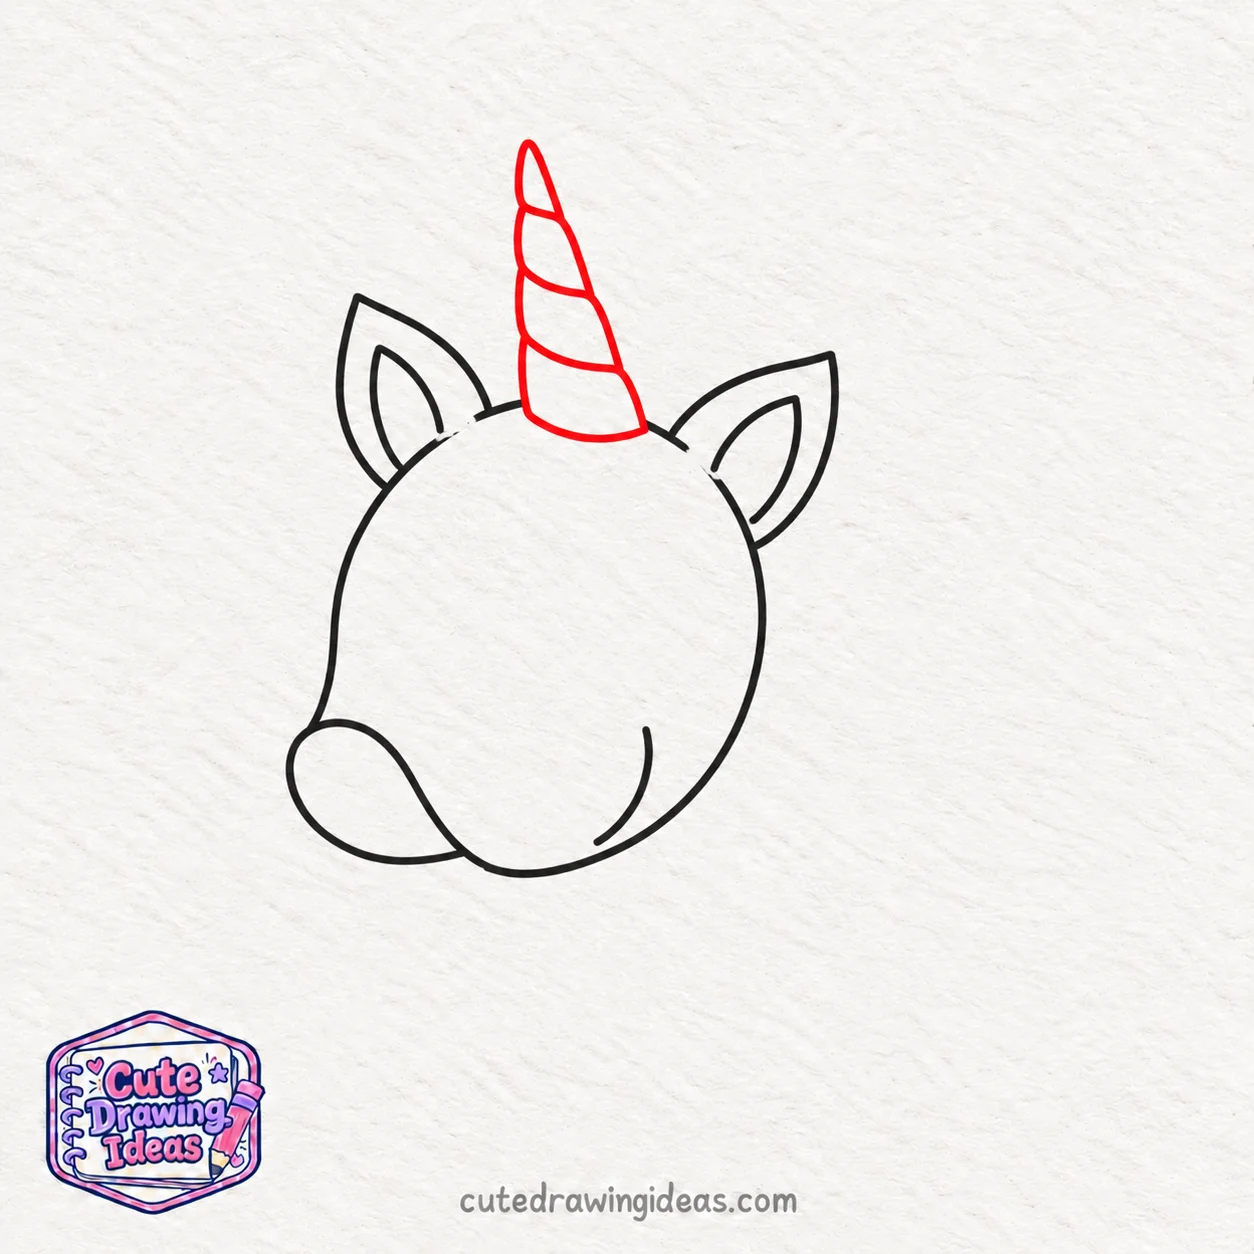
I draw a tall, narrow horn on top of the unicorn’s forehead, between the two ears. I start with two slightly curved lines that rise upward, lean a little to the left, and meet at a pointed tip.
Next, I add three short, curved diagonal lines across the horn to create its twisted, spiral pattern. I space these lines evenly, making each curve slightly smaller toward the tip.
My tip: Keep the base of the horn wider than the top, and leave a little space between the horn and both ears.
Step 5: Add Cute Eyes, Eyelashes, and Facial Features
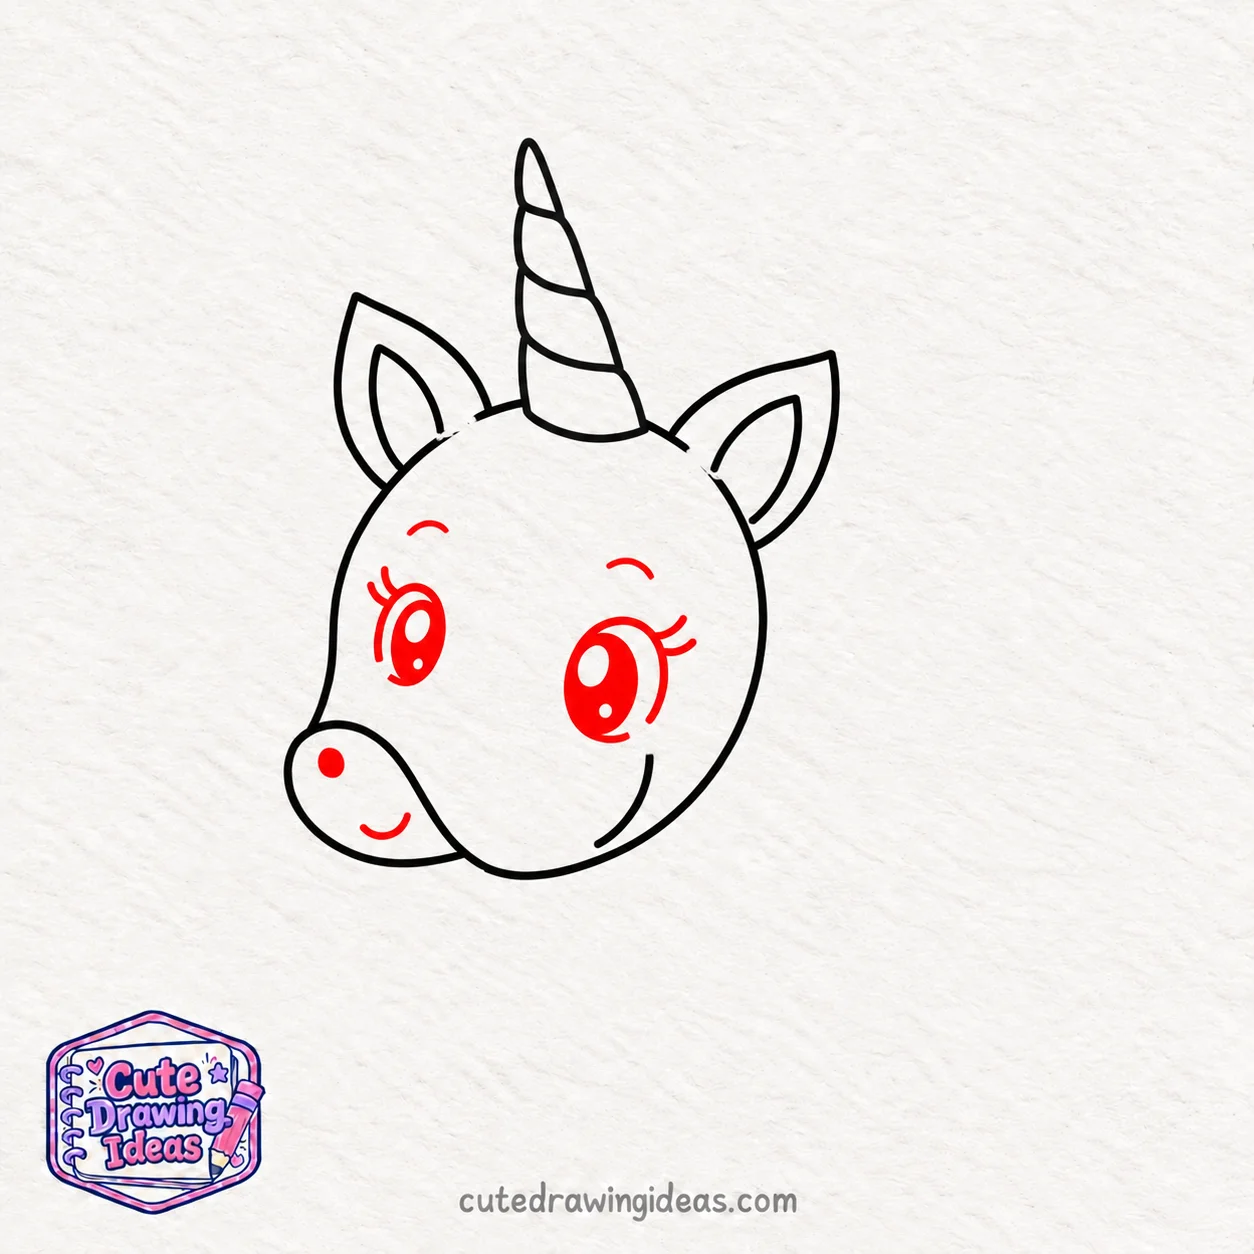
I draw two oval eyes in the upper half of the unicorn’s face, just below the horn. I make the left eye slightly smaller and the right eye a little larger to match the head’s angle.
Next, I add a small white highlight inside each eye and draw two short eyelashes at the outer corners. I also add a short curved eyebrow above each eye.
On the rounded muzzle, I place a tiny oval nostril near the upper-left side and add a small curved smile underneath.
My tip: Leave the highlights uncolored when filling in the eyes. These little white spots make the unicorn’s expression look bright and lively.
Step 6: Draw the Front Hair and Forelock
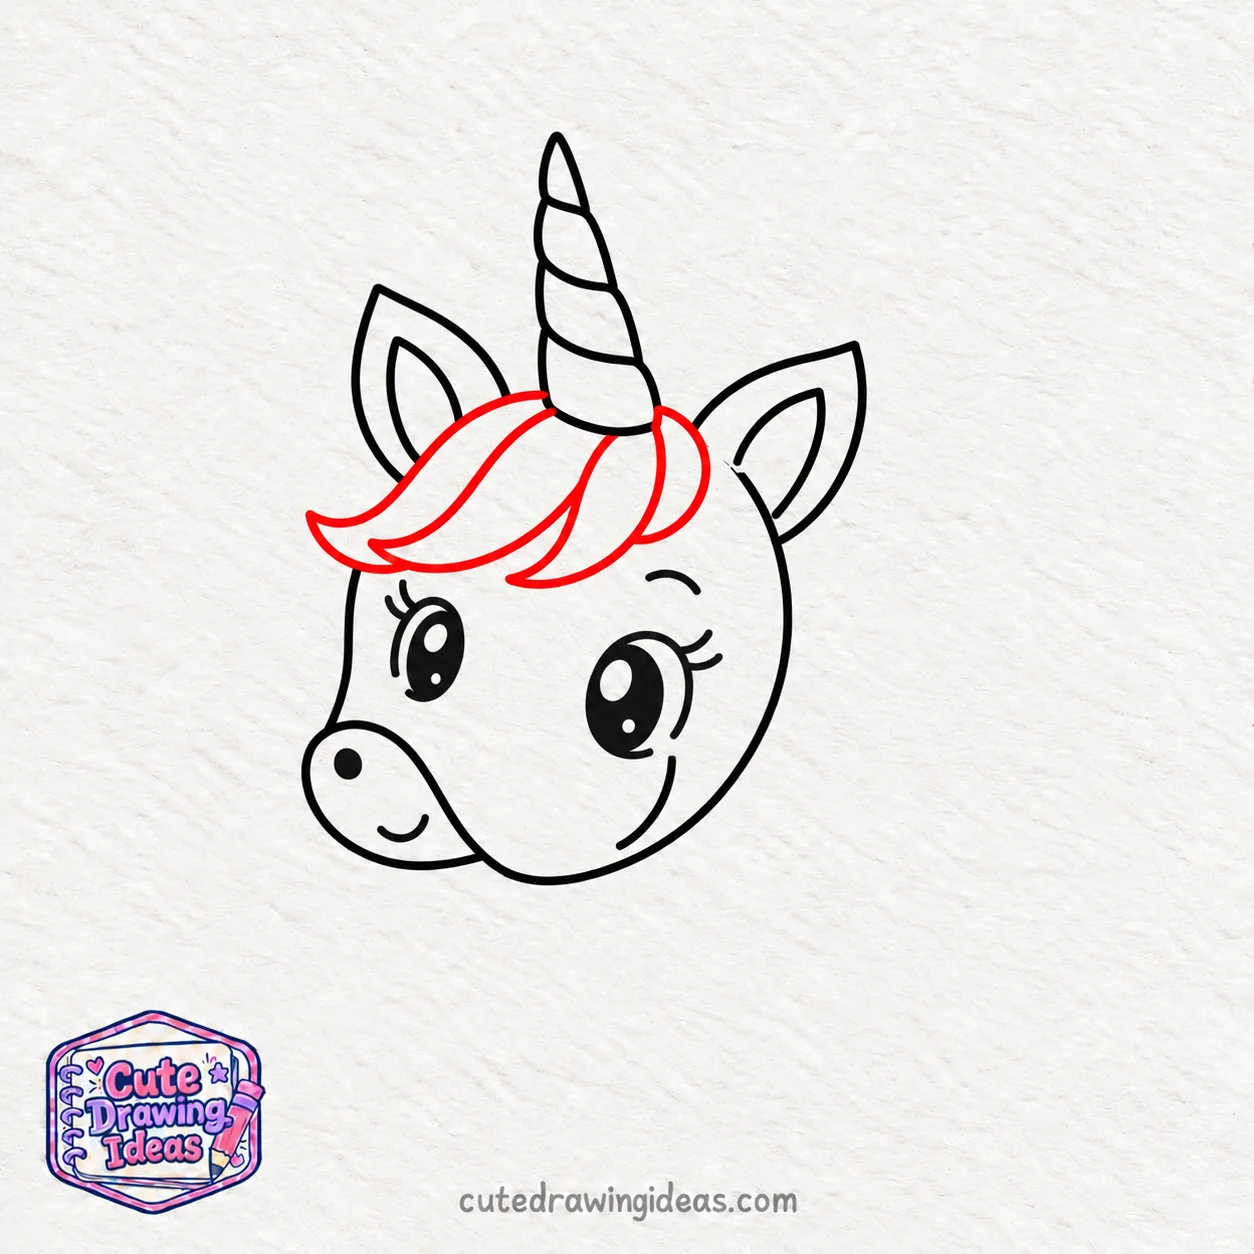
I start at the base of the unicorn’s horn and draw a long, wavy lock of hair sweeping toward the left side of the forehead. I curve the end into a soft point, keeping it just above the left eye.
Next, I add two shorter, curved locks beside the first one to create a layered forelock. I let the hair overlap part of the forehead without covering the eyes or the horn.
My tip: Make the hair locks slightly different in length so the forelock looks naturally flowing rather than stiff.
Step 7: Create the Long, Flowing Unicorn Mane
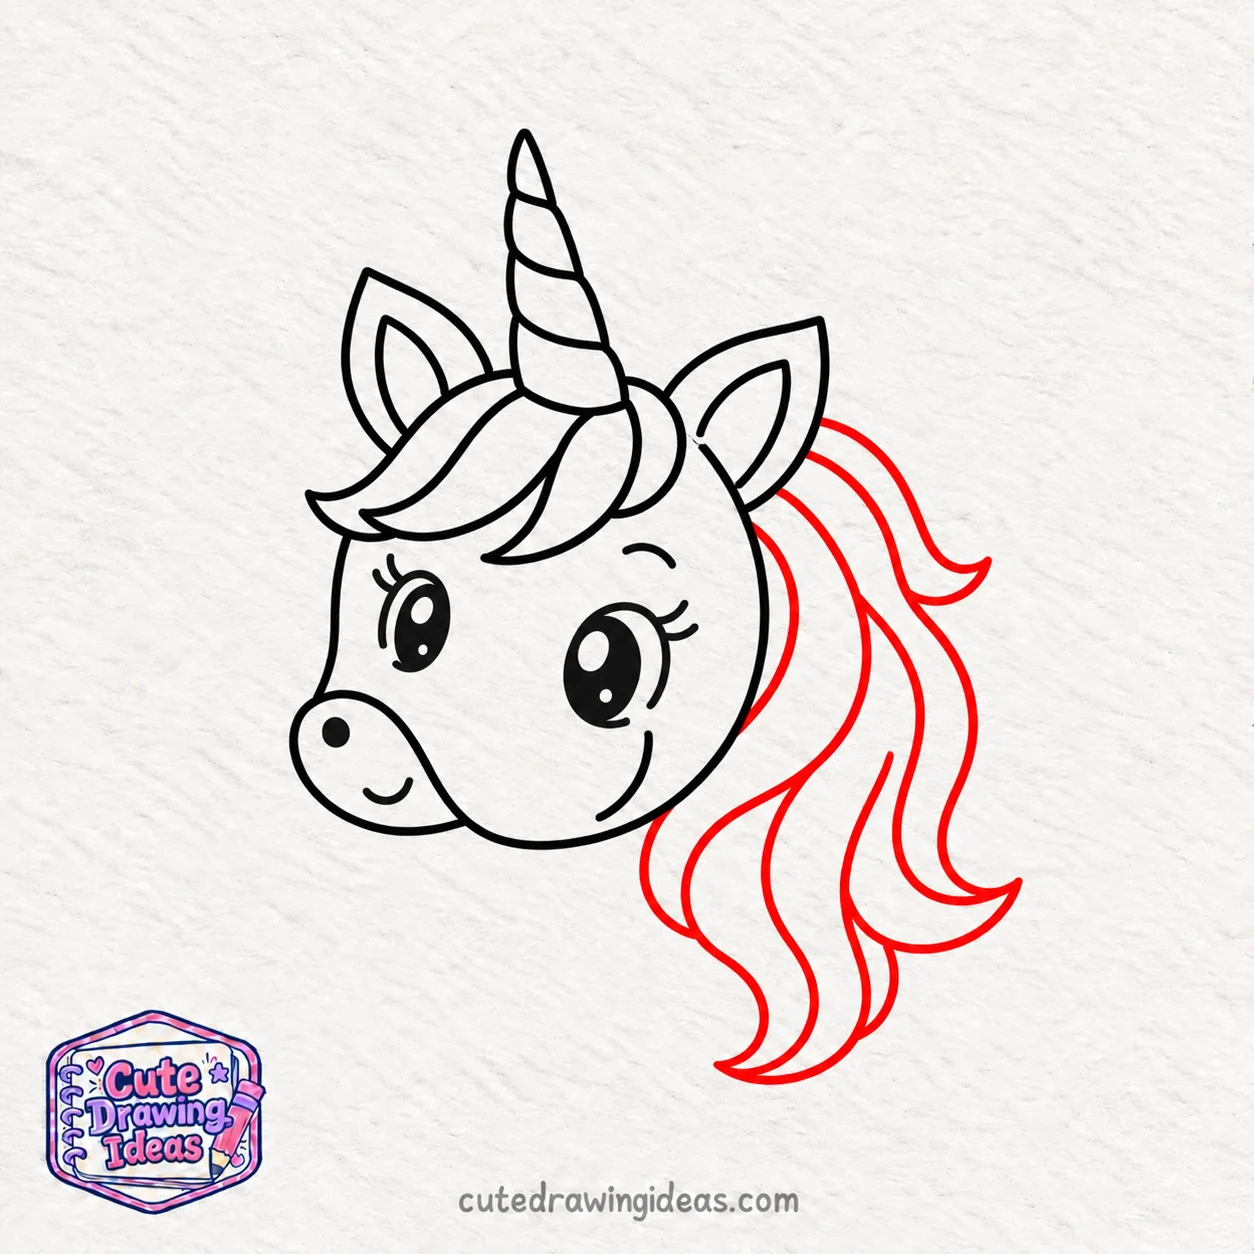
I start just behind the unicorn’s right ear and draw a long, wavy line that flows down the back of its head. I curve it gently outward to the right, then bring it down below the chin, ending in a soft, pointed tip.
Next, I add two more wavy locks alongside the first one, making them slightly different lengths. I draw a few curved lines inside the hair to separate the strands and give the mane a layered appearance.
My tip: Leave some space between the mane and the unicorn’s cheek. This will help the hair stand out when we draw the neck in the next step.
Step 8: Sketch the Neck and Chest

I start just below the unicorn’s chin and draw a gently curved line downward, bending it slightly to the right to form the front of the neck. I keep this line below the head, leaving enough room for the chest.
Next, I draw a short, rounded curve from the lower end of the neckline toward the flowing mane. This creates the upper chest while allowing the back of the neck to stay partly hidden behind the hair.
My tip: Keep the neck slightly narrow near the head and wider toward the chest. This helps it connect naturally to the body we’ll draw next.
Step 9: Draw the Back, Belly, and Rounded Body
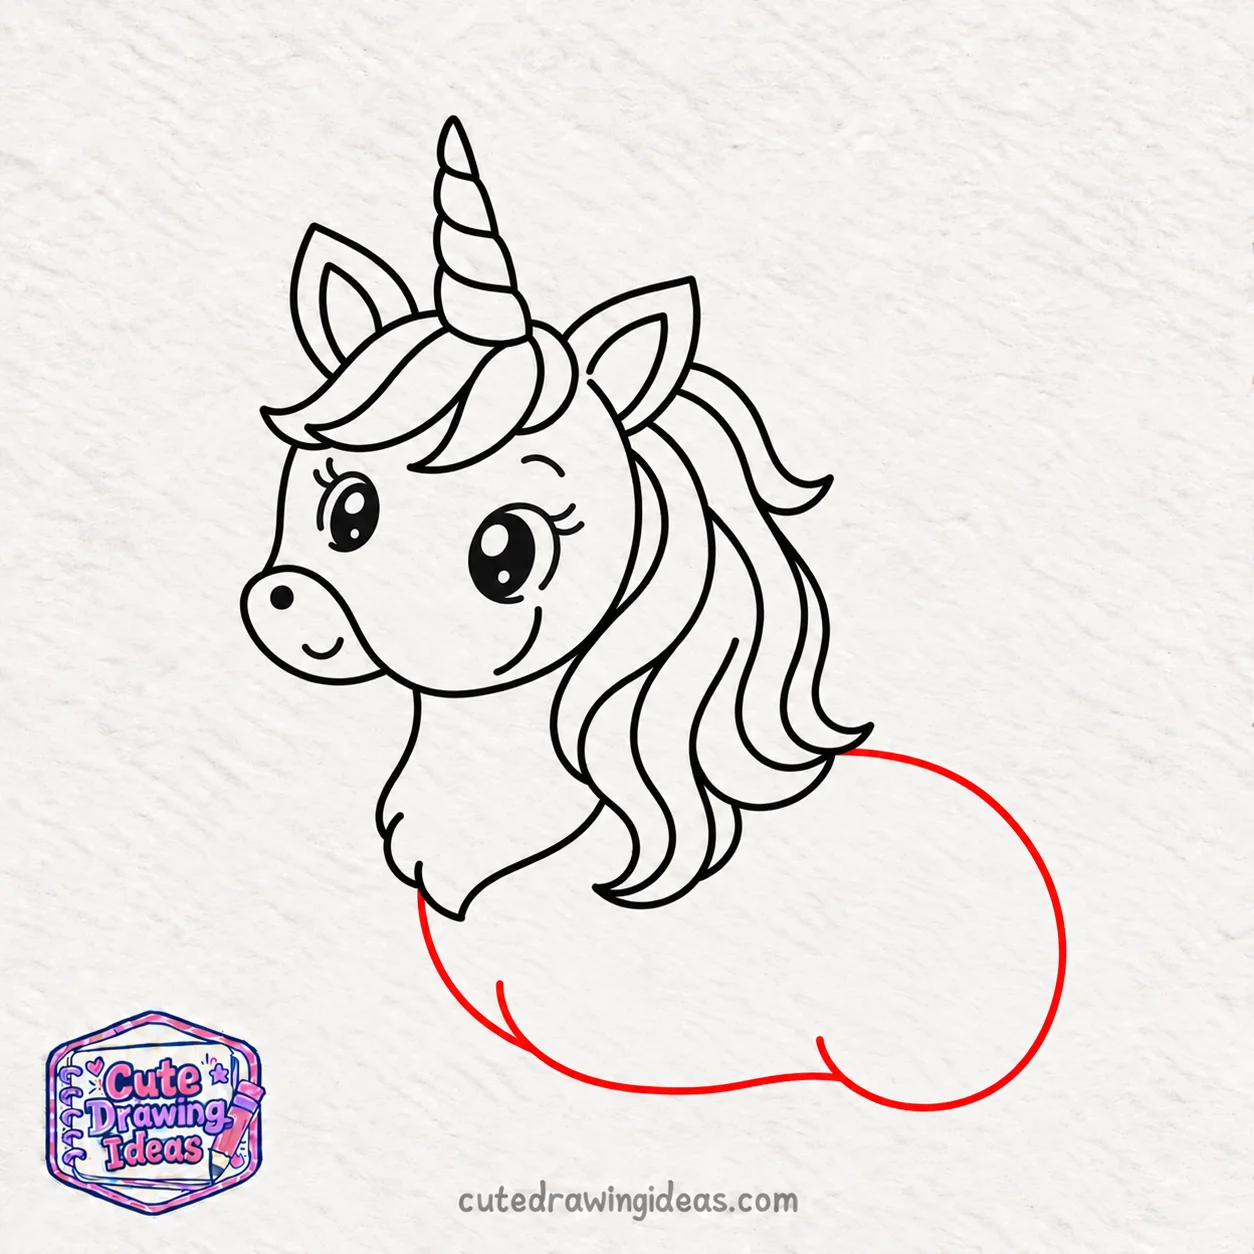
I start at the lower end of the mane and draw a smooth curved line backward to create the unicorn’s back. Then I gently curve the line downward to begin shaping the body.
Next, I draw the belly by starting at the lower chest and curving a line backward toward the rear part of the body. I keep the body round and soft, leaving open space at the bottom for the legs we will add next.
My tip: Do not make the body too long or too narrow. A softly rounded body helps the unicorn keep its cute look.
Step 10: Draw the Two Front Legs
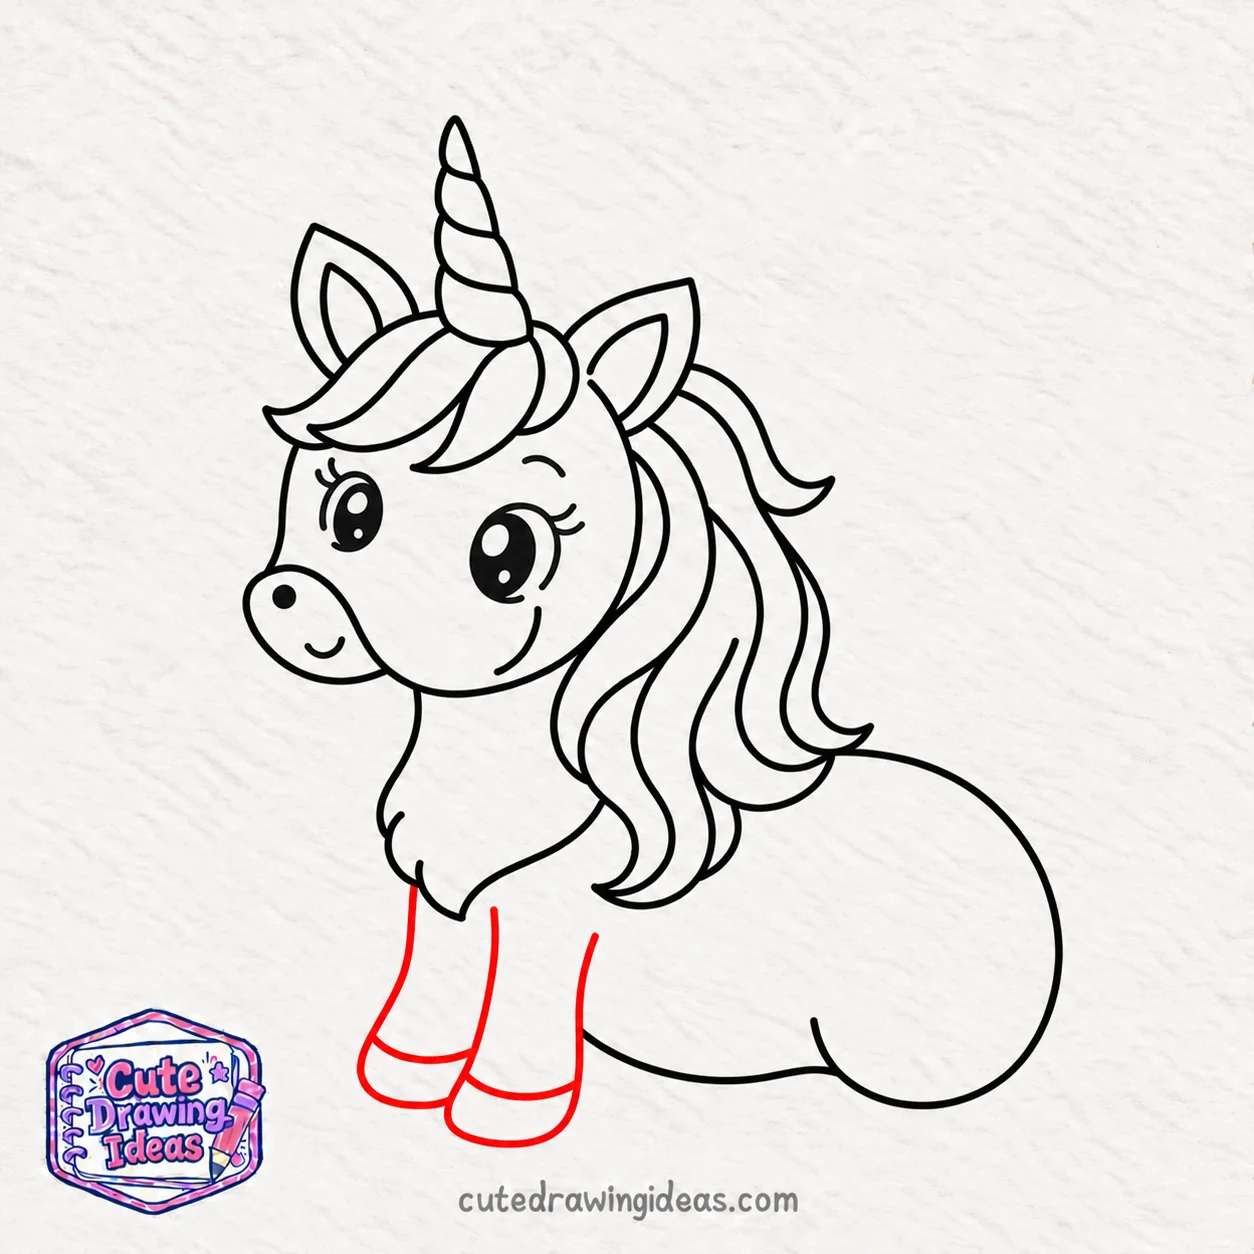
I start just below the unicorn’s chest and draw two slightly curved lines downward to form the first front leg. I keep the leg short and give it a softly rounded bottom before bringing the line back up toward the belly.
Next, I draw the second front leg slightly behind the first one, making it a little shorter so both legs look natural. I keep a small gap between them and leave enough room toward the back of the body for the hind legs.
My tip: Keep both front legs similar in thickness, but don’t make them perfectly straight. A gentle curve gives the unicorn a more relaxed standing pose.
Step 11: Draw the Hind Legs
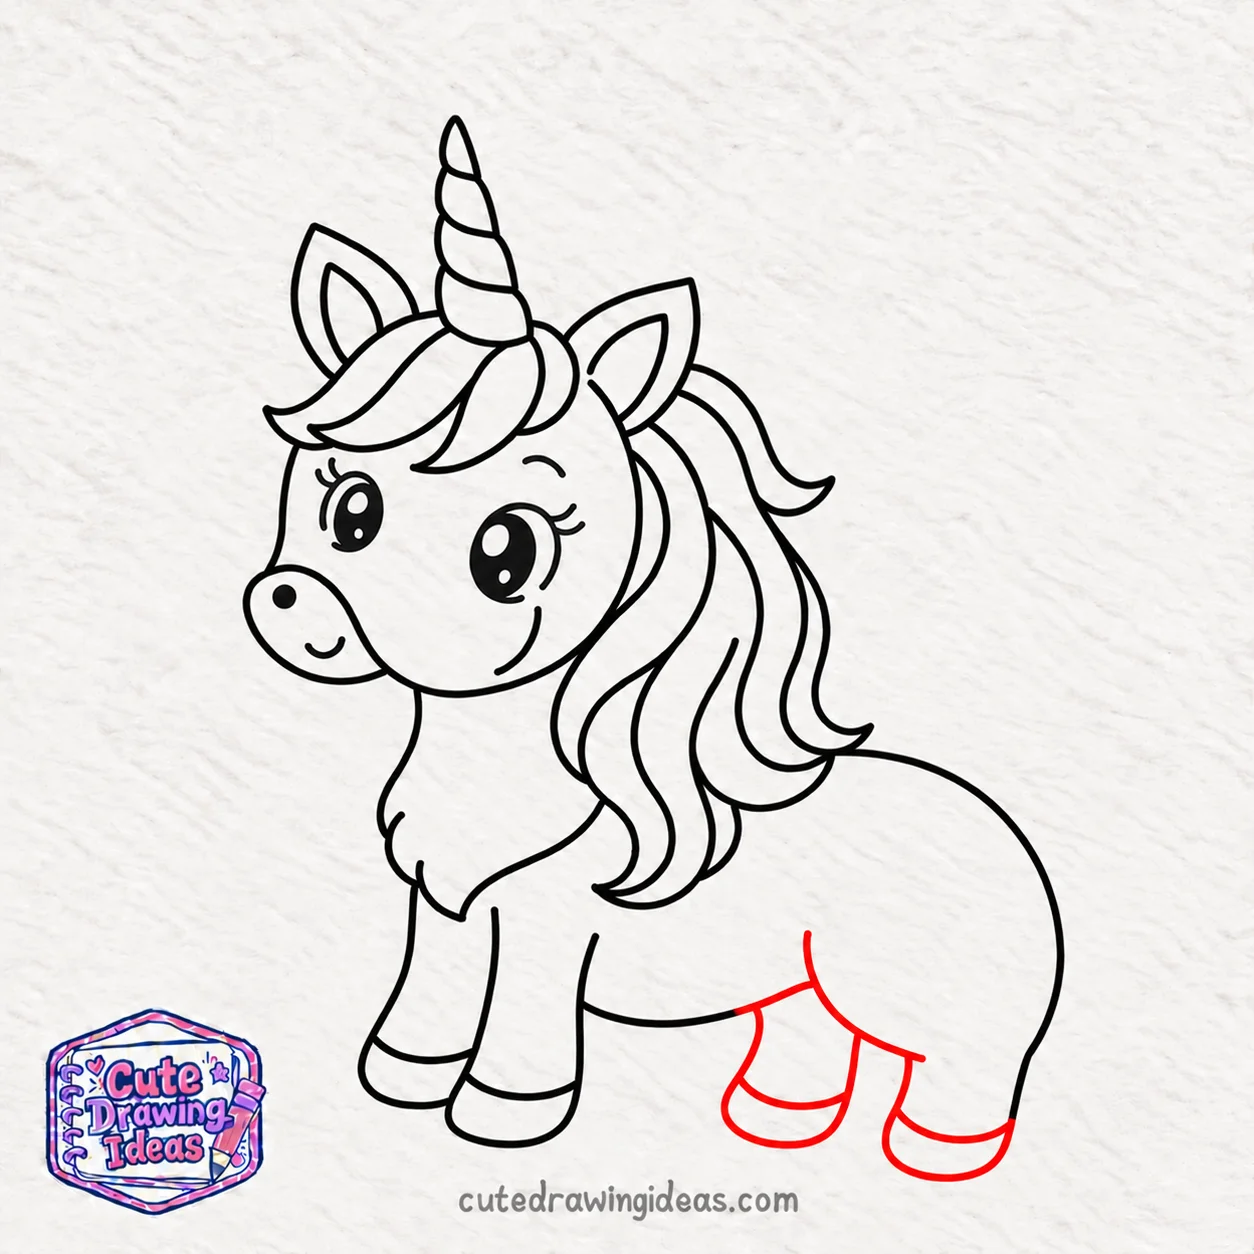
I start near the lower-right side of the unicorn’s rounded body and draw a curved line downward to form the first hind leg. I bend it slightly forward and round the bottom before connecting it back toward the belly.
Next, I add the second hind leg just behind the first one, allowing part of it to remain hidden by the body. I keep both hind legs close to the same length as the front legs so the unicorn looks balanced.
My tip: Make the hind legs slightly thicker at the top and narrower near the bottom. This gives them a natural shape without making the unicorn look too bulky.
Step 12: Shape the Hooves and Add Leg Details
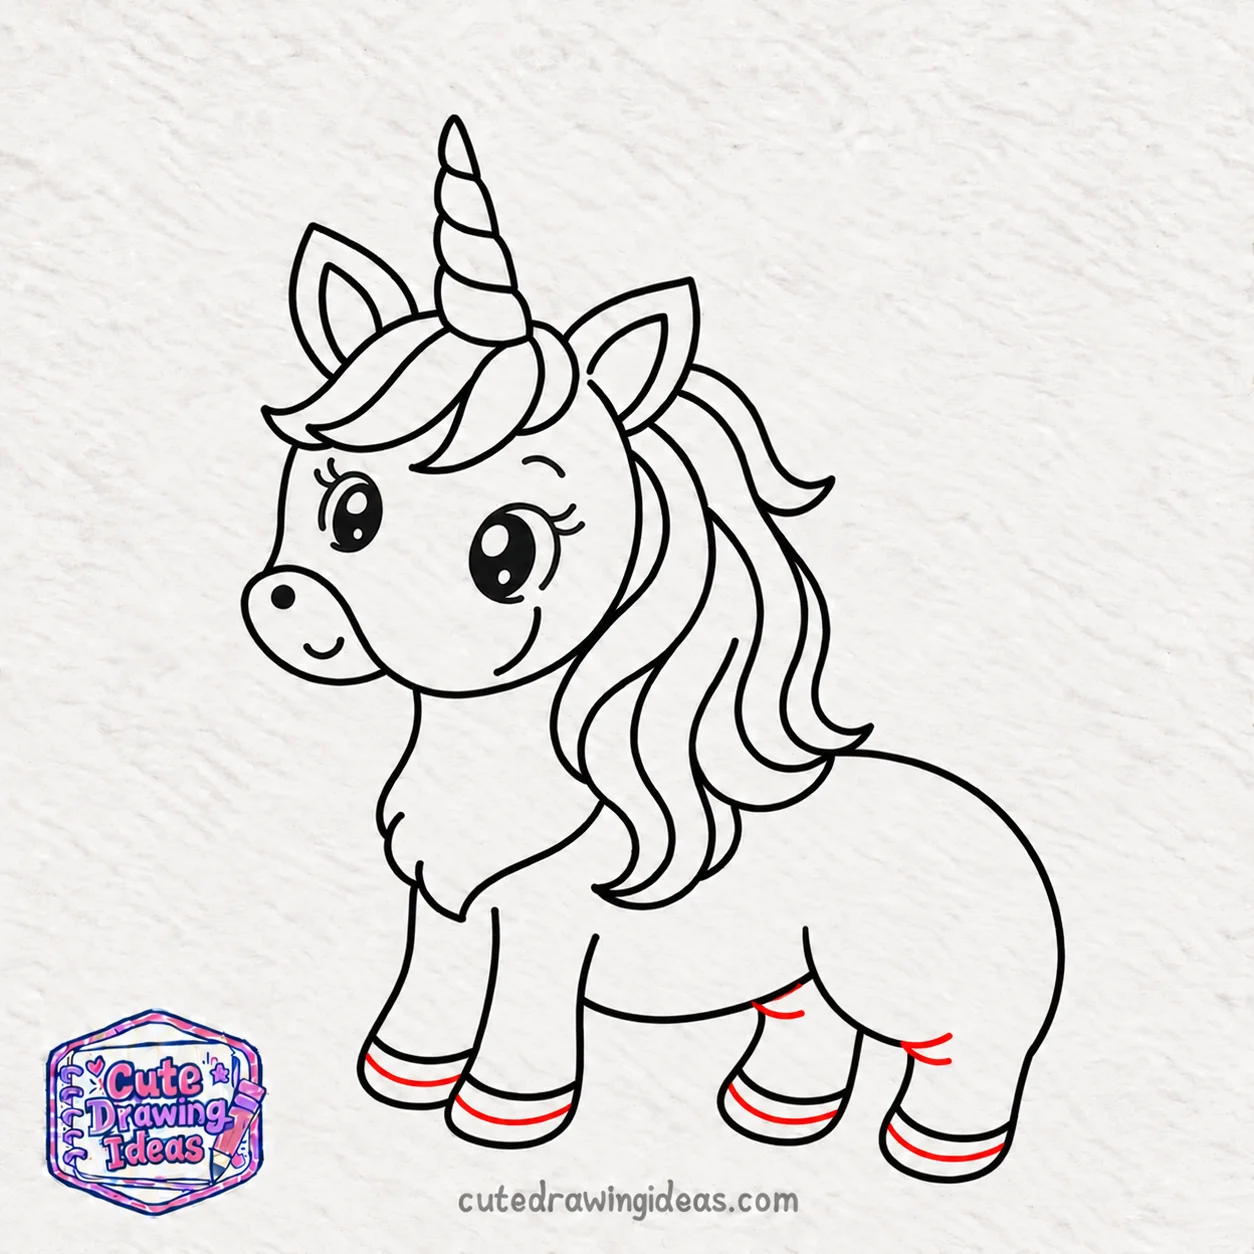
I start with the curved lines already separating the unicorn’s hooves from its legs. Inside each hoof, I draw a short, gentle curve near the bottom edge to give it a more rounded appearance.
Next, I add a small curved crease where the hind legs bend to make their shape clearer. I keep these details subtle so the hooves don’t look too heavy.
My tip: Keep all four hooves similar in size and shape. The back hooves can be slightly wider to match the thicker hind legs.
Step 13: Draw the Long, Flowing Unicorn Tail
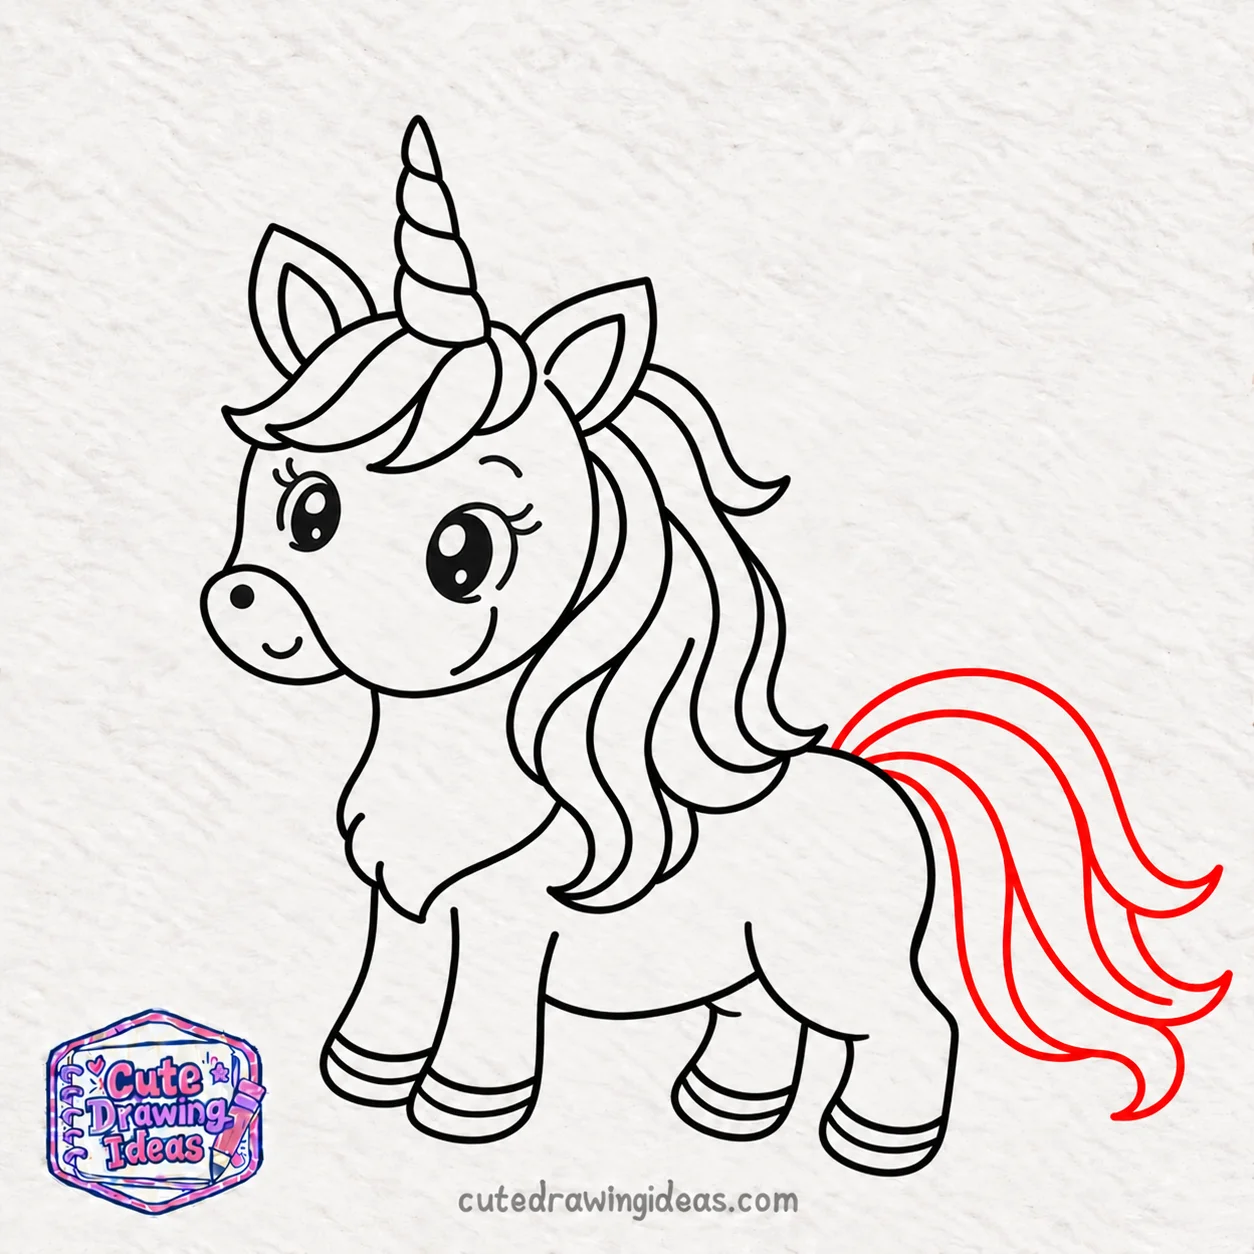
I start at the upper-right side of the unicorn’s rounded body and draw a long, wavy line extending outward to the right. I curve it gently downward and finish with a soft, pointed tip.
Next, I draw another curved line from the base of the tail to create its thickness. I add two more flowing locks underneath, giving each one a slightly different length and a curled end to match the unicorn’s mane.
My tip: Keep the tail flowing away from the hind legs so its shape stays clear. Use long, gentle curves to make the hair look soft and natural.
Step 14: Add Magical Details, Stars, and Sparkles
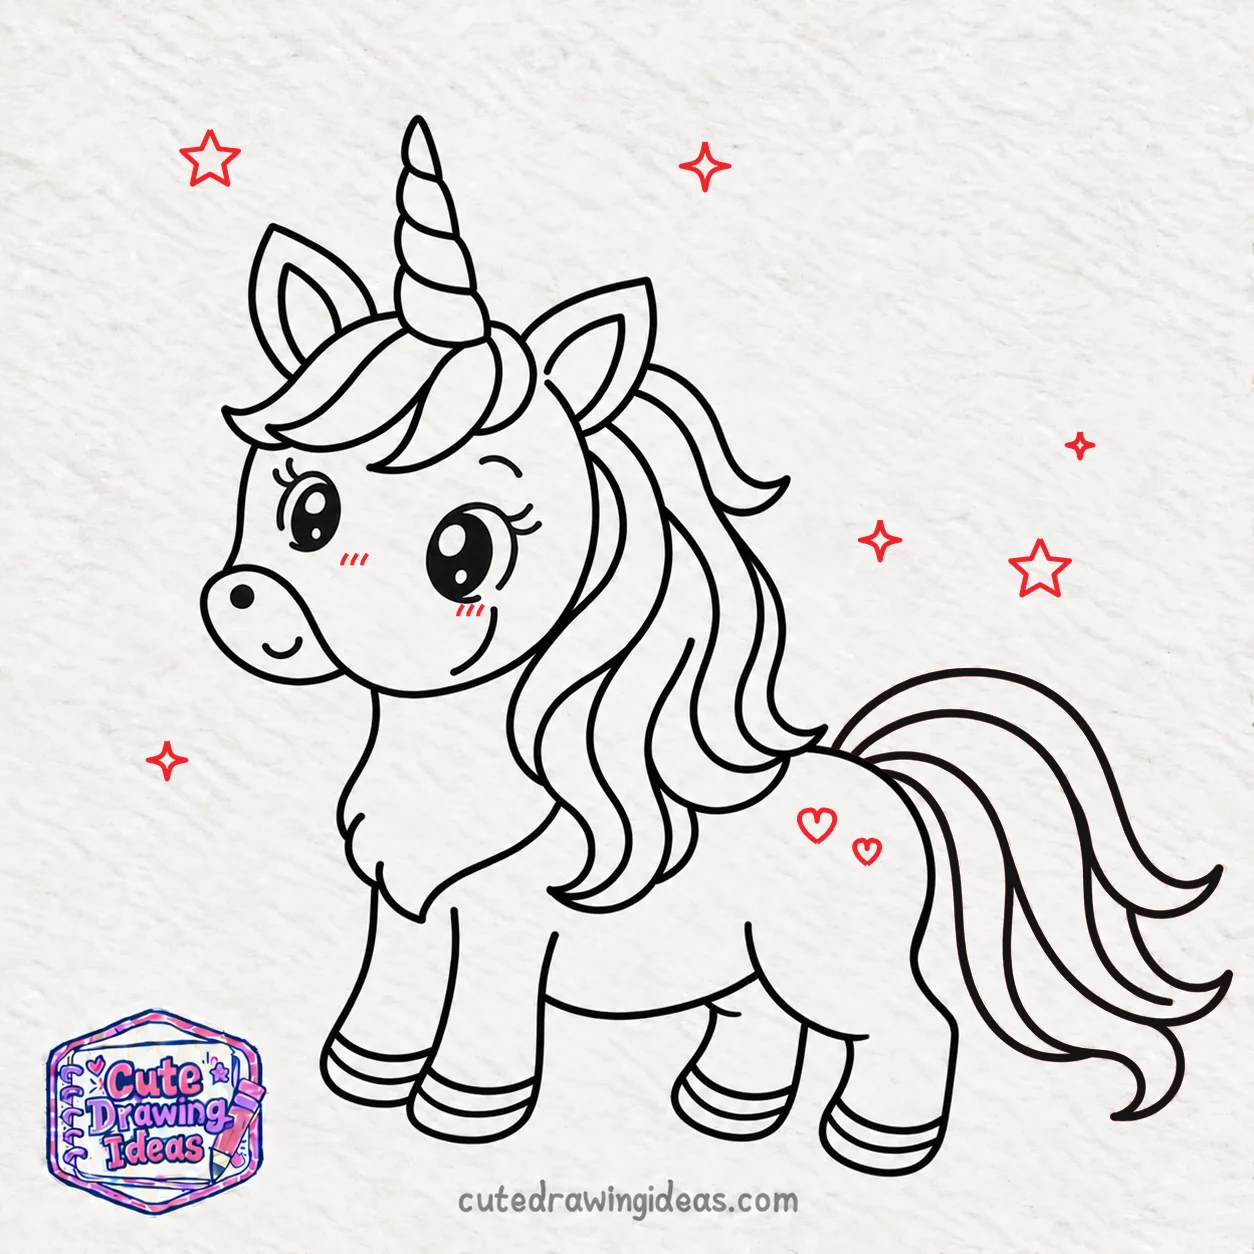
I start by drawing a small five-pointed star near the unicorn’s horn and another just above its flowing tail. Then I add a few tiny four-pointed sparkles around the mane and body to give the drawing a magical touch.
Next, I draw two small heart shapes on the unicorn’s rounded body and add a tiny blush mark beneath each eye. I keep these details spaced apart so they don’t cover the outlines we’ve already drawn.
My tip: Leave some empty space around the stars and sparkles. A few carefully placed decorations will stand out better than too many crowded details.
Step 15: Color Your Cute Unicorn Drawing
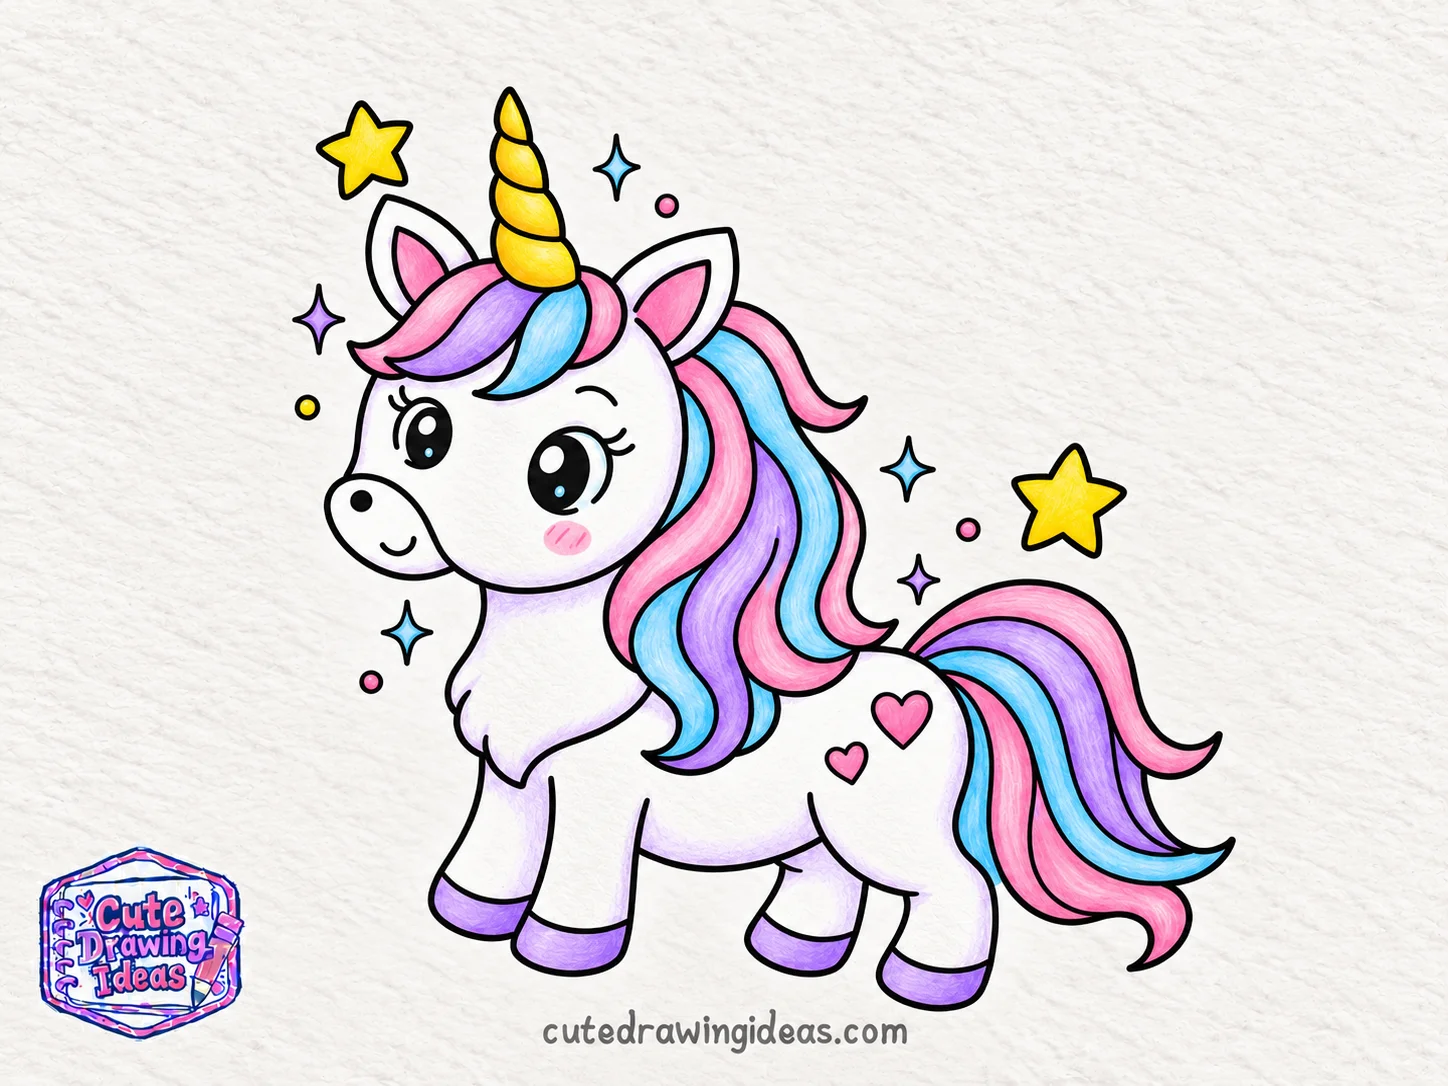
I start by coloring the unicorn’s horn golden yellow and adding soft pink inside both ears. I leave the body white and use a little light lavender around the edges to give it a gentle, shaded look.
Next, I color the flowing mane and tail with pastel pink, purple, and soft blue, using a different shade for each section of hair. I fill the hooves with lavender, add rosy pink to the cheeks, and color the hearts on the body pink.
Finally, I color the stars yellow and add light blue and purple to the smaller sparkles. I keep the black outlines neat and leave the white highlights inside the eyes untouched.
My tip: Use light pressure when coloring with pencils. This makes it easier to blend the pastel shades without covering the smaller details.
Your Finished Cute Unicorn Drawing
You did it! You’ve drawn a lovely unicorn with a golden spiral horn, a flowing rainbow mane, four little hooves, and a beautifully curled tail.
I love how the tiny hearts and stars give this drawing its own magical personality. Maybe your unicorn has different colors, a longer mane, or a slightly different expression than mine. Those little differences make your artwork special.
You can show your unicorn to your friends, hang it in your room, or save it in your sketchbook alongside your other favorite drawings.
Why I Love Drawing Unicorns
What I enjoy most about drawing unicorns is that I don’t have to follow the colors of a real animal. I can turn an ordinary horse-like shape into something completely imaginary.
I also love experimenting with different hairstyles. Sometimes I draw a short, curly mane, while other times I make it long enough to flow past the shoulders.
Each unicorn can have its own personality, which makes this one of my favorite fantasy drawing activities.
Tips to Make Your Unicorn Drawing Even Cuter
Once you’ve learned the basic unicorn drawing, you can improve its appearance with a few small adjustments.
Keep the Head Slightly Bigger Than the Body
For a kawaii-style unicorn, try making the head a little larger than you would on a realistic horse. This creates a playful, cartoon-like appearance. Check the proportions before adding the legs so the drawing stays balanced.
Use Soft Curves for the Face and Body
Look closely at where the forehead meets the muzzle and where the neck joins the chest. These areas should flow together rather than forming sharp corners. If a connection looks awkward, lightly redraw that part before tracing it.
Give the Eyes a Sweet Expression
The direction of the eyes can change the unicorn’s expression. Try moving the pupils slightly to one side to make it look curious, or use gently closed eyes to create a sleepy expression.
Make the Mane and Tail Look Naturally Flowing
Choose a direction for the hair before adding individual strands. You can imagine a gentle breeze pushing the mane backward. Drawing the locks in the same general direction helps them look connected.
Choose Pastel Colors That Work Together
Try using three main colors instead of a different shade for every strand. For example, pink, lavender, and blue look lovely together. Repeat these colors in the tail to keep the whole drawing consistent.
Add Small Magical Details Without Overcrowding the Drawing
Keep your decorations away from important features such as the horn and eyes. You can also vary the sizes of the sparkles, placing one or two larger shapes among the smaller ones to make the background more interesting.
Common Mistakes When Drawing a Unicorn
Even a small mistake can change the appearance of your unicorn. Here are some problems to watch for and how I correct them.
Drawing the Horn Too Wide or Uneven
A horn that stays equally wide from bottom to top can look more like a tube than a pointed horn.
Fix: Draw the outer shape first, making it narrower toward the tip. Then add the spiral lines inside, following the horn’s width.
Making the Head and Body Look Unbalanced
If the head is much too large or the body is unusually long, the unicorn may look as though the two parts belong to different drawings.
Fix: Compare the head and body before adding smaller features. Use a light pencil outline to adjust their proportions without erasing the entire drawing.
Placing the Legs at Awkward Angles
Legs that point in different directions can make a standing unicorn look unsteady.
Fix: Check that the hooves sit at roughly the same ground level. Keep the front legs underneath the chest and the hind legs underneath the rounded rear body.
Making the Mane and Tail Too Stiff
Straight, closely packed hair strands can make the mane look flat.
Fix: Use a few broad S-shaped curves for the main locks. Add shorter inner lines only after the larger hair shapes look right.
Adding Too Many Details Before Finishing the Main Shape
It’s tempting to draw stars, hearts, and tiny decorations before the unicorn’s outline is complete.
Fix: Finish the head, body, and legs first. Once the main drawing looks balanced, add the smaller decorations wherever there’s enough space.
Fun Unicorn Drawing Variations to Try
You can use the same basic unicorn sketch to create several different characters. Here are five variations worth trying.
Cute Baby Unicorn Drawing
Make the body smaller and shorten all four legs. Give the baby unicorn a tiny horn and a short, fluffy mane. You can also make the ears slightly larger compared with the head to create a younger appearance.
Kawaii Unicorn Drawing
Turn your unicorn into a chibi character by drawing a very large head with a small, rounded body. Shorten the muzzle and use tiny hooves. You can draw it sitting down instead of standing for a different pose.
Rainbow Unicorn Drawing
Instead of using separate pastel strands, divide the mane and tail into sections and color them in rainbow order. This version is a good way to practice keeping the colors inside curved outlines.
Cute Unicorn With Wings
Add two feathered wings behind the shoulders to create a winged unicorn. Start with one large curved wing shape on each side, then draw a few rounded feathers along the edges.
This variation gives you a new challenge without changing the unicorn’s face or horn.
Sleeping Unicorn Drawing
Replace the open eyes with two gently curved closed eyelids. Lower the head slightly and bend the front legs underneath the chest to make the unicorn look as if it’s resting.
You could also add a small crescent moon above it to complete the sleepy scene.
Fun Facts About Unicorns
Unicorns may be imaginary, but they have appeared in stories and artwork for centuries. Here are a few interesting facts about these magical creatures.
- Unicorns appear in old legends: Stories about unicorn-like creatures have existed in different parts of Europe and Asia for thousands of years.
- The horn is their most famous feature: In European folklore, people once believed unicorn horns could heal illnesses or protect against poison. These were legends, not real medical properties.
- Unicorns haven’t always looked like horses: Some historical descriptions combined features of horses, goats, and other animals. The graceful white horse with one horn became a familiar image in European art.
- The unicorn is Scotland’s national animal: It has been connected with Scottish royal symbols for centuries and is often associated with strength and purity.
- Unicorns and pegasi are different mythical creatures: A unicorn is known for its horn, while Pegasus is a winged horse from Greek mythology. Modern fantasy drawings sometimes combine a horn and wings into one creature.
Frequently Asked Questions About Unicorn Drawing
1. How do you draw a unicorn step by step?
Start with the head and muzzle, then add the ears, spiral horn, and facial features. Draw the mane, neck, body, and four legs before finishing with the tail, decorations, and colors. Following the steps in order helps you build the drawing without losing track of the proportions.
2. What is the easiest way to draw a unicorn?
The easiest way is to begin with a simple unicorn outline. Use an oval for the head, a rounded body, short legs, and a pointed horn. Once those shapes look right, add the eyes and hair. You can leave out the smaller decorations for a quicker drawing.
3. How do you draw a cute unicorn?
Focus on the character’s overall appearance rather than realistic horse anatomy. A rounded muzzle, expressive face, and playful hairstyle can make your unicorn look more like a cartoon character. The design in this tutorial uses those features while keeping a full-body pose.
4. How do you draw a unicorn horn?
Draw two lines rising from the forehead and joining at a pointed tip. Make the horn wider at its base. Then draw three or four curved diagonal lines across it to suggest a spiral. The lines should follow the horn’s shape rather than running straight across.
5. How do you draw a unicorn for kids?
Younger children can begin with a simpler version using a large oval head, two ears, a horn, and a small body. They can skip the detailed mane strands and draw larger shapes instead. Colored pencils are useful because mistakes are easier to correct.
6. How do you draw a unicorn mane and tail?
Sketch the outer shape of the hair first, deciding where it starts and which direction it flows. Divide it into a few large, wavy locks and finish their ends with soft points or curls. Add the inner strand lines last so the hair doesn’t become crowded.
7. What colors should I use for a cute unicorn?
Pastel pink, lavender, baby blue, and yellow are lovely choices. You can leave the unicorn’s body white or try a pale cream shade. A golden horn and slightly darker hooves can provide contrast without making the drawing too colorful.
8. How do you make a unicorn drawing look magical?
Try adding a few stars, four-pointed sparkles, or a rainbow behind your unicorn. You can also leave small white areas in the colored mane to suggest shine. Keep these effects light so the unicorn remains the main subject.
9. How do you draw a cute baby unicorn?
Use a larger head-to-body ratio, shorter legs, and a smaller horn. A baby unicorn also looks adorable with a fluffy forelock and a rounded belly. You can make it sit down by drawing its hind legs tucked beside the body.
10. How do you draw a cute unicorn with wings?
Draw a curved wing outline behind the shoulder, then add small overlapping feathers along the lower edge. Repeat the shape on the opposite side, showing only the part that would be visible behind the body. Keep the horn in place to distinguish it from an ordinary winged horse.
Keep Drawing
Your unicorn drawing is complete, but there’s plenty more you can try. I’d love to see you turn this design into a sleeping baby unicorn or give it a completely different hairstyle.
Pick your favorite variation, open a fresh sketchbook page, and keep drawing!