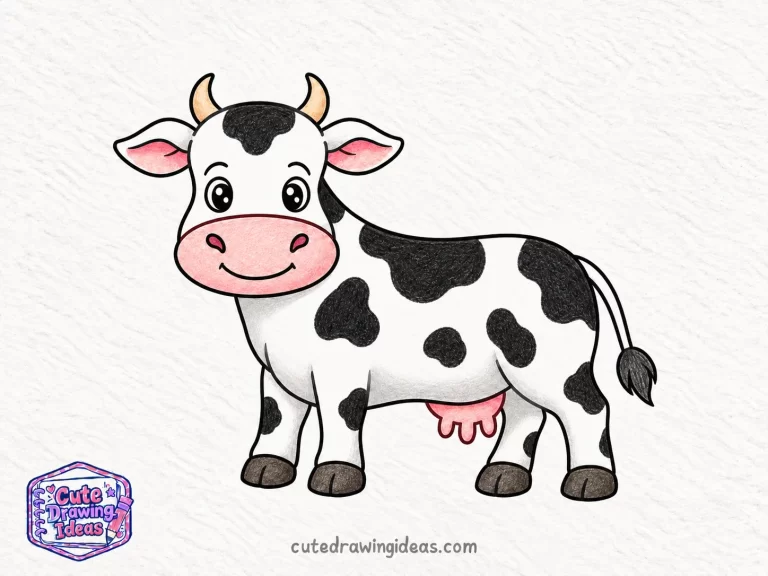
Difficulty: Intermediate | Time: 30–40 minutes | Steps: 11 | Good for: Kids & Teens
Drawing a cow is not just about adding black spots to a white body. The real challenge is getting its broad head, sturdy legs, and rounded body to look right together. I especially enjoy working on the facial details because even a small change to the eyes or muzzle can give the cow a completely different expression.
In this tutorial, I’ll show you how to draw a cow in 11 steps, from the first outline to the final coat markings and colors. We’ll practice proportions and a little shading without getting into complicated drawing techniques.
What You Will Need
- An HB pencil for light sketching
- A 2B pencil for shading and darker details
- An eraser for corrections
- Drawing paper or a sketchbook
- A black fine-tip pen for outlining (optional)
- Black, grey, pink, and brown colored pencils
- A pencil sharpener
Before You Start
Start with light pencil lines. We will build the cow’s body in stages, so keeping your first lines light will make it easier to adjust the proportions.
Leave enough room for the whole cow. The head will sit toward the left side of your paper, while the body extends to the right. Keep the lower part of the page clear for the legs and hooves.
Step by Step: How to Draw a Cow
Step 1: Draw the Cow’s Head

Start near the upper-left area of your paper. Draw a tall, softly rounded shape for the cow’s head. Make the forehead slightly wider, then bring both sides downward with gentle curves, narrowing them toward the chin.
Keep one cheek a little fuller than the other to give the head a slight turn toward the viewer. Leave some space around the top and sides for the ears and horns, which we will add next.
Don’t worry about the eyes or nose yet. For now, focus on getting the head outline and its proportions right.
Step 2: Add the Ears and Horns
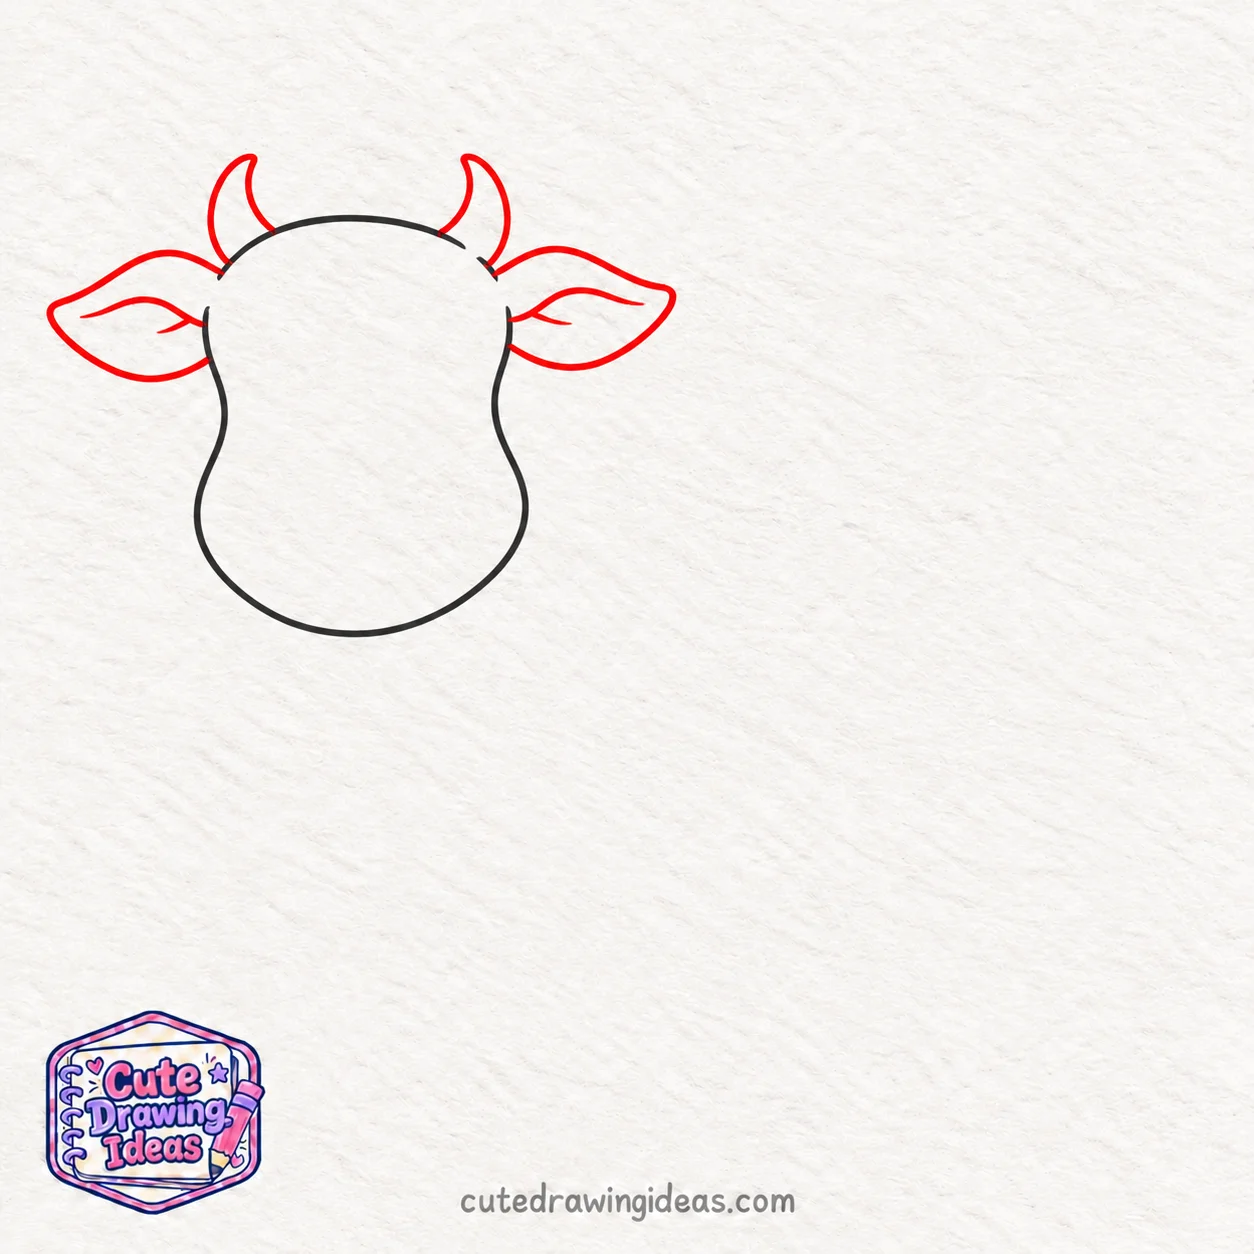
Draw a long, leaf-shaped ear on each upper side of the cow’s head. Point them slightly outward and add a smaller curved line inside each ear.
Next, draw two short, gently curved horns on top of the head, just inside the ears.
Keep the horns smaller than the ears to give your cow a natural, friendly appearance.
Step 3: Draw the Cow’s Muzzle

Draw a wide, rounded oval across the lower part of the cow’s face. Make it slightly wider than the chin to create a broad muzzle.
Inside the oval, add two small, curved nostrils near the top. Finish with a gentle upward curve below them for a smiling mouth.
Keep the muzzle rounded and the nostrils evenly spaced for a friendly expression.
Step 4: Add the Eyes and Facial Details
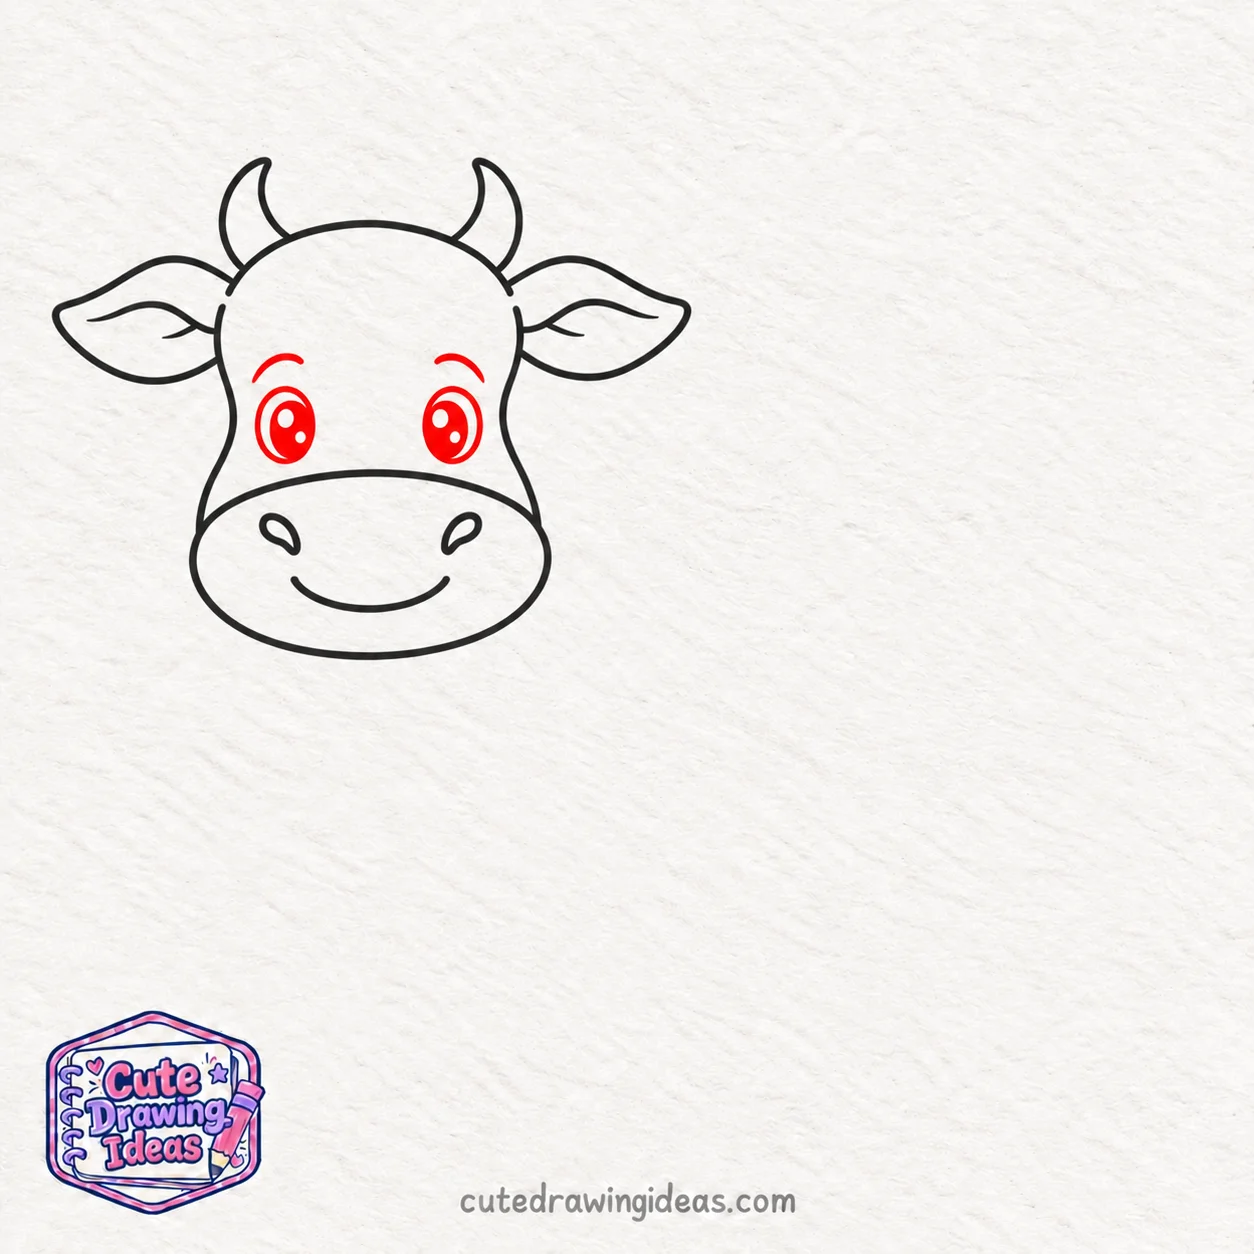
Draw two oval eyes above the muzzle, one on each side of the cow’s face. Keep them evenly spaced and slightly tilted to follow the head’s shape.
Add a dark pupil inside each eye, leaving a small white circle for a highlight. Draw a short, gentle curve above each eye to form the upper eyelids.
Keep the highlights in the same position to give your cow a bright, friendly expression.
Step 5: Sketch the Neck and Back

Start behind the right side of the cow’s head. Draw a short, sloping line outward to form the neck, then extend it into a long, gently curved line toward the right for the back.
Add another short curve below the left side of the head to show the front of the neck. Leave the lower body open for the next step.
Keep the back slightly arched and the neck broad so the cow looks sturdy and well-proportioned.
Step 6: Complete the Cow’s Body
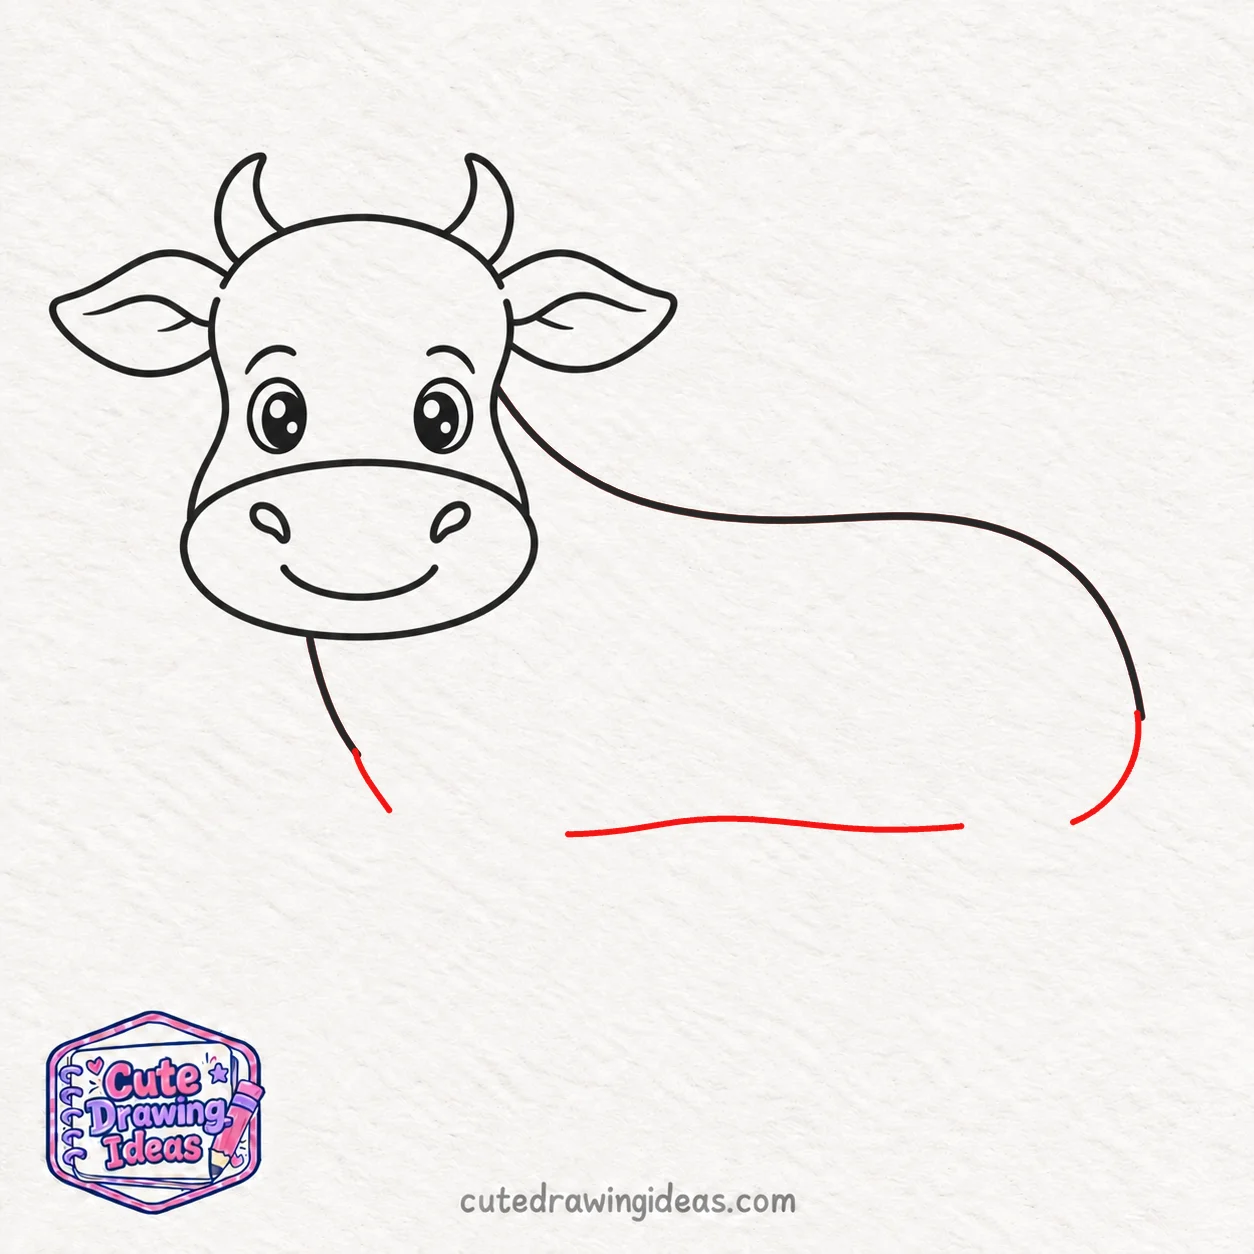
Continue the backline downward in a rounded curve to form the cow’s hindquarters. From there, draw a gently curved belly line toward the left, keeping the body long and slightly rounded.
Extend the short line below the head to shape the chest. Leave spaces along the lower body for the legs, which we’ll draw next.
Keep the belly slightly curved rather than completely straight to give your cow a natural body shape.
Step 7: Draw the Front Legs and Hooves

Below the cow’s chest, draw two sturdy front legs extending downward. Make each leg slightly narrower near the bottom, with a gentle bend at the joints.
Add a rounded hoof at the end of each leg. Draw a short line down the middle of each hoof to show its split.
Keep one front leg slightly behind the other to give your cow a more natural standing pose.
Step 8: Draw the Back Legs and Hooves
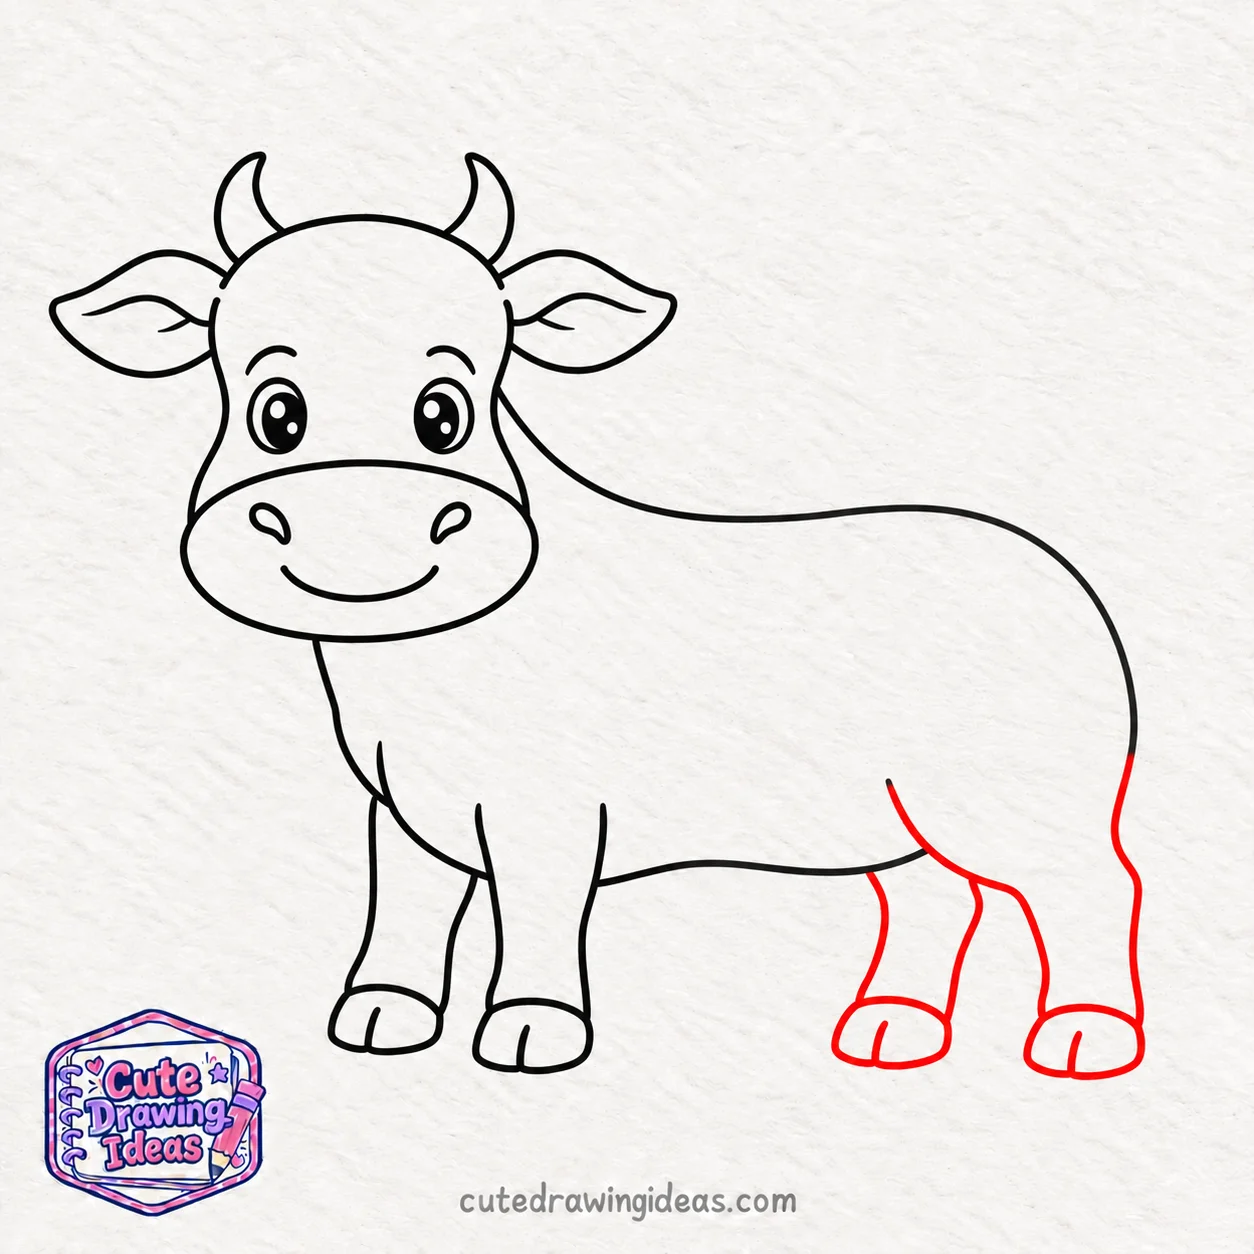
Under the cow’s hindquarters, draw two back legs extending downward. Make them slightly wider at the top, with gentle bends to show the joints.
Add a rounded hoof to each leg and draw a short dividing line in the middle. Position one back leg slightly behind the other to match the standing pose.
Keep the back hooves level with the front ones so your cow looks balanced.
Step 9: Draw the Tail and Udder
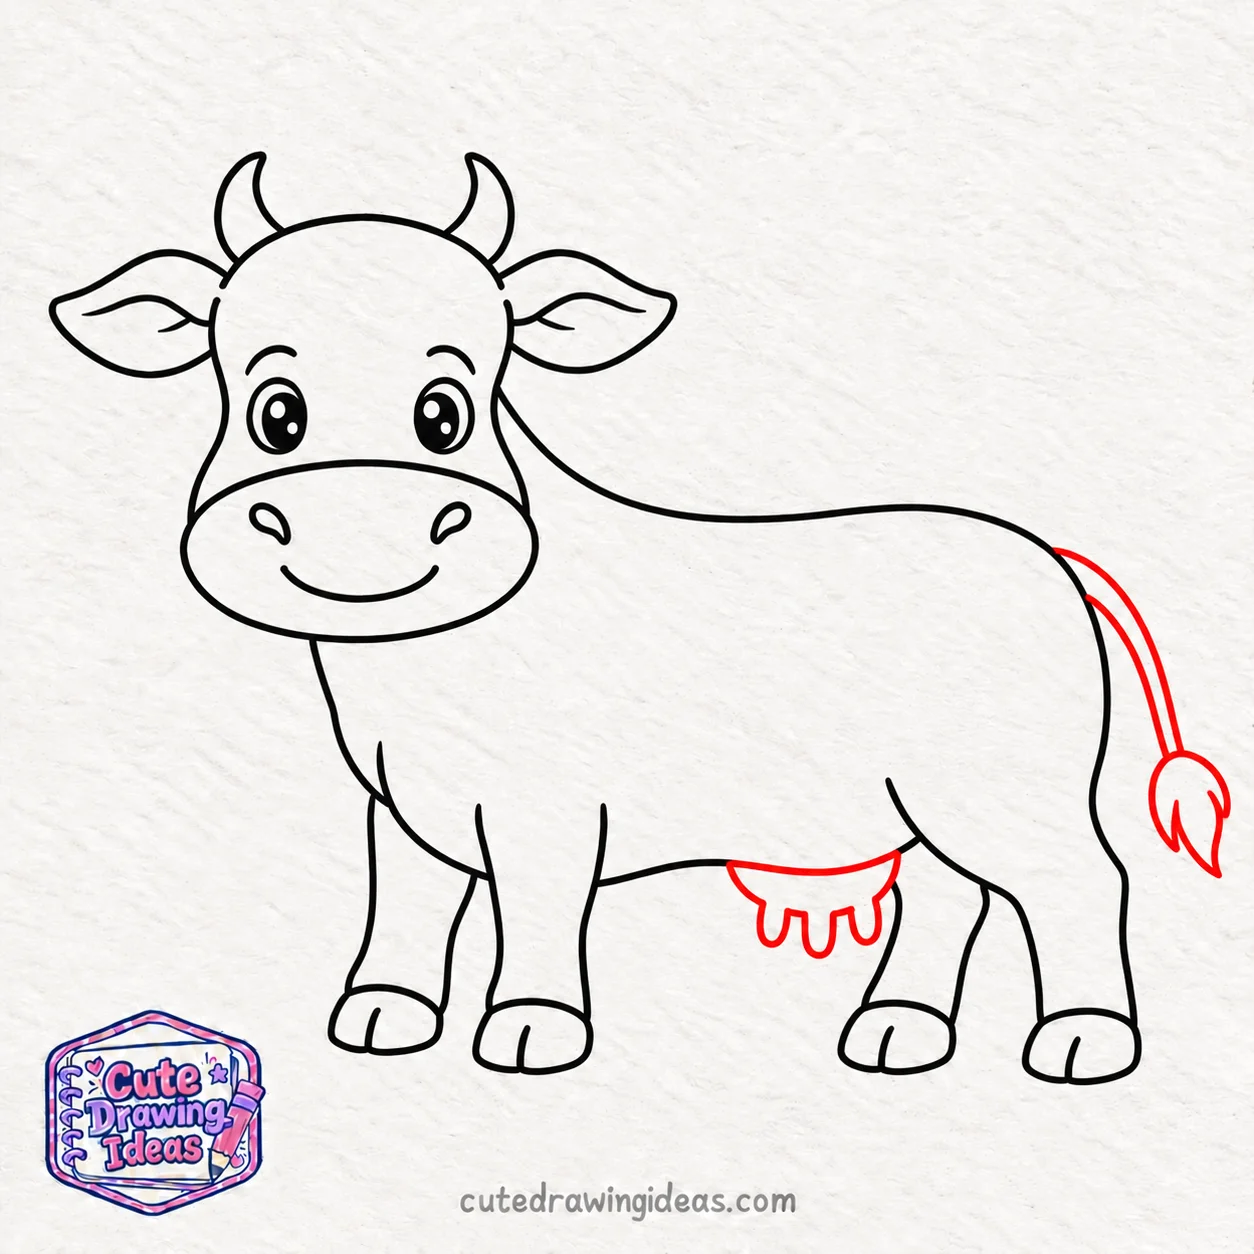
At the back of the cow’s body, draw a thin tail curving downward. Add a small, pointed tuft of hair at its tip.
Next, draw a rounded udder beneath the belly, just in front of the back legs. Add four short, rounded teats hanging from it.
Keep the udder small and the tail slightly curved for a natural appearance.
Step 10: Add the Cow’s Spots and Final Details

Draw several irregular, rounded patches across the cow’s back and sides. Make some large and others smaller, leaving white spaces between them.
Add a small patch on the forehead and a few short lines to define the tail tuft. Check the outlines and erase any unwanted pencil marks.
Avoid making the spots identical. Different shapes and sizes will give your cow a more natural coat pattern.
Step 11: Color Your Cow Drawing
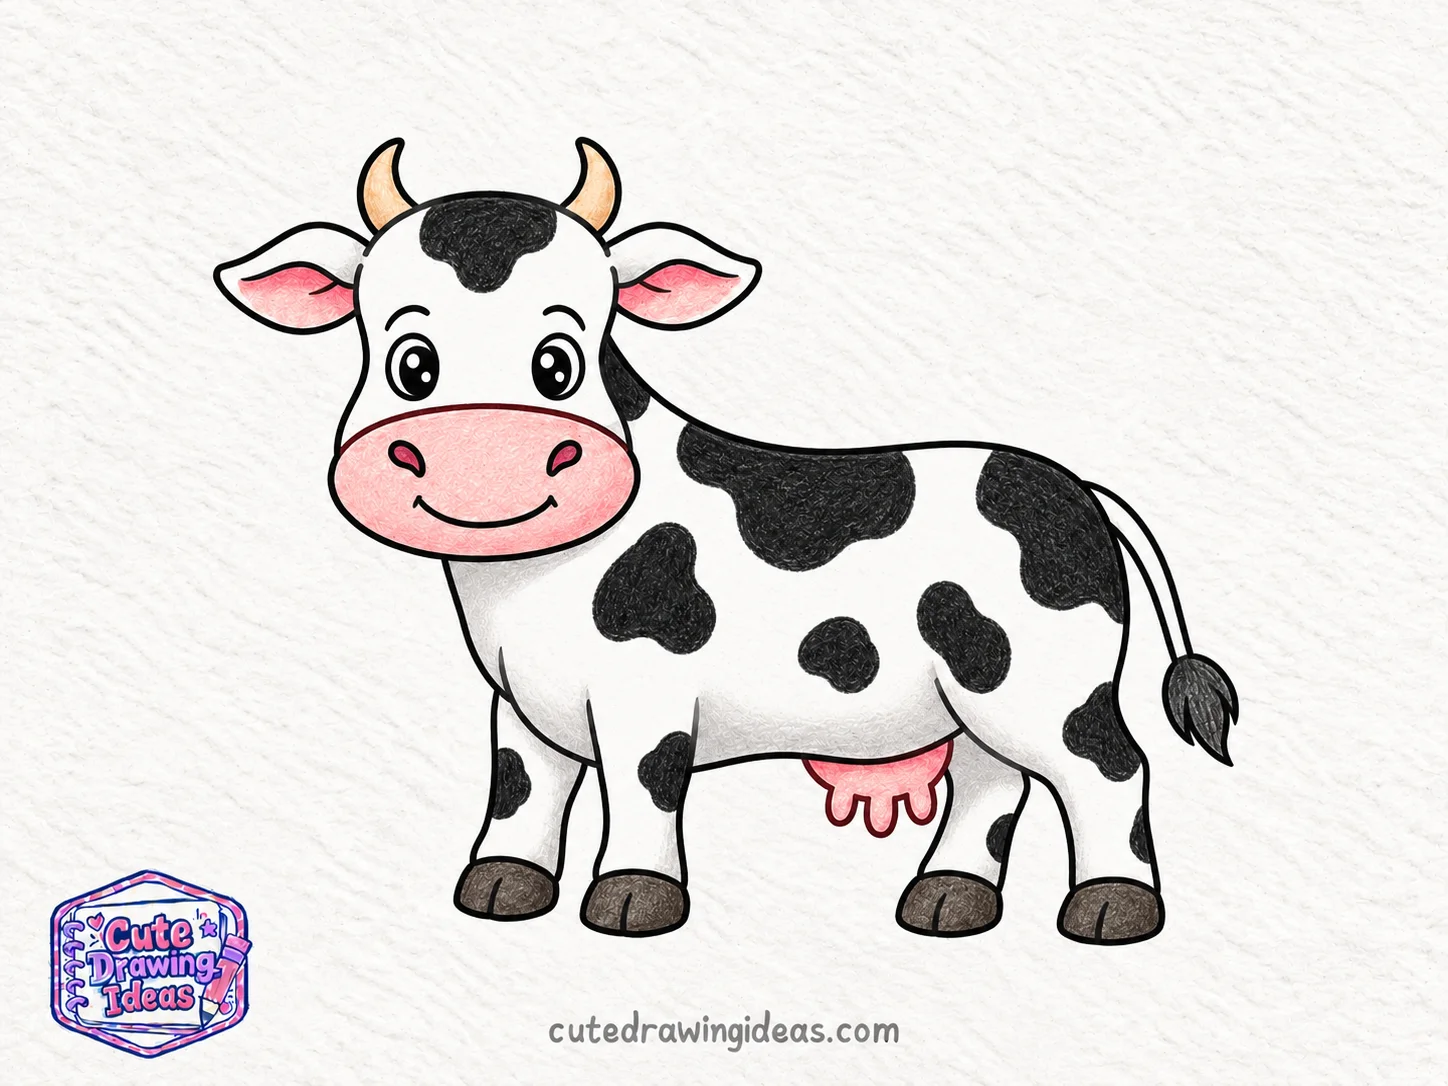
Start by filling the cow’s irregular spots with black, including the patches on its forehead, back, sides, and legs. Use short, overlapping pencil strokes and leave the rest of the coat white.
Next, color the broad muzzle, inner ears, and udder soft pink. Make the nostrils and teats slightly darker for definition. Use light cream for the horns, dark grey or brown for all four hooves, and charcoal black for the tail tuft.
Add gentle grey shading beneath the head, along the neck and belly, and around the legs. Make the shadows slightly darker where the legs meet the body to create depth. Keep the eyes dark and their small white highlights untouched.
Blend the colors lightly and avoid heavy shading to maintain a soft, natural, hand-drawn finish.
Your Finished Cow Drawing
Your cow drawing is complete! You now have a smiling cow with a spotted coat, four sturdy legs, and a little curved tail. Take a look at your finished sketch and notice how the different parts have come together.
Why I Love Drawing Cows
What I enjoy most about drawing cows is how much personality I can give them through their expressions and markings. Two cows can have the same body shape but look completely different because of their coat patterns.
I also like that I don’t have to copy every spot perfectly. I can experiment with different shapes and still create a recognizable cow. It gives me room to be creative while practicing my animal drawing skills.
Tips to Make Your Cow Drawing Look Better
Check the Overall Proportions
Before outlining, look at the entire cow rather than focusing on one feature. Compare the size of the head with the body and check whether the legs look strong enough to support the torso.
This helps you spot proportion problems before adding smaller details.
Use the Spaces Between the Legs
Pay attention to the empty spaces beneath the cow’s body. The gaps between the front legs and back legs should be clear enough to distinguish each limb.
Checking these spaces can help you position the legs without drawing extra guidelines.
Give Your Outlines Some Variation
Use slightly thicker lines around the main body and thinner lines for details such as the inner ears, eyelids, and tail hairs.
This small difference makes the drawing easier to read without requiring complicated shading.
Keep Your Coloring Controlled
When filling the black patches, work in short strokes and follow the direction of each marking. Try not to press too hard immediately.
Building the color gradually helps prevent uneven patches and gives the finished cow a softer appearance.
Common Mistakes When Drawing a Cow
Making the Head Too Large for the Body
An oversized head can make the cow look more like a baby calf than an adult.
Fix: Compare the head with the length and height of the torso before drawing the neck. Adjust either shape while your pencil lines are still light.
Drawing the Legs Too Close Together
When all four legs overlap, the cow can appear to have only two legs.
Fix: Separate the front and back legs slightly. Make the legs farther from the viewer a little narrower to create a sense of depth.
Making the Muzzle Too Wide
A muzzle that takes up most of the face can leave too little space for the eyes and cheeks.
Fix: Keep the muzzle broad but leave visible space on both sides of the upper face. Check its position before adding the nostrils.
Placing the Udder Too Low
A large, low-hanging udder can make the lower body look crowded, especially when the legs are short.
Fix: Draw the udder close to the belly and just ahead of the hind legs. Leave enough space between the teats and the hooves.
Fun Variations to Try
Once you have finished the main cow drawing, you can experiment with a few different versions.
Baby Cow Drawing
Try turning your cow into a little calf by making its head rounder and slightly larger in proportion to its body.
Shorten the legs, soften the cheeks, and reduce the size of the horns. You can also leave out the udder.
These changes will give your baby cow drawing a younger appearance without requiring you to start from scratch.
Fluffy Highland Cow Drawing
For a different challenge, try drawing a Highland cow with long, shaggy fur.
Add a thick fringe hanging over the forehead and use short, uneven strokes along the body to suggest its fluffy coat. Make the horns longer and curve them outward.
You can use warm brown or reddish-brown colored pencils instead of black-and-white markings.
Cow Eating Grass
Turn your standing cow into a grazing cow by changing the position of its head.
Lower the neck toward the ground and tilt the muzzle downward. Then draw a few uneven blades of grass beneath its mouth.
Keep the legs planted beneath the body so the pose looks balanced.
Fun Facts About Cows
Here are a few interesting facts about the animals we have been drawing.
- Cows have a wide field of vision. Their eyes sit on the sides of their heads, allowing them to see much of their surroundings without turning around.
- Not all Holstein cows are black and white. Some have red-and-white coats, giving you another natural color combination to try.
- Cow markings can help identify individual animals. Holstein coat patterns are distinctive enough to be used in identification research.
- Cows have one stomach with four compartments. These help them digest grass and other plant materials.
- Cows chew their food more than once. They bring partially digested food back to their mouths and chew it again. This process is called chewing cud.
Frequently Asked Questions
How Do You Draw a Cow’s Face?
Begin with a broad, rounded head and leave enough space for the muzzle. Use an imaginary vertical centerline to help position the eyes and nostrils. Slightly uneven cheek shapes can give the face a gentle three-quarter appearance.
How Can I Make My Cow Drawing Look More Realistic?
Use a reference photo to study the cow’s actual head, body, and leg proportions. Make the eyes smaller, reduce the exaggerated smile, and pay closer attention to the joints and hooves. Light shading can help show the body’s rounded form.
How Do You Draw Natural-Looking Cow Spots?
Start with a few large, irregular patches rather than many small circles. Let some markings curve around the cow’s shoulders and hindquarters. You can also place a patch along the body’s outer edge to make the pattern feel less evenly arranged.
What Is the Difference Between Drawing a Baby Cow and an Adult Cow?
A baby cow, or calf, generally has a rounder-looking face and shorter legs relative to its body. To show this in a drawing, make the head proportionally larger and keep the features softer. An adult cow needs a longer body and more developed proportions.
Can I Draw a Cow Using Only a Pencil?
Yes. Use an HB pencil for the initial sketch and a softer 2B or 4B pencil for the darker spots and shadows. Leave the lighter coat areas unshaded, and use your eraser to lift highlights. You can finish the entire drawing without colored pencils or markers.
Keep Drawing
Every cow you draw can have a different expression, pose, or coat pattern. Try sketching another one from a different angle and see how much you can change while keeping its proportions recognizable.
I hope you enjoyed drawing this cow as much as I enjoyed putting the tutorial together. Keep practicing, and have fun with your next animal drawing!
