
Difficulty: Easy | Time: 15 minutes | Steps: 7 | Good for: Kids and beginners
Want to learn how to draw a mushroom without getting stuck on complicated shapes? In this tutorial, I’ll show you how to turn a rounded cap and a short stem into a little toadstool with white spots and a smiling face.
We’ll build our mushroom drawing in seven easy steps, starting with a pencil outline and finishing with cheerful colors. It’s a lovely nature drawing for beginners, and you can follow along even if you’ve never drawn a mushroom before.
What You Will Need
You only need a few basic art supplies for this mushroom drawing:
- Pencil: For sketching the mushroom’s outline.
- Eraser: To remove any unwanted pencil marks.
- Drawing paper: A plain sheet or sketchbook page.
- Black marker: To outline your drawing once you’re happy with it.
- Coloring pencils or crayons: Red, cream, pink, and green for the final details.
Before You Start
Place your paper on a flat surface and leave enough room to draw the mushroom’s cap near the top and its stem underneath.
I like to start with light pencil strokes because they’re easier to correct. Don’t worry about making both sides perfectly identical. A little unevenness can give your mushroom a more natural, hand-drawn look.
We’ll be drawing a classic red toadstool with a rounded cap, white spots, and a cute face on its stem.
Step by Step: How to Draw a Mushroom
Step 1: Draw the Mushroom Cap
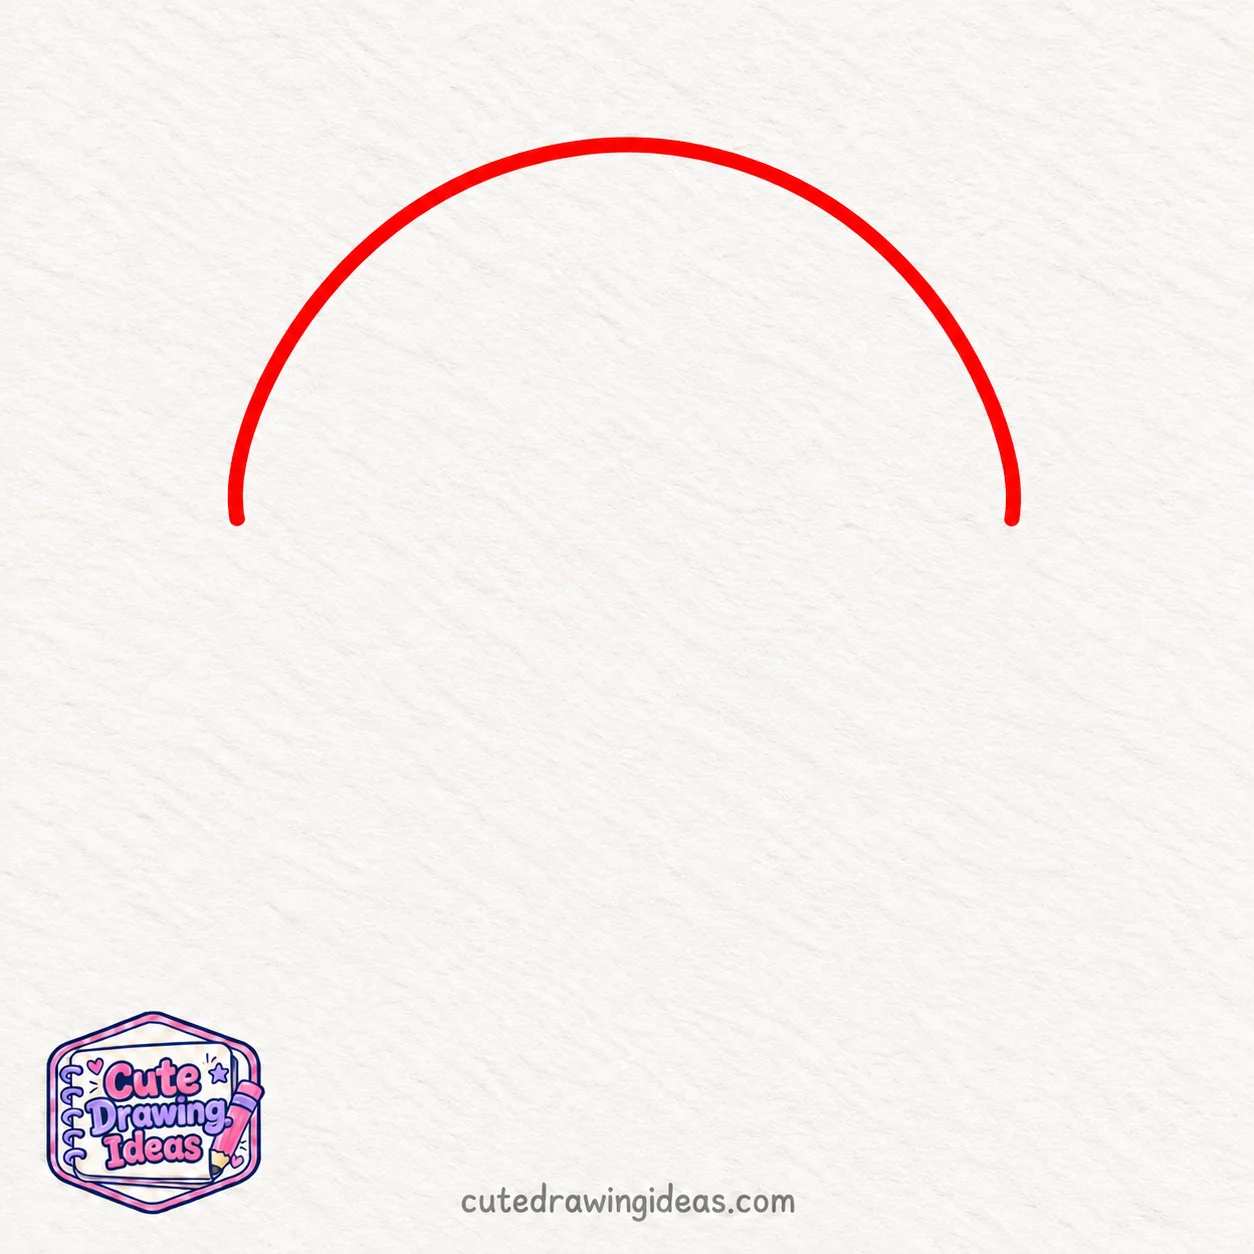
Start near the upper half of your paper and draw a wide, upside-down U shape. Begin at the lower-left edge, curve your line upwards to form a rounded dome, and bring it back down to the lower-right edge.
Keep both ends at roughly the same height and make the top gently rounded rather than pointed.
Leave the bottom of the cap open for now. We’ll connect the two ends in the next step.
Drawing tip: Make the cap wider than it is tall so there’s enough space for the mushroom spots later.
Step 2: Add the Curved Underside
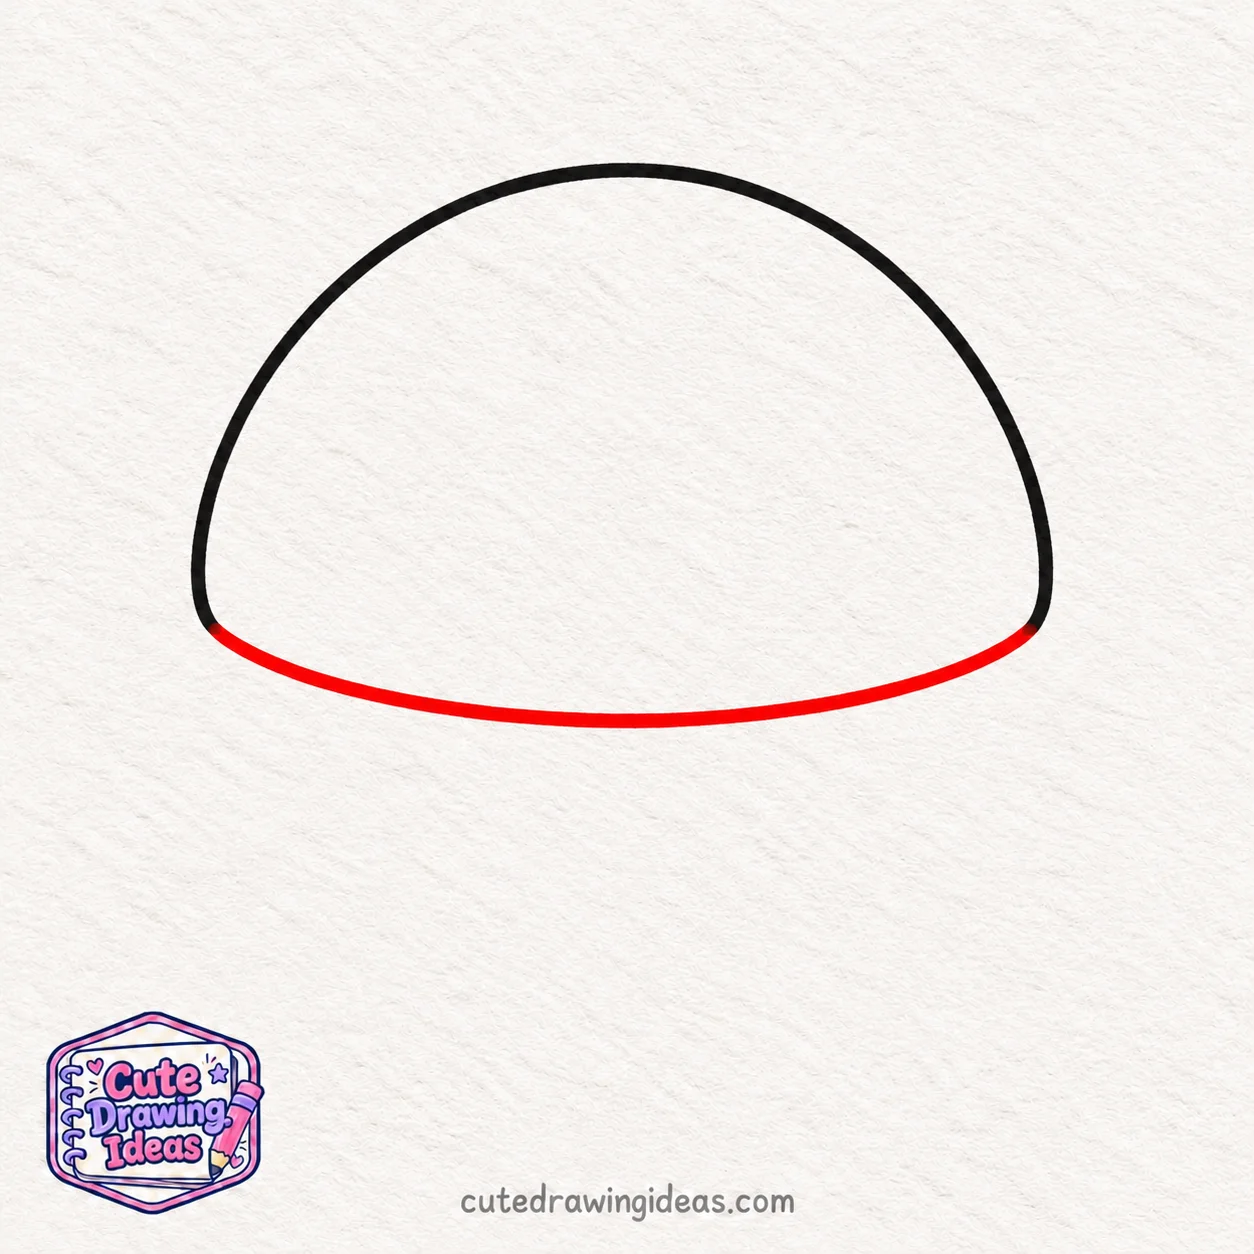
Now, connect the two open ends of the mushroom cap with a shallow curved line. Start at the lower-left tip, curve slightly downward through the middle, and finish at the lower-right tip.
Keep this new line flatter than the rounded dome above it. This closes the mushroom cap and creates its lower edge, where we’ll attach the stem in the next step.
Drawing tip: Avoid making the bottom curve too deep, or your mushroom cap may look more like a circle than a wide dome.
Step 3: Draw the Mushroom Stem
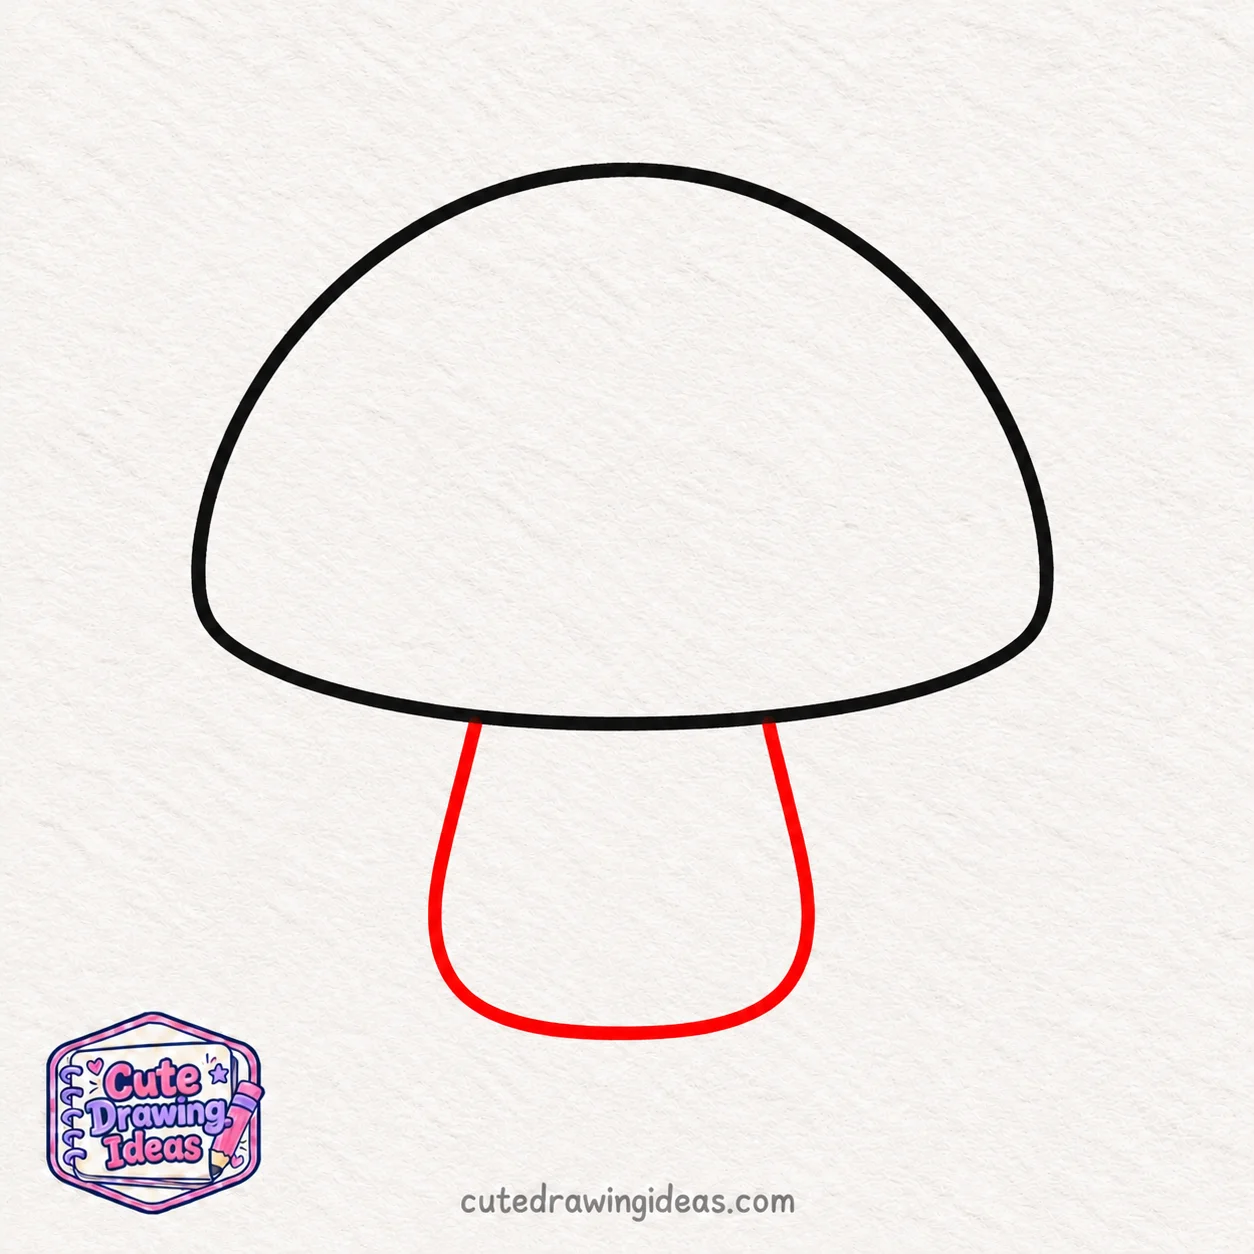
Under the middle of the mushroom cap, draw two slightly curved vertical lines to form the stem. Start each line from the cap’s lower edge, leaving enough space between them for a cute face later.
Let the lines curve gently outward as they go down, making the stem a little wider at the bottom. Connect their ends with a soft, rounded line to complete the stem.
Keep the stem shorter and narrower than the cap so your mushroom has a balanced, cartoon-like shape.
Drawing tip: Make sure the stem sits in the center of the cap rather than leaning too far to one side.
Step 4: Add the Mushroom Spots

Let’s add some spots to the mushroom cap. Start by drawing a medium-sized oval near the top center of the cap. Then, add two smaller rounded spots, one on each side.
Draw two more spots near the lower edges of the cap, making them slightly different in size. Keep all five spots within the cap’s shape, with a little space between them.
These rounded patches will become the white polka dots on our classic red toadstool when we add color.
Drawing tip: Avoid arranging the spots in a perfectly straight row. Slightly uneven placement makes the mushroom look more natural.
Step 5: Draw a Cute Mushroom Face
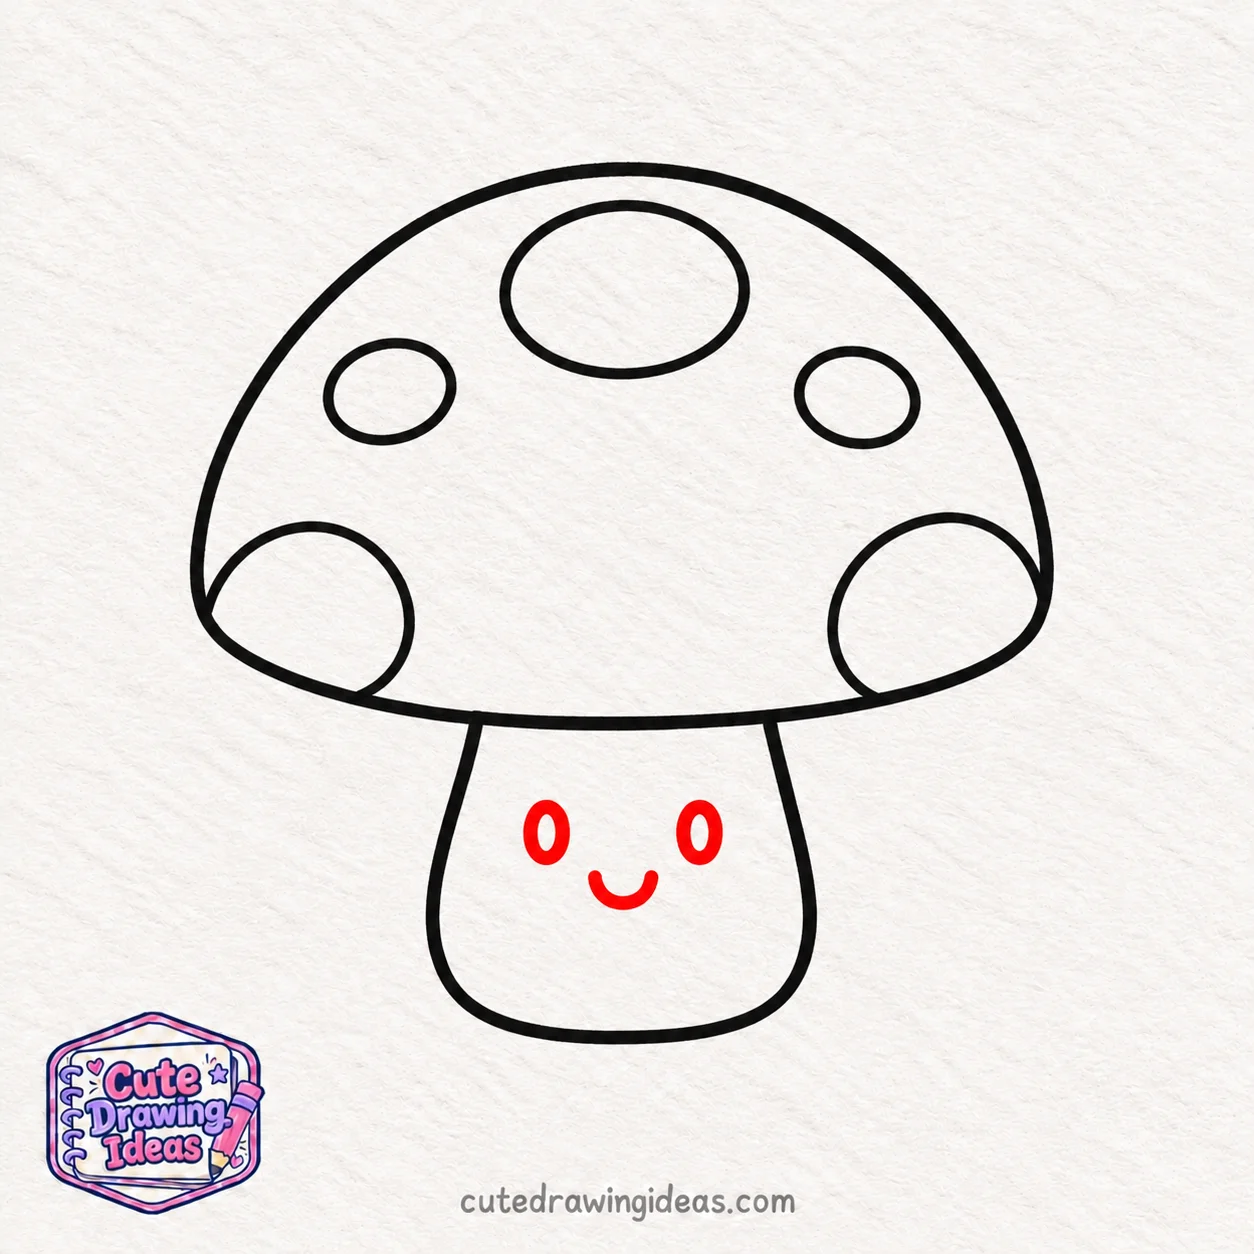
Let’s give our mushroom a cheerful little face! On the upper half of the stem, draw two small, upright oval eyes, placing one on each side of the center. Keep a little space between them.
Next, draw a tiny U-shaped curve just below the eyes to make a smiling mouth. Leave enough room around the smile for the cheeks we’ll add in the next step.
Drawing tip: Keep the facial features small enough to fit comfortably inside the stem without touching its outline.
Step 6: Add the Cheeks and Ground Details

Draw two small ovals on the mushroom stem, one just below each eye and slightly to the side of the smile. These will become the rosy cheeks when we add color.
Next, draw a few short, pointed grass tufts around the bottom of the stem. Place two or three curved blades on each side, keeping them close to the base so they don’t cover the mushroom.
These little details give our cute mushroom drawing a cheerful expression and make it look as though it’s growing on the forest floor.
Drawing tip: Leave a little space between the cheeks and the stem’s outline so they remain easy to color.
Step 7: Color Your Cute Mushroom Drawing
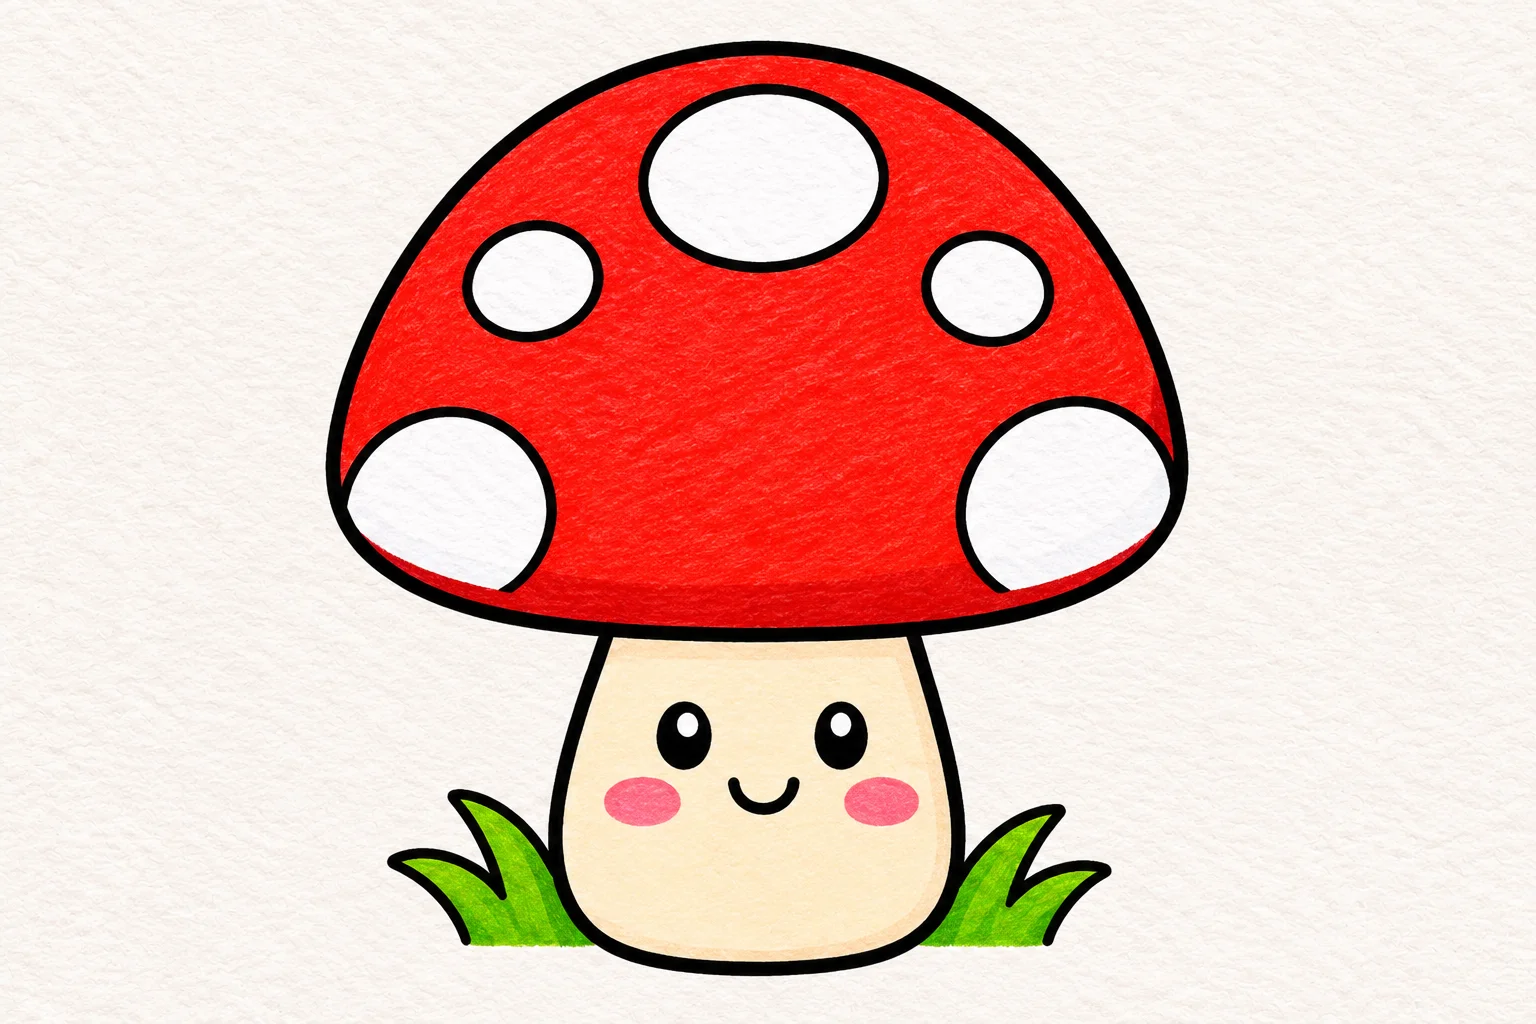
It’s time to bring our mushroom to life with color! Start by coloring the mushroom cap bright red, carefully leaving all five spots white.
Next, fill the stem with a soft cream or light beige shade. Color the two oval eyes black, leaving a tiny white highlight in each. Keep the little smile black and fill both cheeks with a gentle pink.
Finally, color the grass tufts around the mushroom’s base fresh green. You can add a slightly darker red along the lower edges of the cap for a little depth.
Your cute mushroom drawing is now complete, with its spotted red cap, happy face, and grassy base!
Drawing tip: Use light, even strokes when coloring the cap so the white mushroom spots stay neat and clearly visible.
Your Finished Mushroom Drawing
Take a look at your finished mushroom! The bright red cap and white polka dots give it that familiar storybook toadstool appearance, while the little face adds a playful touch.
I especially like how the green grass makes the mushroom feel part of a tiny woodland scene without needing a complicated background.
If your cap or spots look slightly different from mine, that’s perfectly fine. Those small differences make your drawing your own.
Why I Love Drawing Mushrooms
What I love most about drawing mushrooms is how much personality you can give them. A plain mushroom shape can look completely different with a sleepy expression, a crooked cap, or a few unusual spots.
I also like using mushrooms in little forest doodles. They fit naturally beside flowers, leaves, snails, and other woodland creatures, so you can turn one small drawing into a larger scene whenever you feel like experimenting.
Tips to Make Your Mushroom Drawing Look Better
Here are a few ways to improve your mushroom illustration without making it more complicated.
- Keep your outlines consistent: Use similar pressure when tracing with a black marker. This helps the cap, spots, and stem look like parts of the same drawing.
- Choose where to add shading: A slightly darker color beneath the cap can make it appear more rounded. Leave the middle of the stem lighter.
- Add a small highlight: Leave a narrow uncolored patch near the upper curve of the cap to suggest a slightly glossy surface.
- Try a limited color palette: Red, cream, pink, and green work well together. You don’t need lots of colors to make the drawing stand out.
Common Mistakes When Drawing a Mushroom
Even a simple mushroom drawing can look a little off if the proportions or details aren’t right. Here are some common mistakes and how to fix them.
- The Mushroom Cap Looks Too Tall or Narrow
A tall, narrow cap can make your mushroom look more like a pointed hat than a rounded toadstool.
Fix: Widen the lower sides of the cap and soften the top curve to create a broader dome shape.
- The Stem Looks Disconnected From the Cap
Small gaps between the stem and the cap can make the two parts look separate.
Fix: Extend both stem lines upward until they meet the cap’s lower edge. Make sure there are no gaps.
- The Mushroom Spots Look Too Crowded
Drawing too many spots close together can make the cap look cluttered.
Fix: Erase a few spots and spread the remaining ones across the cap, leaving enough space between them.
- The Colors Cover the Outlines
Pressing too hard with crayons or colored pencils can hide the mushroom’s eyes, smile, and other small details.
Fix: Use light strokes around the facial features. Once you’ve finished coloring, carefully retrace any faded outlines with a black marker.
Fun Mushroom Drawing Variations to Try
Once you’ve learned how to draw a cute mushroom, you can experiment with a few different designs.
1. Sleepy Kawaii Mushroom
Give your mushroom closed, curved eyes instead of open ones. Add a tiny mouth and a few little stars around the cap to create a sleepy kawaii mushroom character.
2. Cute Mushroom House
Turn the stem into a little fairy house by drawing an arched door in the center. Add one or two round windows beneath the cap and a stepping-stone path leading to the entrance.
This makes a lovely starting point for a fairy garden drawing.
3. Simple Realistic Mushroom
Try drawing the mushroom from a slight side angle, with an uneven cap and a narrower stem. Add a few fine gill lines beneath the cap and use gentle pencil shading instead of a cartoon face.
You can also use a button mushroom as a reference for a different cap shape.
4. Rainbow Mushroom
Replace the round spots with stars, hearts, or wavy stripes. Divide the cap into a few curved sections and color each one differently to create a rainbow mushroom with a patterned design.
5. Mushroom Family
Draw one large mushroom with two smaller mushrooms beside it. Give each mushroom a different height, cap shape, or facial expression.
Add a few leaves or tiny flowers around the group to create a woodland illustration.
Fun Facts About Mushrooms
Here are a few interesting mushroom facts to go with your nature drawing.
- Mushrooms aren’t plants. They belong to the fungi kingdom, which is separate from plants and animals.
- Many mushrooms produce spores. These tiny reproductive cells are often released from structures such as gills beneath the cap.
- Mushrooms can grow in circles. Some fungi produce mushrooms in circular patterns called fairy rings.
- Some mushrooms glow naturally. Certain fungi produce light through a process called bioluminescence.
- Much of a fungus can stay hidden. The mushroom we see is often just the reproductive structure, while a network of fine fungal threads grows through soil, wood, or other material.
Frequently Asked Questions About Mushroom Drawing
How do you draw a mushroom step by step?
Start with a rounded cap and connect its ends with a shallow curve. Add a short stem, draw spots across the cap, and finish with a face, cheeks, and grass. Color the cap red and leave the spots white.
How can beginners make a mushroom drawing easier?
Sketch the cap and stem lightly in pencil before adding smaller details. Focus on getting the main outline right first, and use an eraser whenever you need to adjust a curve.
How do you draw a cute mushroom?
Give your mushroom a friendly expression with two oval eyes, a small smile, and rounded cheeks. A broad cap and a short stem can also help create a playful cartoon appearance.
How do you draw a mushroom for kids?
Begin with the cap and stem, then let kids decorate the cap with circles or ovals. Younger children can use crayons for coloring and skip smaller facial details if they find them difficult.
How do you draw mushroom spots?
Draw several circles and ovals of different sizes across the mushroom cap. Spread them out rather than placing them in a straight line. For a red toadstool drawing, leave the spots white when coloring.
How do you draw a mushroom house?
Use the mushroom cap as the roof and turn the stem into the body of a house. Add a small door, circular windows, and a pathway. You can also draw flowers or tiny stones around the base.
What is the easiest type of mushroom to draw?
A classic cartoon toadstool is a good choice for beginners because its outline consists of a rounded dome and a short stem. You can draw it without spots, facial features, or shading if you want an even simpler version.
Keep Drawing!
Now that you’ve drawn your first little toadstool, why not make a whole mushroom family with different expressions?
And if you’re looking for another easy drawing to try, take a look at my cute kitten drawing tutorial for a different character to add to your sketchbook.
Happy drawing!