Difficulty: Easy | Time: 20 minutes | Steps: 9 | Good for: Ages 9+ and beginners
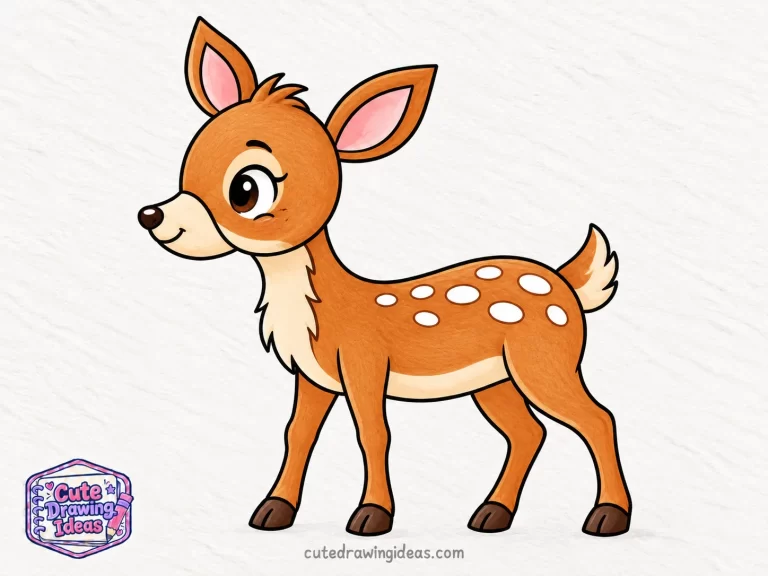
A baby deer, also called a fawn, has large ears, a small face, and little white spots along its back. These features make it a lovely subject for a cute deer drawing.
In this tutorial, I’ll show you how to draw a cute deer in 9 easy steps. I’ll start with the head, then add the face, body, legs, and spots. You can follow along with a pencil and finish your drawing with your favorite colors.
What You Will Need
Before we begin, gather a few basic drawing supplies:
- Pencil: For sketching the deer.
- Eraser: To remove extra lines or correct mistakes.
- Drawing paper: A plain sheet or sketchbook will work.
- Black pen or marker: For outlining your finished drawing.
- Colored pencils or markers: For adding color to your deer.
I recommend using light pencil strokes at first. This makes it easier to adjust the shapes before tracing the final outline.
How to Draw a Deer Step by Step
We’ll draw a small, standing fawn with a rounded head, slender legs, and a spotted coat. Follow each step in order and use the pictures to see where each new part belongs.
Step 1: Draw the Deer’s Head
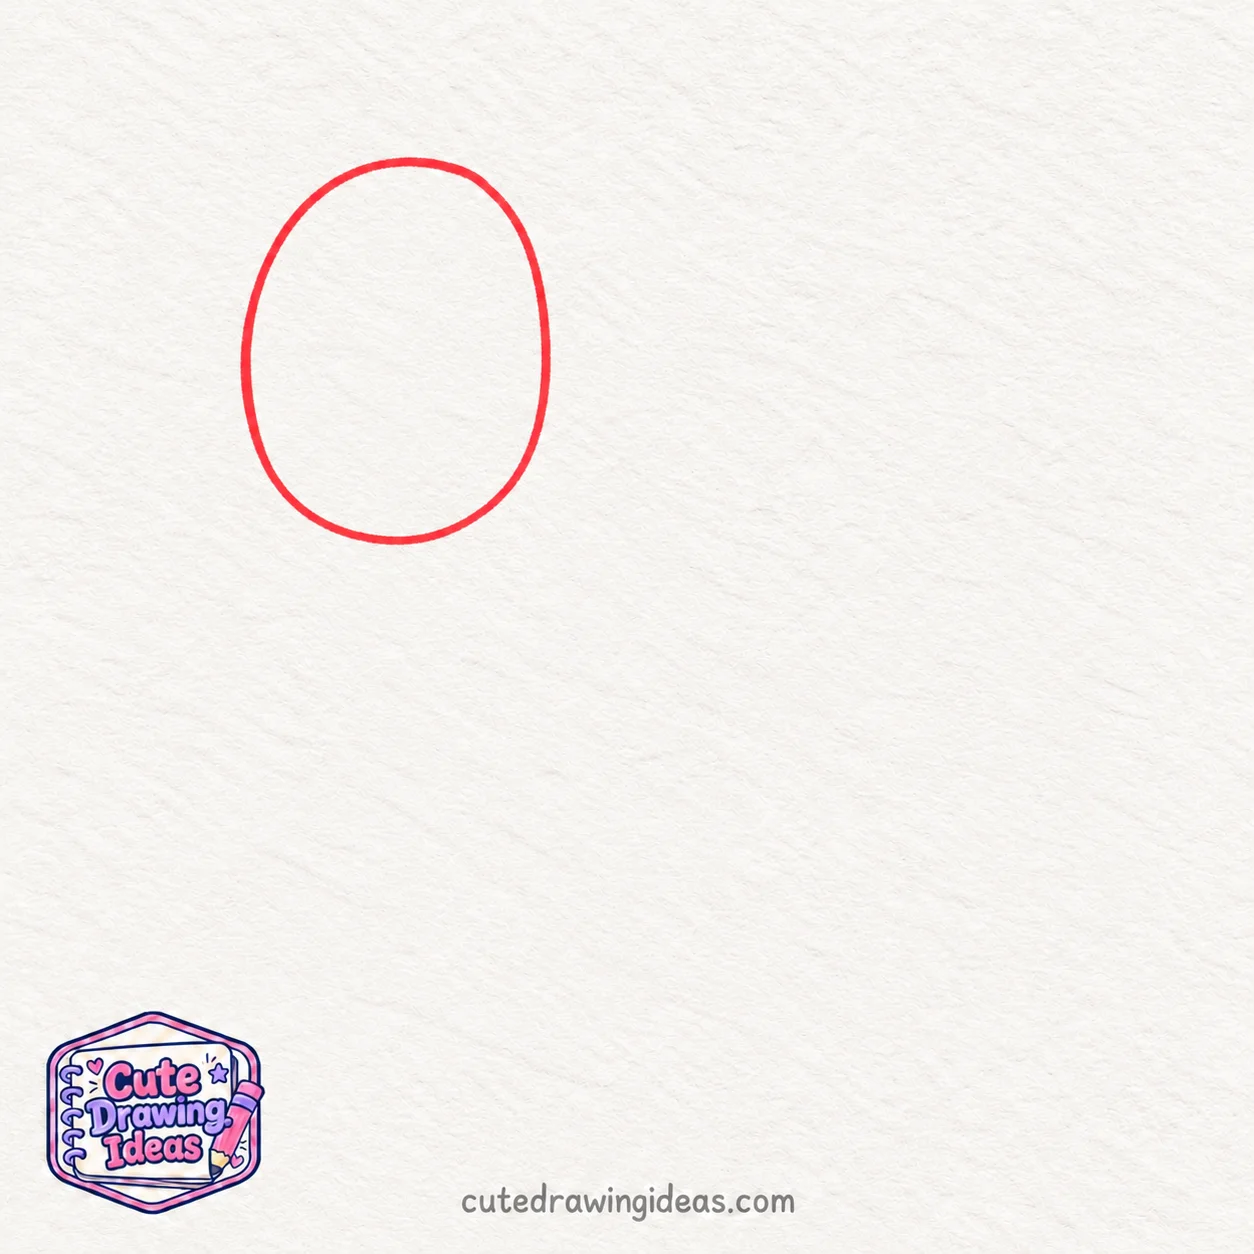
Start by drawing a large, upright oval near the upper-left side of your paper. Make it slightly wider at the bottom to give the deer a soft, rounded face.
Leave plenty of space to the right for the body and below for the legs.
This oval will form the head of your deer. Keep your lines light, as we’ll add the ears, muzzle, and eyes in the next steps.
Step 2: Add the Muzzle and Nose

From the lower-left side of the head, draw a small rounded muzzle that sticks out slightly. Keep it attached smoothly to the head so the face looks soft and natural.
At the front of the muzzle, add a small nose. Then draw a short curved line just below it for the mouth.
Keep these new lines simple and light. The muzzle should be small compared with the head because we are drawing a cute young deer.
Step 3: Draw the Deer’s Ears
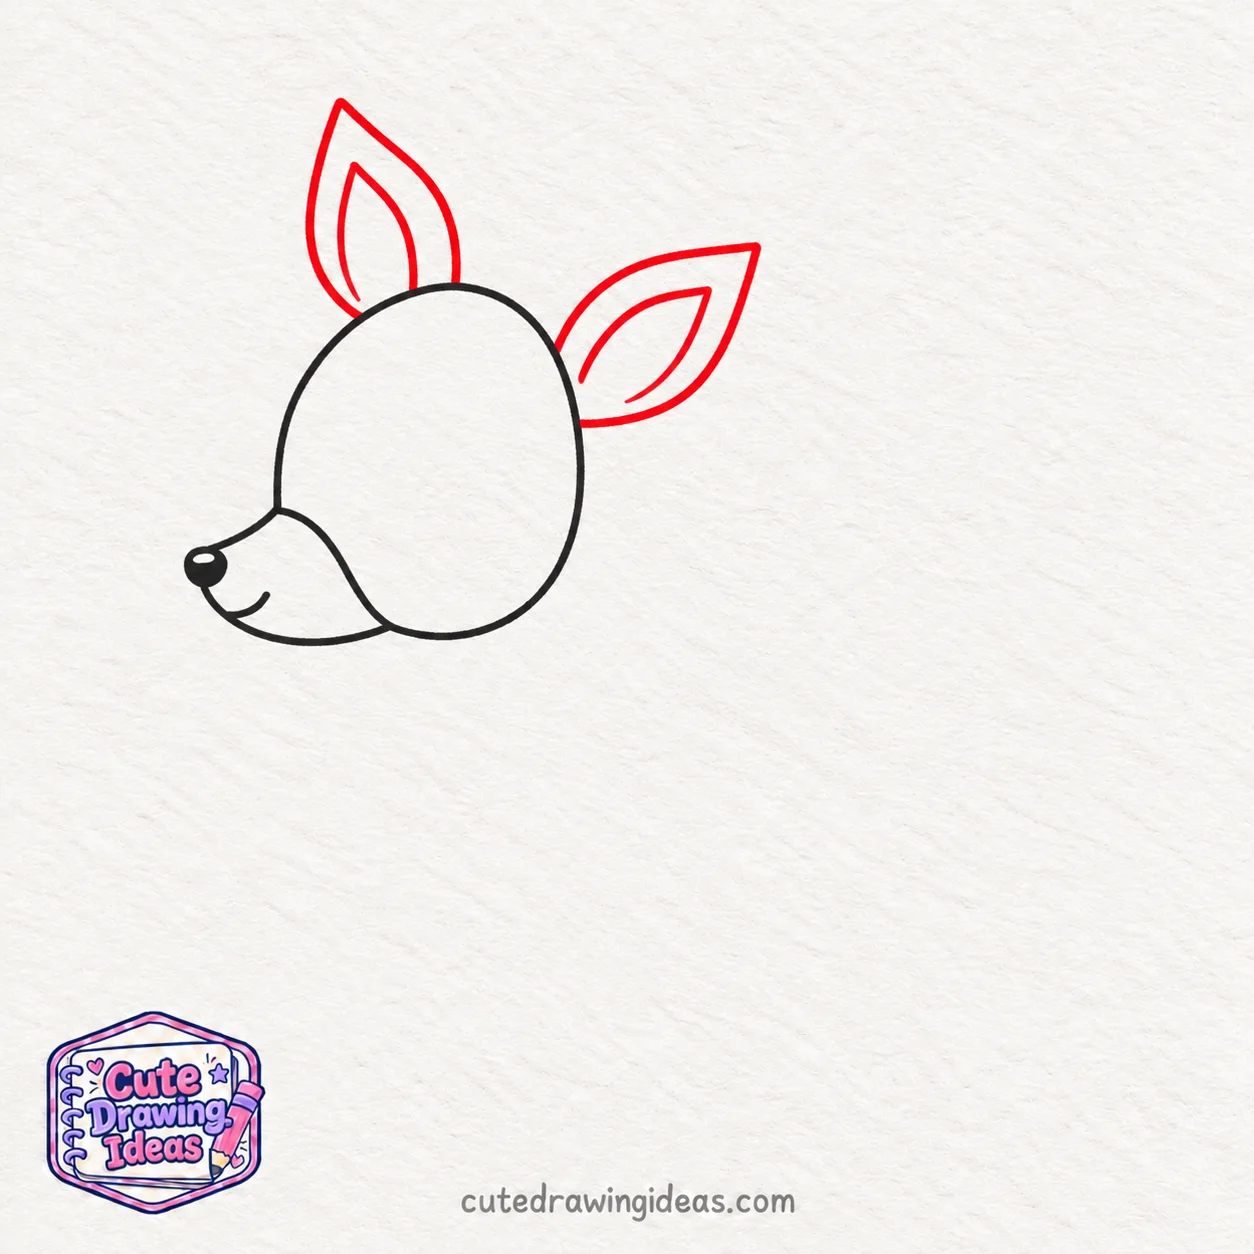
At the top of the head, draw two long, leaf-shaped ears. Angle the left ear slightly outward and the right ear upward to give your deer a natural look.
Inside each ear, add a smaller curved shape to show the inner ear.
Make both ears slightly pointed at the tips and wider near the middle. Keep the ears balanced with the size of the head.
Step 4: Add the Eye and Facial Details
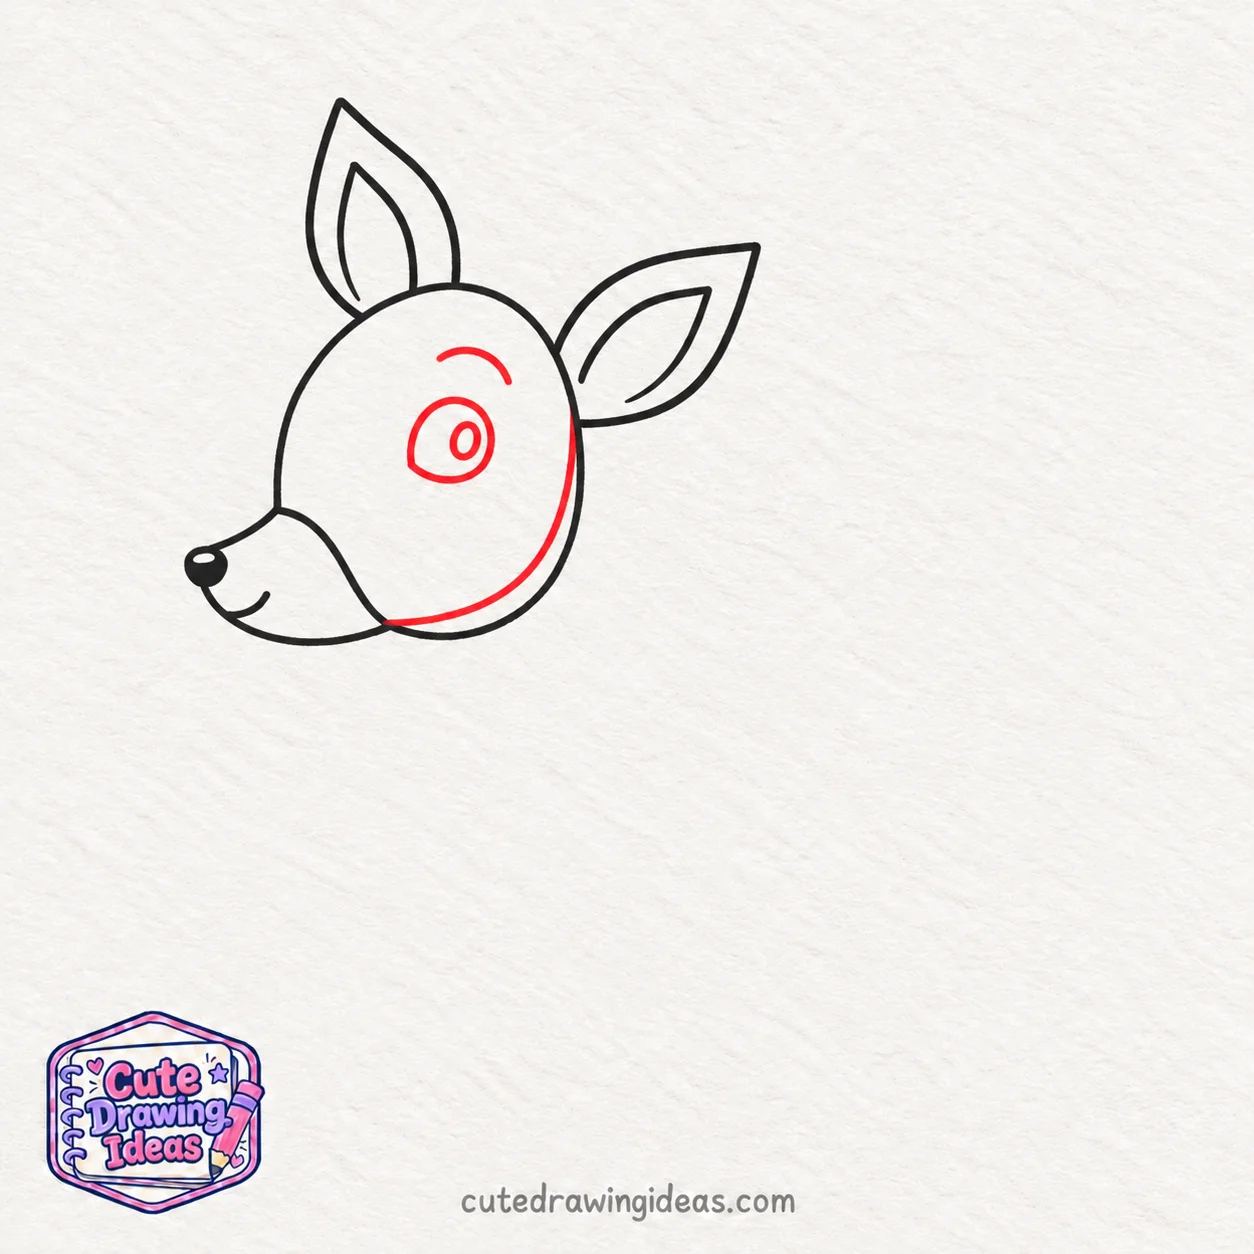
Inside the deer’s head, draw a round eye just above and slightly behind the muzzle. Add a smaller black circle for the pupil, leaving a tiny white spot to make the eye look shiny.
Next, draw a short, gentle curve below the eye to give the deer a soft cheek.
Keep the eye large enough to stand out, but leave some space between it and the nose.
Step 5: Draw the Neck and Body
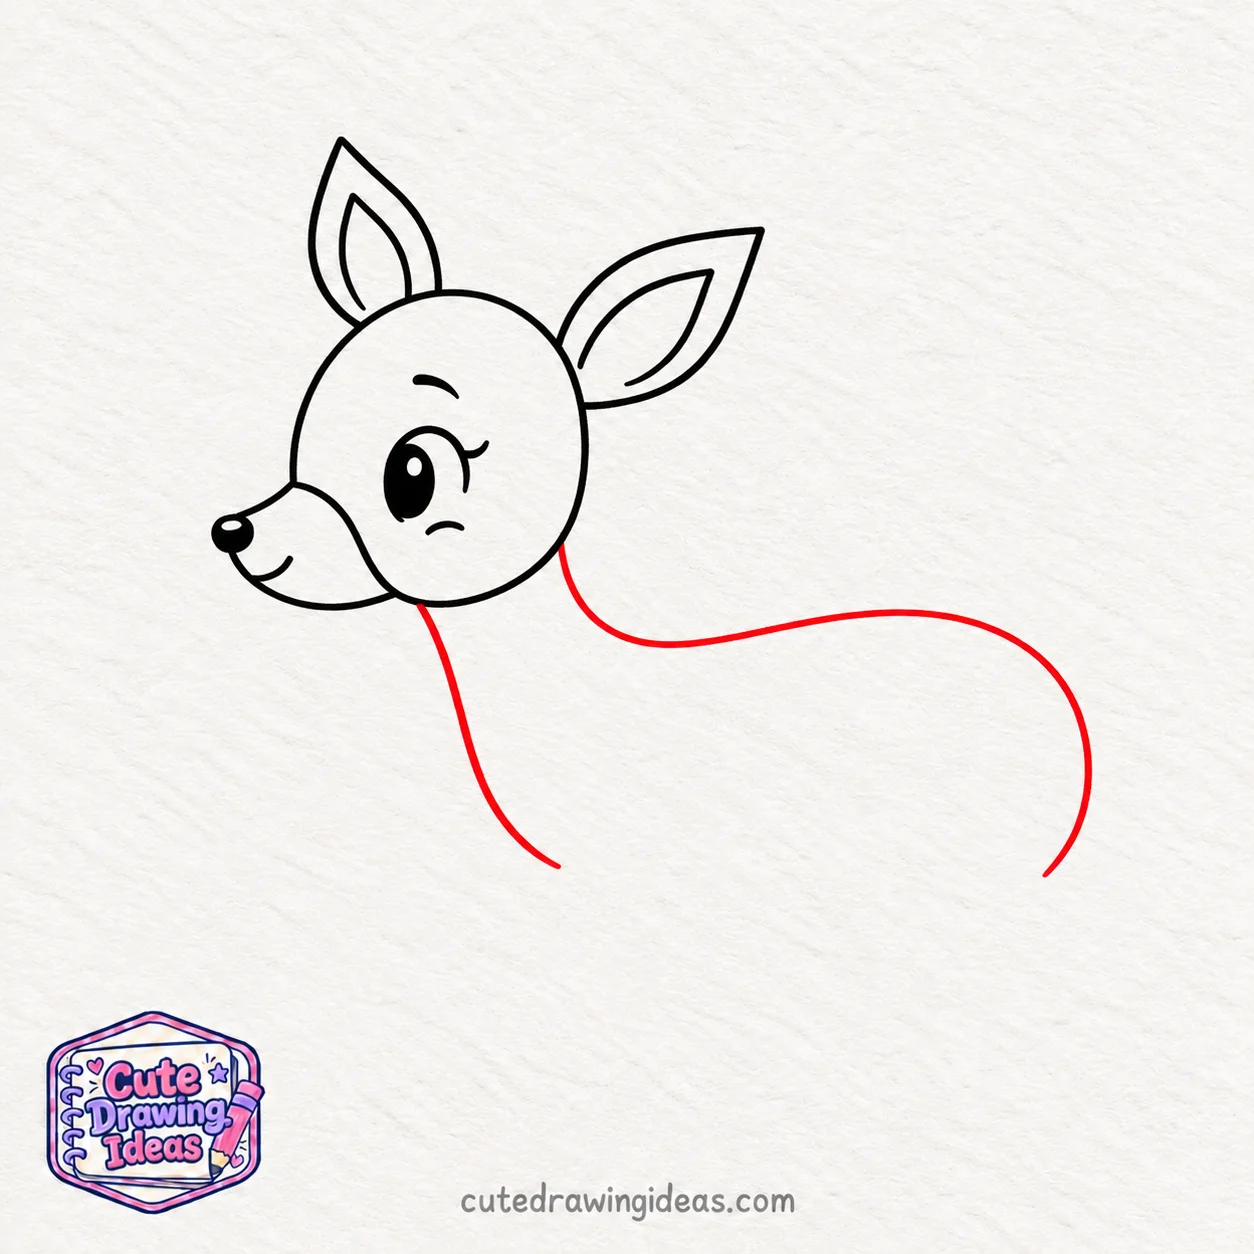
Start beneath the deer’s head and draw two short, gently curved lines to form the neck.
From the upper neck, extend a smooth line towards the right to make the deer’s back. Curve it downward at the end to form a rounded rear.
Next, draw a curved line underneath for the belly and connect it back towards the chest.
Keep the body longer than the head and slightly rounded so your baby deer looks well-proportioned.
Step 6: Draw the Front Legs and Hooves
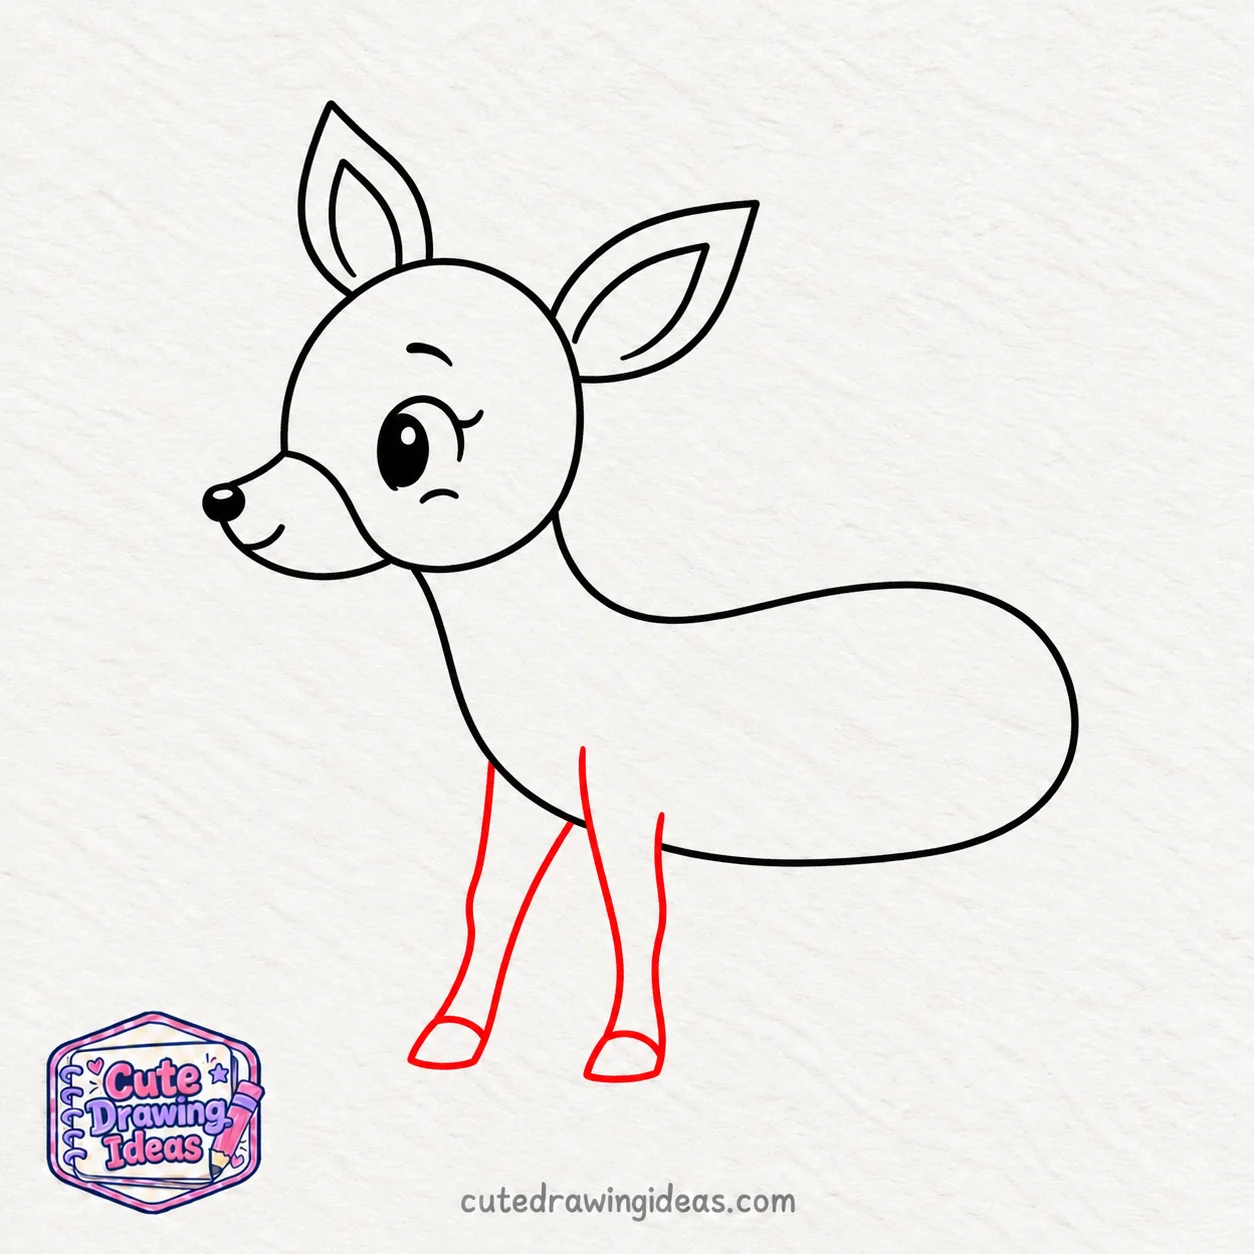
Just below the deer’s chest, draw two slender front legs extending downward. Make the first leg nearly straight and place the second slightly behind it, towards the right.
At the bottom of each leg, draw a small, flattened hoof. Add a short line to show where each hoof splits.
Keep both legs about the same length, with the hooves resting at the same level so your baby deer looks balanced.
Step 7: Draw the Back Legs and Tail
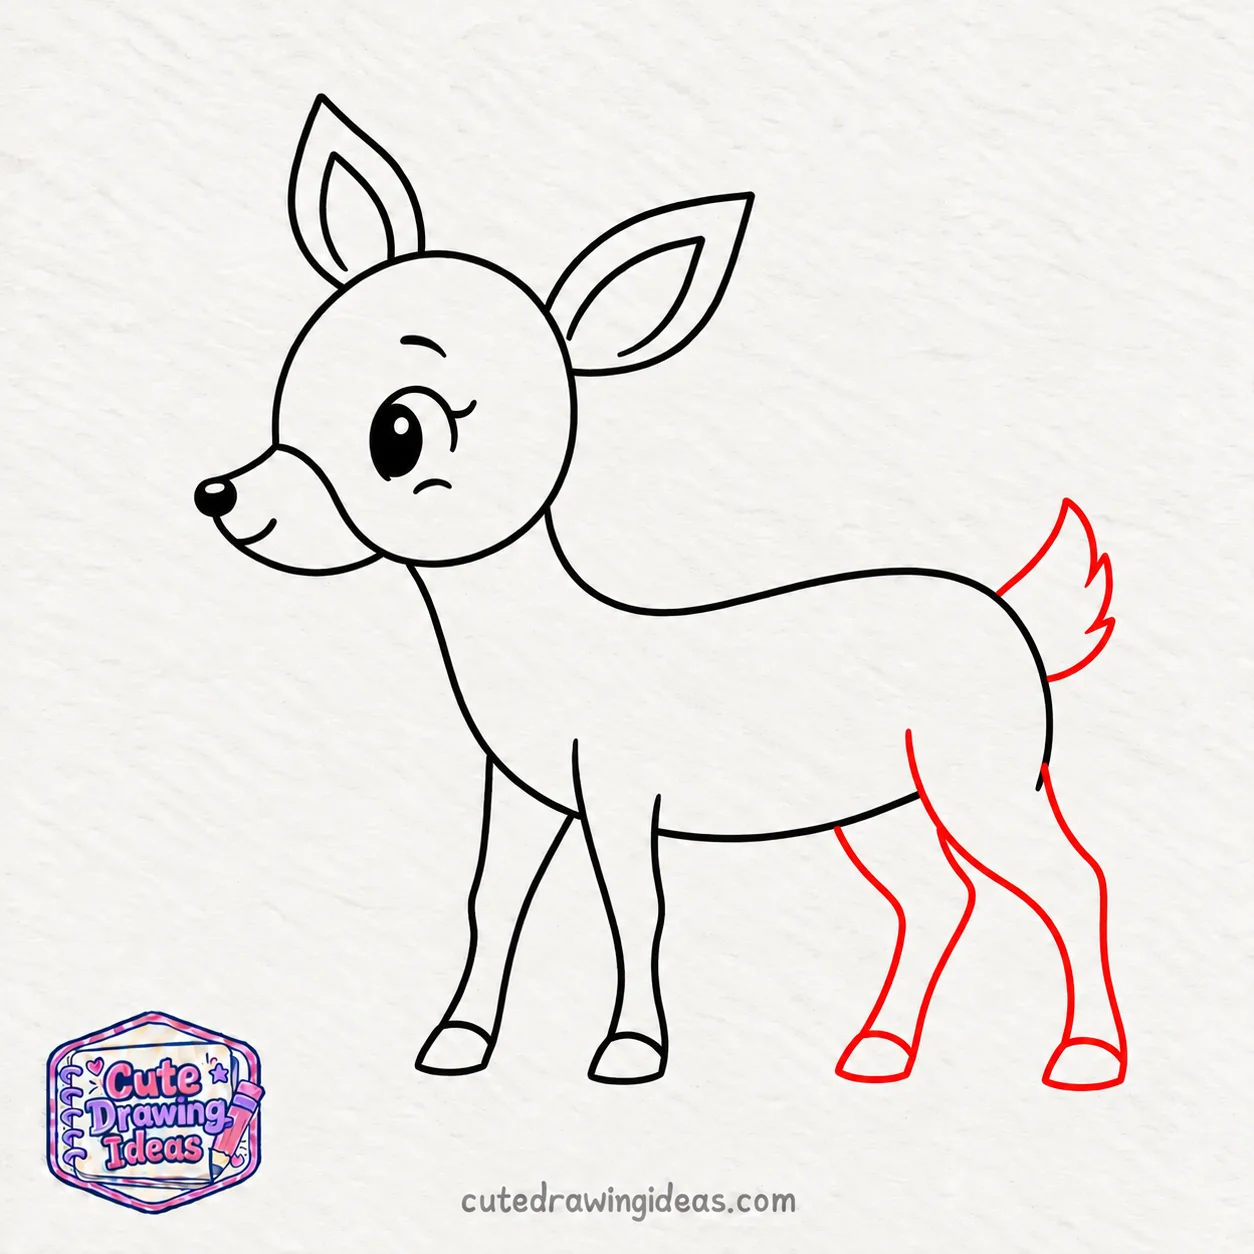
At the rear of the deer’s body, draw two hind legs extending downward. Give the upper parts a gentle bend to show the shape of the back legs.
Make the lower parts slimmer and add a small hoof at the bottom of each leg. Keep all four hooves at the same level so your deer looks steady.
Finally, draw a short, slightly raised tail at the back of the body. Keep it small and rounded to match the young deer’s shape.
Step 8: Add the Spots and Final Details
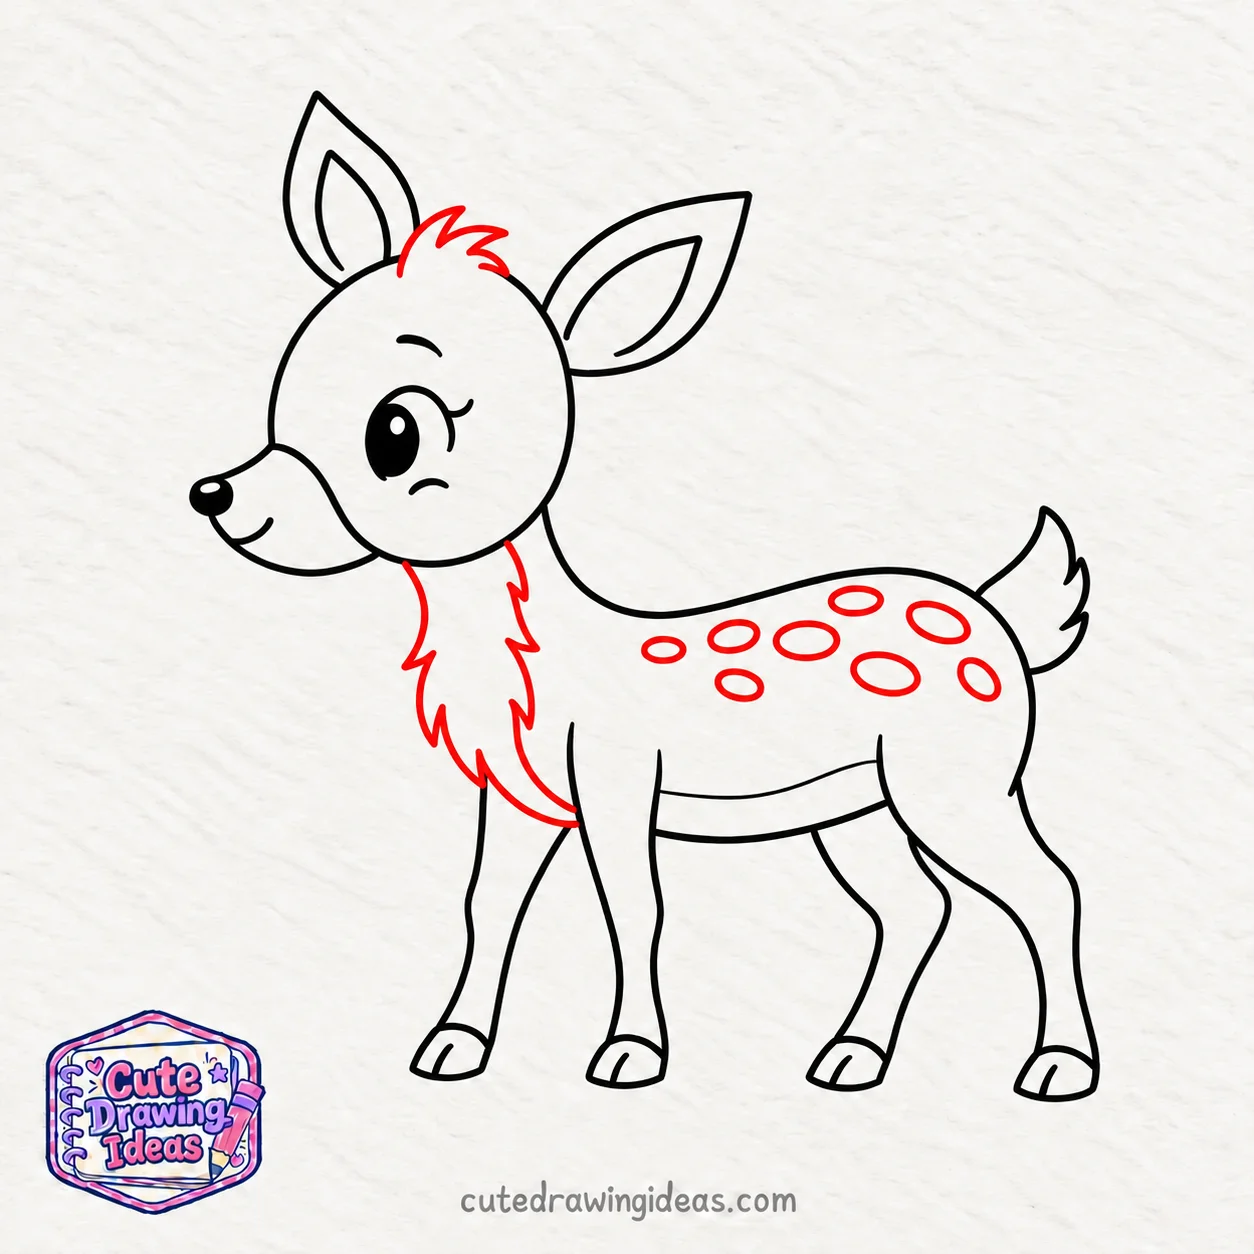
Now, let’s give our baby deer its spotted coat.
Draw a few small oval spots along the upper part of the back. Make some slightly bigger than others and leave a little space between them.
Next, draw a gently curved line from the lower chest towards the belly to separate the lighter underside from the brown coat.
Check the lines around the neck, legs, and tail. Erase any overlapping pencil marks that shouldn’t appear in the final outline.
You don’t need to cover the entire body with spots. A few well-placed markings will give your fawn its recognizable appearance.
Step 9: Outline and Color Your Deer
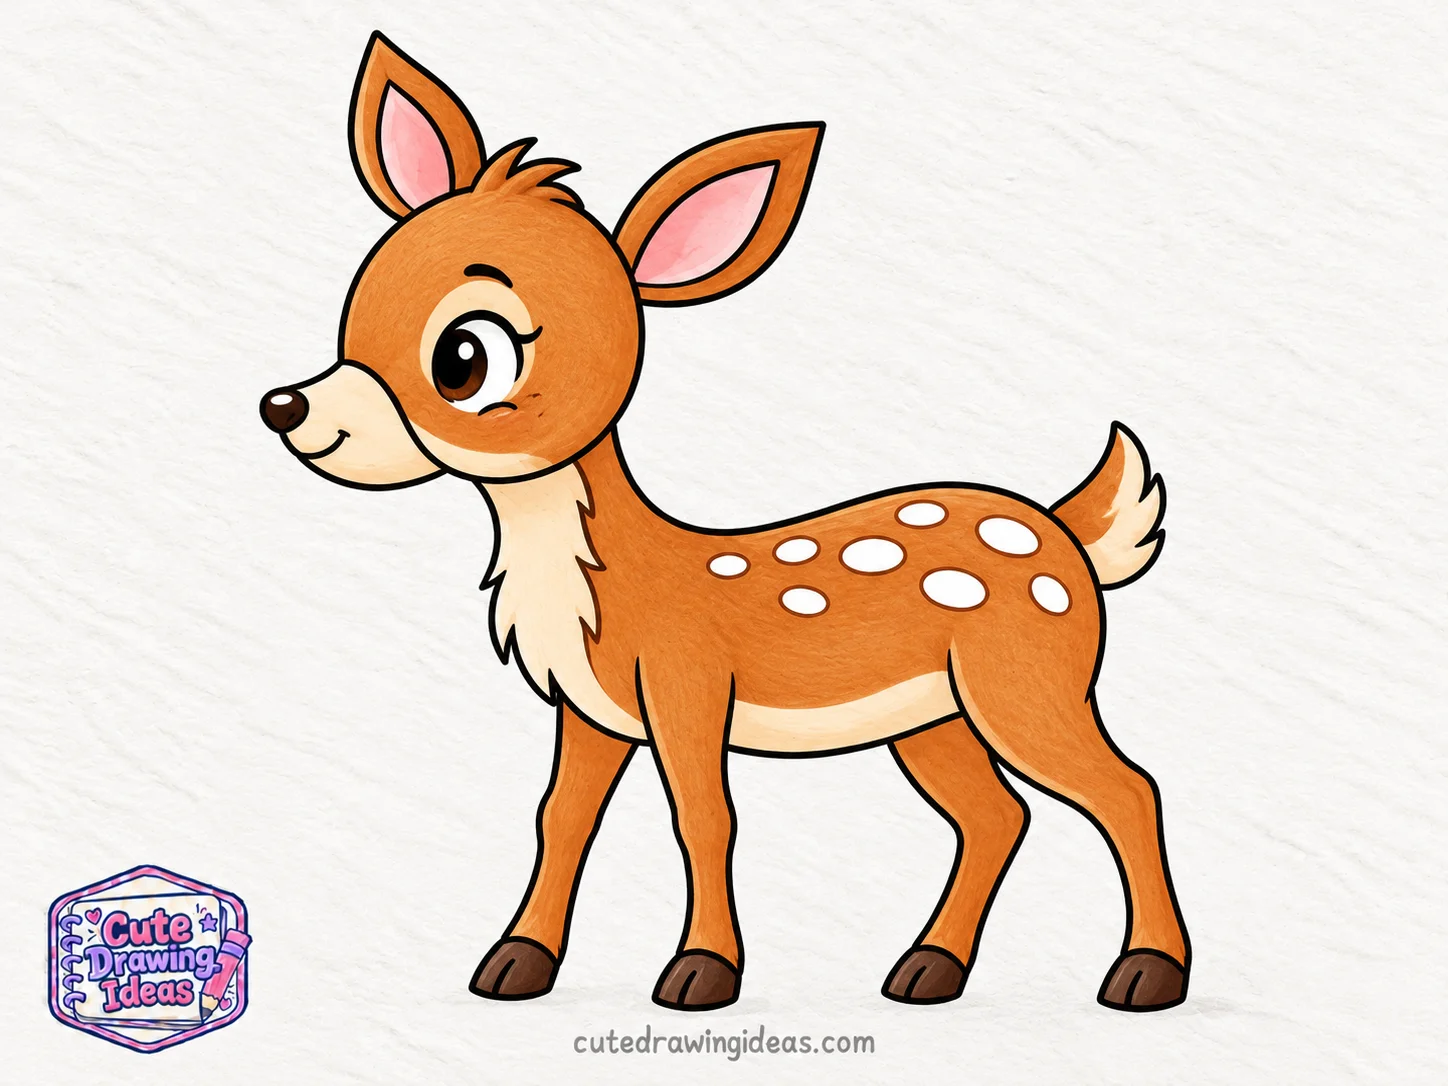
Trace your deer drawing with a black pen or marker. Let the ink dry before gently erasing any remaining pencil lines.
Color the head, neck, back, and legs warm brown. Use cream or light beige for the muzzle and belly, and leave the little spots on the back white.
Add soft pink inside the ears and dark brown to the hooves and nose. Keep the tiny white highlight in the eye untouched.
Your cute deer drawing is now complete!
Why I Love Drawing Deer
I love drawing deer because of their gentle expressions and graceful shapes. Their long ears, tiny noses, and slender legs give them a look that’s different from other animals I usually draw.
My favorite part is adding the little white spots to a baby deer’s back. They make the drawing look more like a real fawn without needing lots of tiny details.
I also enjoy drawing deer in woodland scenes. A little grass, a few flowers, or some trees can turn a simple deer sketch into a lovely forest picture.
How to Fix Common Deer Drawing Mistakes
If your deer doesn’t look quite right, you probably don’t need to start again. Here are three problems I would check before finishing the outline.
1. The Legs Look Uneven
If one leg is much shorter than the others, your deer might look as though it’s leaning.
How to fix it: Lightly draw a horizontal guideline beneath the hooves. Adjust the legs until all four hooves meet the line. Erase the guideline when you’re happy with their positions.
2. The Head Looks Disconnected From the Body
Sometimes the neck lines don’t join the head and body naturally, making them look like separate shapes.
How to fix it: Check where the neck meets the chest and back. Gently adjust these connections so the neck flows into the body without sharp corners.
I find it helpful to look at the entire outline before adding any extra details.
3. The Spots Look Too Crowded
Adding too many spots can make the deer’s coat look messy, especially on a small drawing.
How to fix it: Erase a few markings and leave more space between the remaining spots. Concentrate them along the upper back instead of spreading them across the belly and legs.
Cute Deer Drawing Variations to Try
Once you’ve finished your standing fawn, you can use the same basic shapes to create other deer drawings. Here are three ideas I like.
1. Sleeping Baby Deer
Instead of drawing a standing deer, make a sleeping fawn curled up on the ground.
Draw a rounded body with the legs folded underneath. Lower the head slightly and replace the open eye with a small curved line to show that the deer is sleeping.
You can add a few spots along its back and some grass beneath its body.
2. Cute Cartoon Buck
If you want to try a different deer character, turn your drawing into a cute cartoon buck.
Add two short, branching antlers above the head, positioning them between the ears. Make the neck slightly thicker and the body a little larger than the baby deer’s.
You can also leave out the white spots to give your cartoon deer a more mature appearance.
3. Grazing Deer
For a slightly different challenge, draw a deer lowering its head to eat grass.
Keep the body and legs similar to the original drawing, but extend the neck downward towards the ground.
Angle the head so the nose points towards a small patch of grass. This changes the pose without needing lots of extra details.
It’s a nice way to practice drawing the same woodland animal from another position.
Fun Facts About Deer
Here are some interesting facts about deer that you might enjoy while drawing!
- Baby deer are called fawns. Their little white spots help them blend into grass and woodland surroundings, making it harder for predators to spot them.
- Deer have different names. An adult male deer is called a buck, while a female deer is called a doe.
- Deer can grow new antlers. Male deer of many species shed their antlers and grow a new pair each year.
- Deer use their tails to warn others. White-tailed deer lift their tails to show the white underside when they sense danger.
- Their fur can change with the seasons. White-tailed deer have reddish-brown coats in summer and more grayish-brown fur in winter.
- Deer eat plants. They enjoy leaves, grasses, fruits, buds, and twigs. They are herbivores, which means they eat plants rather than meat.
Frequently Asked Questions
Can I Draw a Cute Deer Without Antlers?
Yes! A baby deer, or fawn, doesn’t need antlers. You can draw a lovely little deer using just its large ears, rounded face, slender legs, and spotted coat.
How Do I Draw a Cute Deer Face Only?
If you only want to draw the face, follow Steps 1 to 4 of my tutorial. Draw the head, add the muzzle and ears, then finish with a round eye and a tiny smile. You can leave out the neck and body.
Can I Draw a Deer Using Only a Pencil?
Of course! You don’t need colored pencils or markers. Start with a light pencil sketch, darken the final outline, and use gentle shading to show the brown coat. Leave the spots and belly lighter.
How Can I Add a Forest Background to My Deer Drawing?
I like adding a few small trees behind the deer, some grass beneath its hooves, and little flowers nearby. Keep the background light and simple so your deer remains the main focus.
Keep Drawing
I hope you enjoyed drawing your little deer! Now that you’ve tried a standing fawn, why not draw a sleeping one or add a few trees and flowers to make a woodland scene?
You can also try another animal drawing and fill your sketchbook with your favorite creatures.