Difficulty: Intermediate | Time: 40–60 minutes | Steps: 11 | Best for: Teens 13+
Wolves are interesting animals to draw because of their pointed ears, thick fur, bushy tails, and expressive eyes. I especially like how a wolf can look gentle and friendly while still keeping its wild appearance.
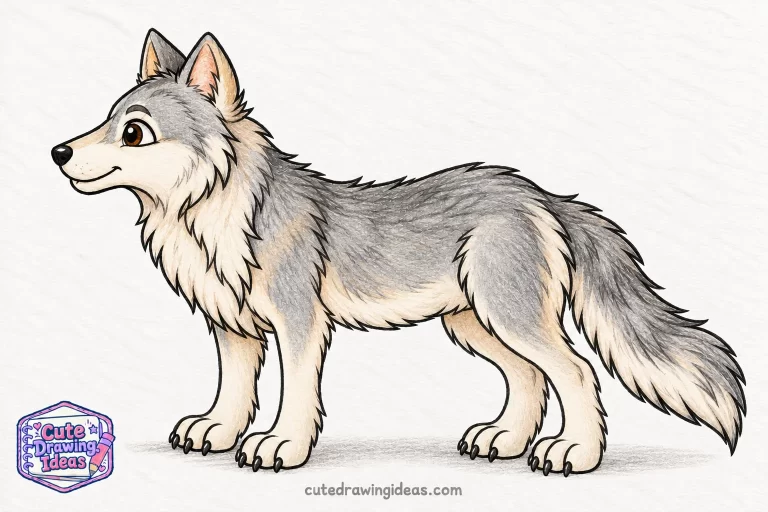
In this tutorial, I’ll show you how to draw a cute wolf in 11 steps. We’ll begin with a light pencil sketch, work on the head and body proportions, and gradually add the paws, fluffy fur, and facial details. I’ll also show you how to use colors and shading to give your wolf drawing more depth.
This is an intermediate-level drawing, so we’ll pay a little more attention to anatomy and fur texture while keeping the wolf’s expression soft and adorable.
What You Will Need
- An HB pencil for the initial sketch
- A 2B or 4B pencil for darker details and shading
- An eraser
- Drawing paper or a sketchbook
- A black fine-tip pen or marker (optional)
- Grey, brown, cream, and black colored pencils
Before You Start
Before I begin my wolf sketch, I like to look at how the different body parts fit together. A wolf has a long muzzle, a broad chest, strong legs, and a thick coat. Getting these proportions right will help our drawing look like a wolf rather than a domestic puppy.
We’ll use light construction shapes to plan the head, chest, and body before adding the smaller details. Keep your pencil strokes gentle so you can adjust the proportions or erase guidelines later.
Leave enough room on your paper for all four legs and the bushy tail. Our cute wolf will be standing sideways with its head slightly turned toward us, so we can show its friendly face and natural body shape.
How to Draw a Cute Wolf Step by Step
Step 1: Sketch the Basic Head and Body Shapes
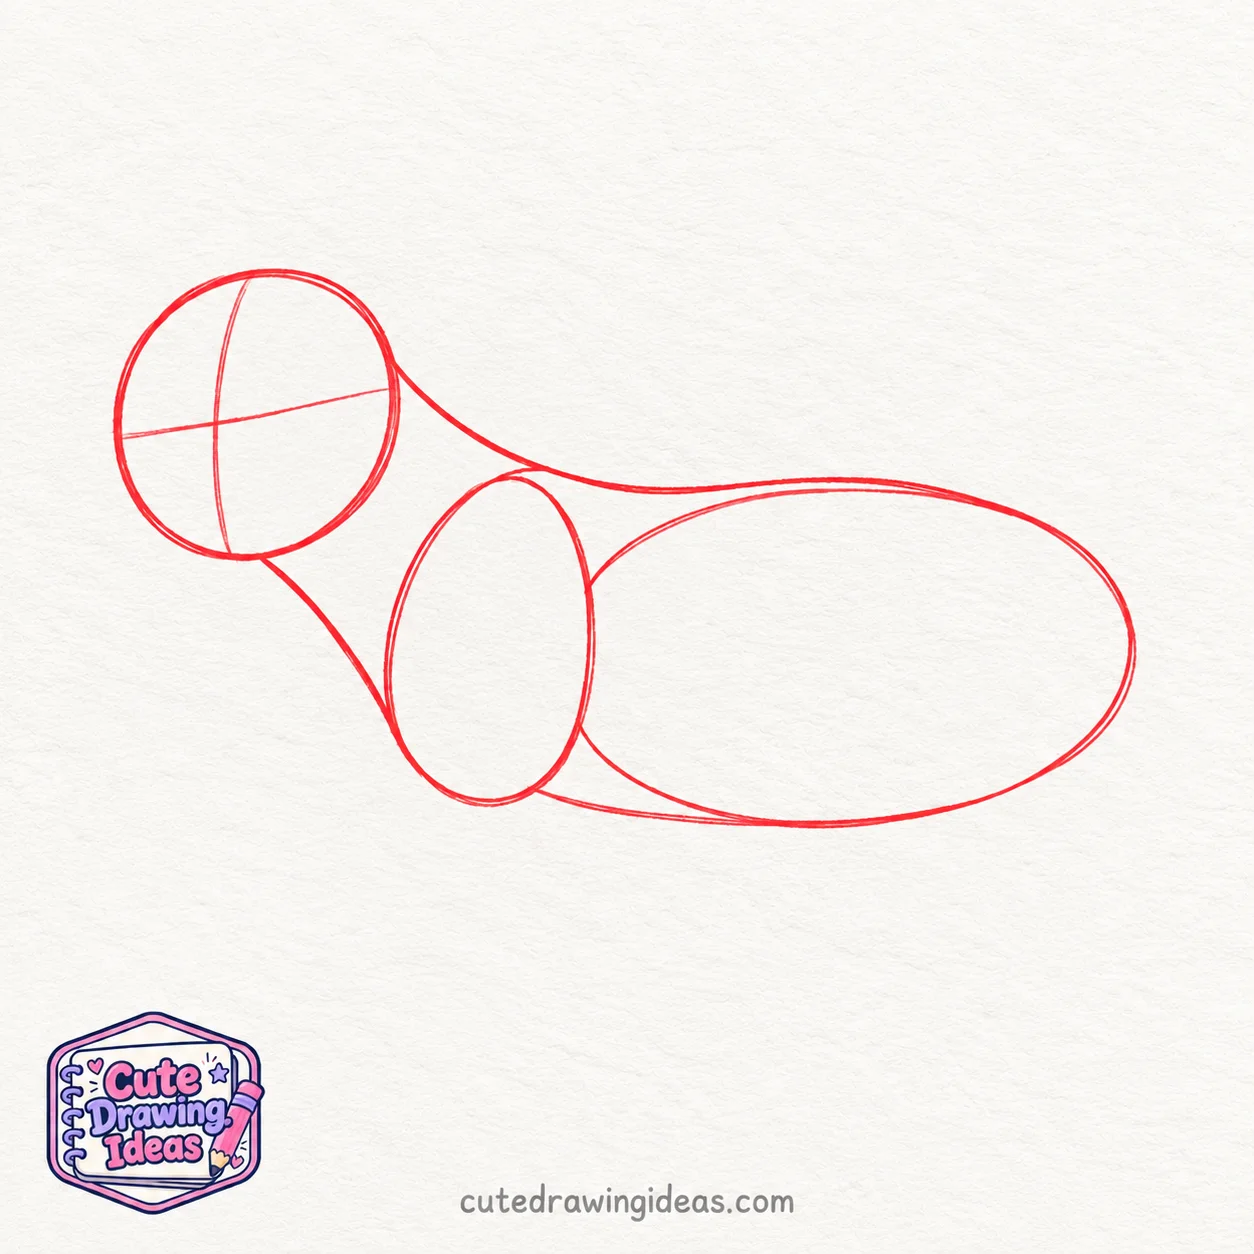
Start by drawing a medium-sized circle in the upper-left area of your paper for the wolf’s head. Add two light, crossing guidelines inside it to help position the facial features later.
Next, draw a smaller, upright oval below and slightly to the right of the head. This will guide the chest and shoulder area.
For the third shape, draw a large horizontal oval extending to the right of the chest. Make it roughly twice as long as the head circle is wide, and let its front edge overlap the chest oval slightly. This forms the main body.
Connect the head to the chest with two sloping lines to establish the neck. Then add a gentle line from the back of the head toward the upper body to guide the wolf’s back.
Keep all three shapes lightly sketched. They will help us maintain the correct proportions as we develop our cute wolf drawing. Don’t add the legs, ears, or tail yet.
Step 2: Shape the Wolf’s Head and Muzzle
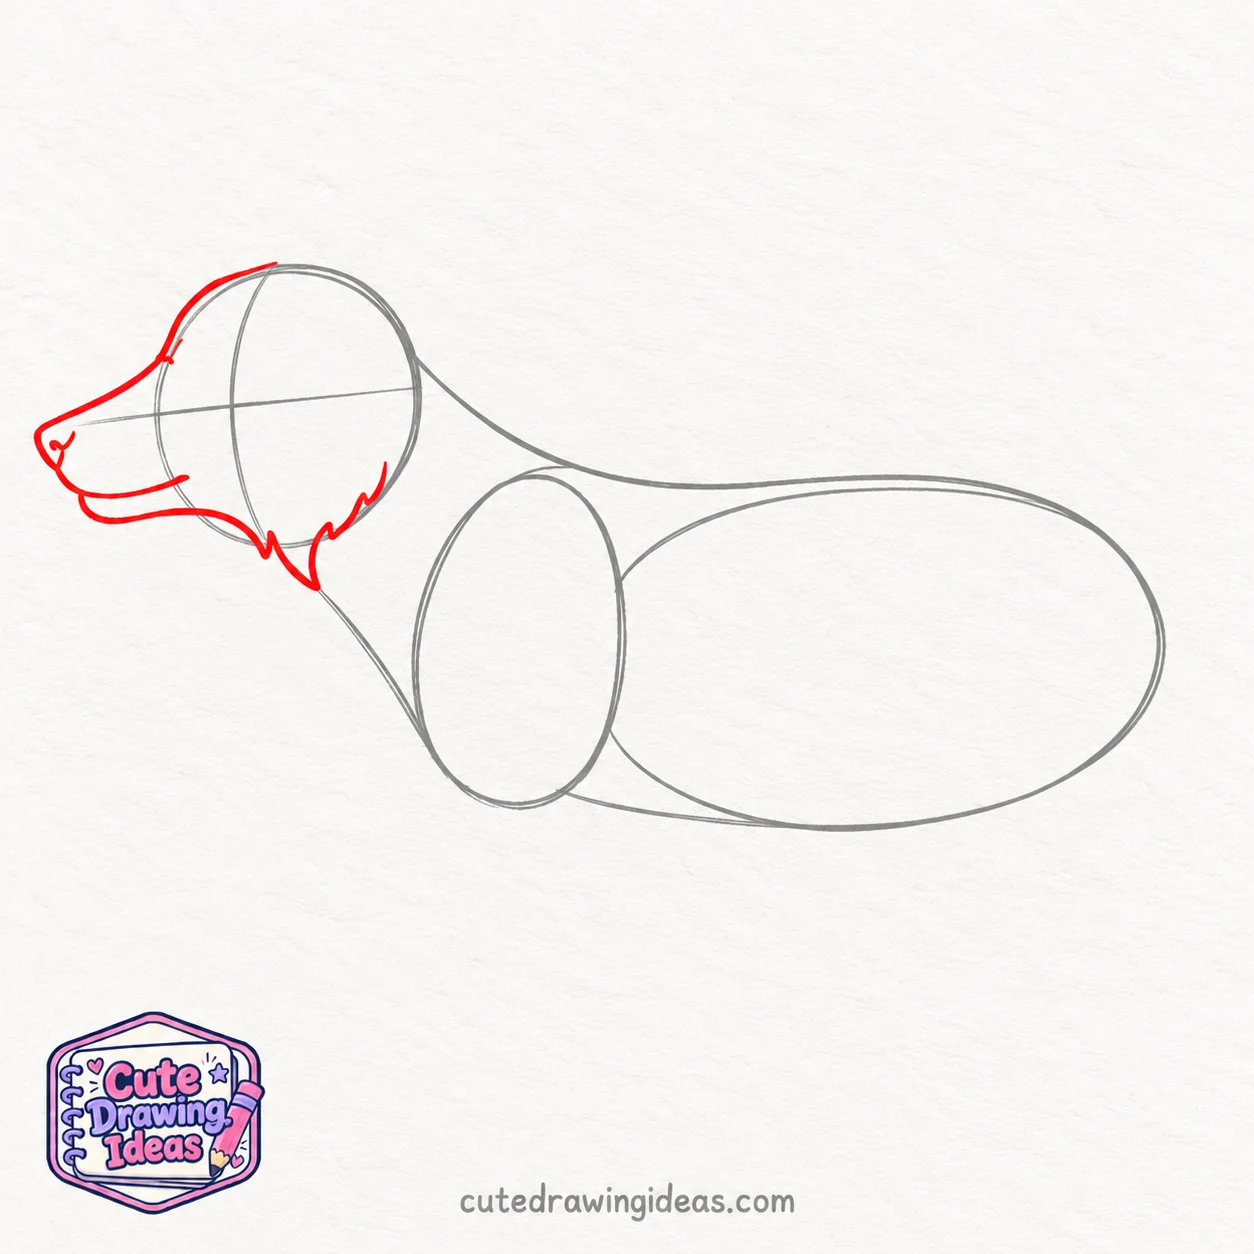
Let’s give our wolf’s head a more defined shape. Starting near the upper-left side of the head circle, draw a gently sloping line toward the left to form the forehead and the top of the muzzle.
At the end of this line, curve slightly downward to shape the nose area. Then draw the lower edge of the muzzle back toward the head, connecting it to a softly rounded jawline.
Refine the lower part of the head with a few small, pointed curves where the cheek fur will begin. Keep the muzzle slightly tapered but not too narrow, as we want our cute wolf to have a gentle expression.
Leave the original head circle and facial guidelines lightly visible for now. They’ll help us position the ears and facial features in the next steps.
Check the shape before moving on. The muzzle should extend naturally from the forehead, and the jaw should connect smoothly to the neck. A slightly softened muzzle will make the wolf look friendly without losing its natural features.
Step 3: Draw the Wolf’s Pointed Ears
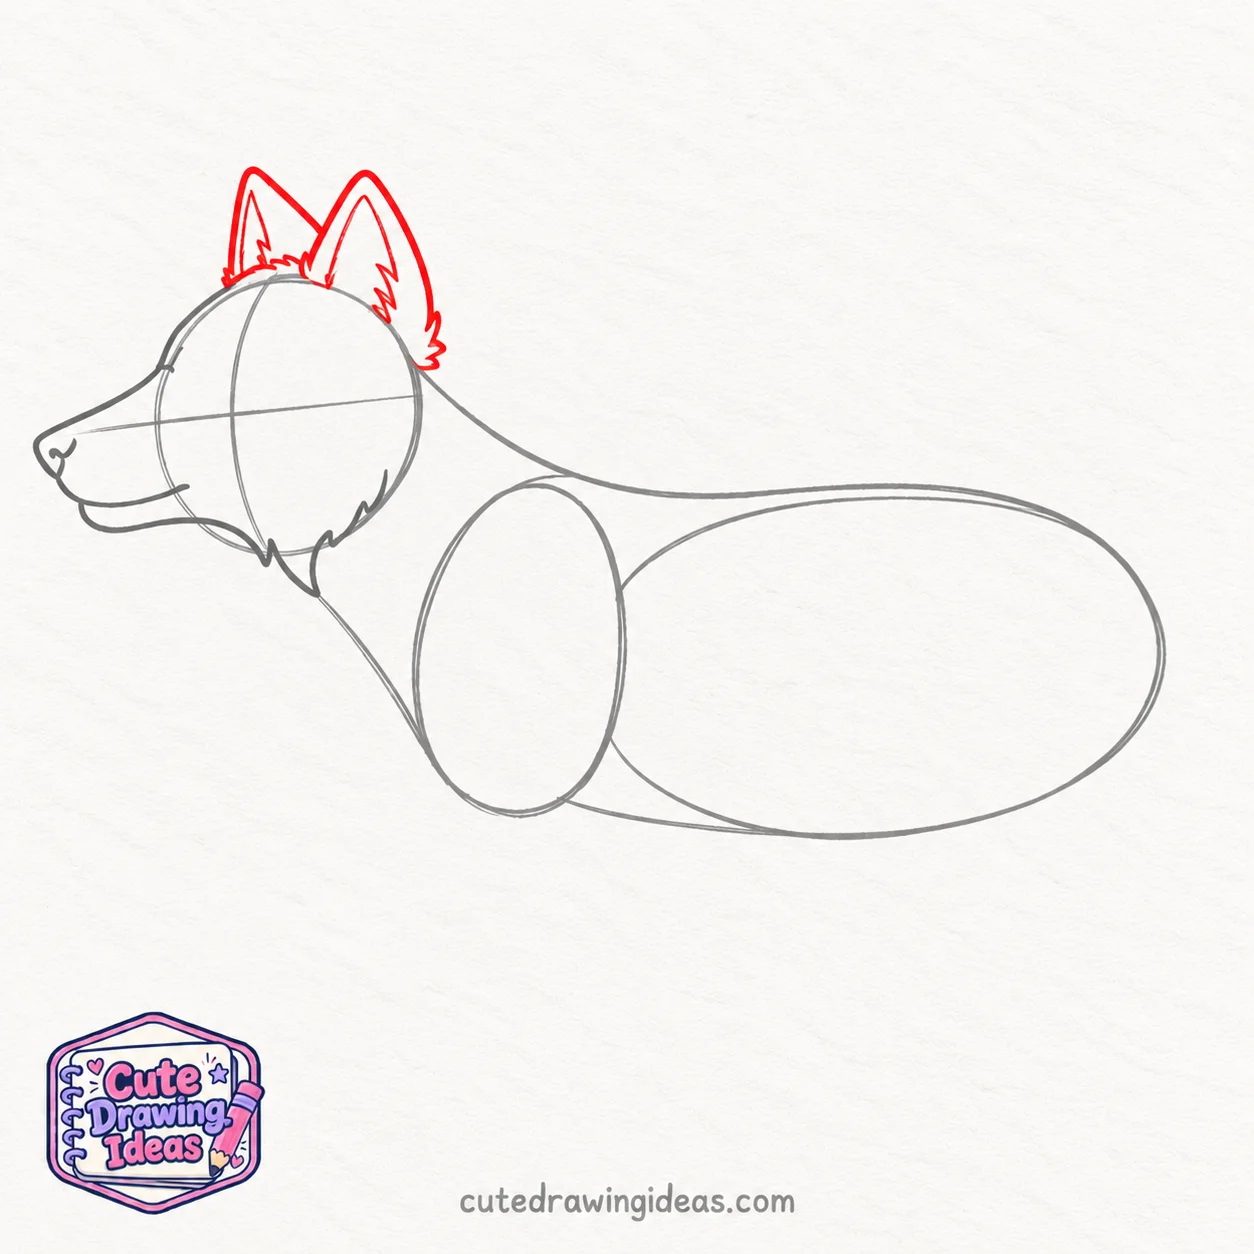
Now let’s add the wolf’s ears. On the upper-right side of the head circle, draw a tall, slightly curved triangle for the first ear. Keep the tip pointed but softly rounded, and connect its base naturally to the top of the head.
Next, draw the second ear just behind the first, closer to the upper-middle part of the head. Make it slightly smaller and let part of its base overlap the head outline to show that it’s farther away.
Inside each ear, draw a smaller curved triangular shape to define the inner ear. Add a few short strokes near the base to suggest soft fur, but leave the detailed texture for later.
Check the placement. Both ears should point upward, with the nearer ear appearing slightly larger. Keep the original head, muzzle, chest, and body guidelines visible, as we’ll need them for the remaining steps.
Step 4: Add the Cute Wolf’s Eyes, Nose, and Mouth
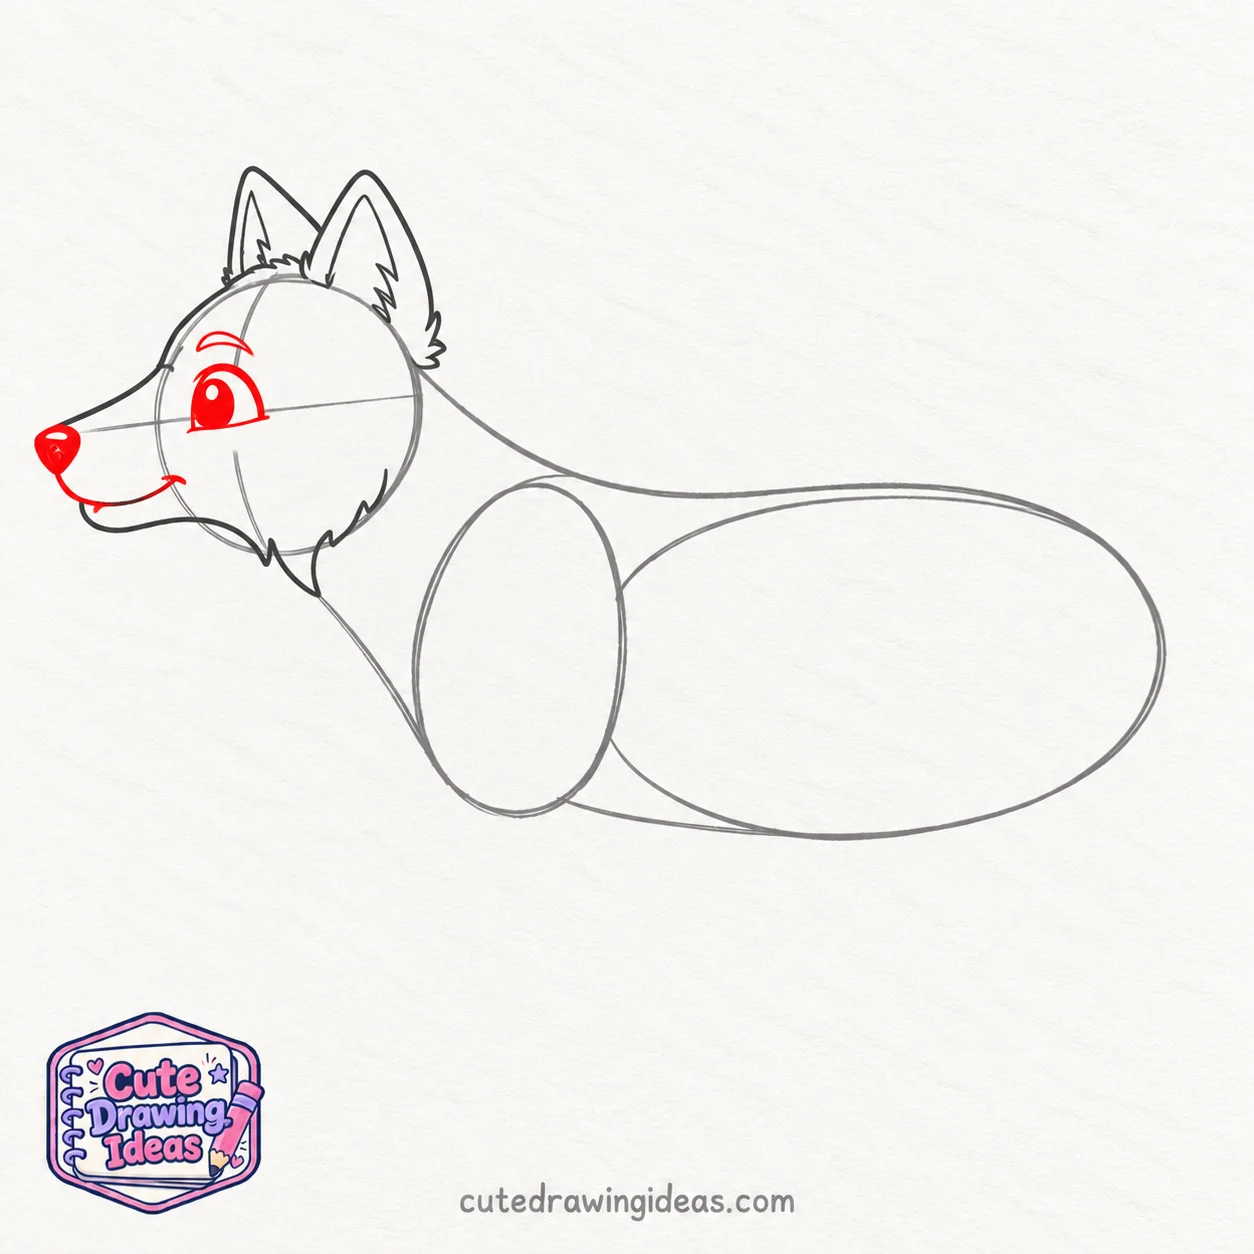
Let’s give our wolf a friendly expression. Using the horizontal guideline inside the head circle, draw a slightly rounded, almond-shaped eye just behind the muzzle. Add a dark pupil and leave a tiny white highlight to make the eye look bright and expressive.
Next, refine the small nose at the tip of the muzzle into a rounded triangular shape. Darken its outline and add a little shading, leaving a small highlight near the top.
Now, follow the mouth line from Step 2 and curve its back end slightly upward to create a gentle smile. Add a short line beneath the mouth to define the lower lip.
Finally, draw a small curved line above the eye to suggest the brow and a few subtle markings around the cheek. These details will make the face more expressive without changing the head shape.
Check the expression. The eye should sit naturally above the muzzle, and the mouth should look relaxed rather than exaggerated. Keep the construction guidelines visible for now, and leave the detailed fur texture for Step 10.
Step 5: Draw the Fluffy Cheeks, Neck, and Chest
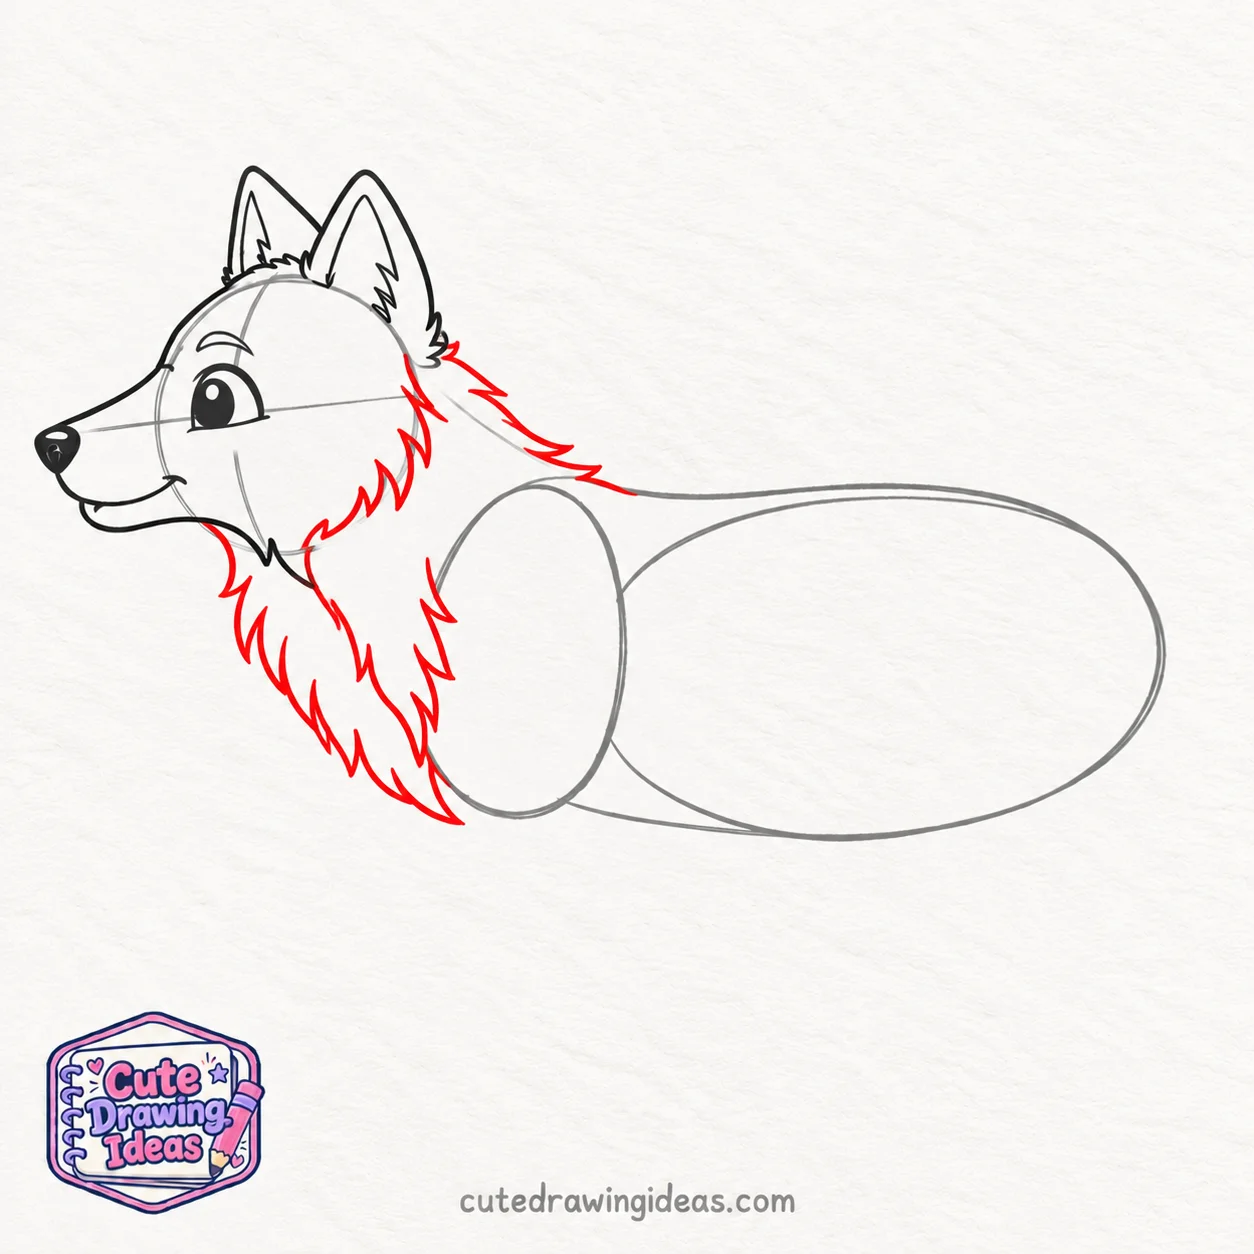
Let’s give our cute wolf a thicker, fluffier coat. Start along the lower edge of the cheek and add a few short, pointed fur tufts extending toward the neck. Follow the existing cheek outline without changing the shape of the head.
Next, move to the back of the neck, just below the ears. Follow the sloping guideline toward the shoulders, adding small, uneven zigzag strokes to create a soft layer of fur.
Now, use the upright chest oval as your guide. Starting beneath the jaw, draw a series of longer, pointed fur tufts downward toward the lower chest. Let the tufts overlap slightly and vary their lengths to make the fur look natural.
Keep the chest full and rounded, but don’t cover the entire oval with fur. We still need its guidelines for positioning the front legs later.
Check the fur direction. The cheek fur should point outward, while the neck and chest fur should flow downward. This will give your wolf a thick, fluffy appearance without making the outline look messy.
Step 6: Refine the Wolf’s Back, Belly, and Body Shape
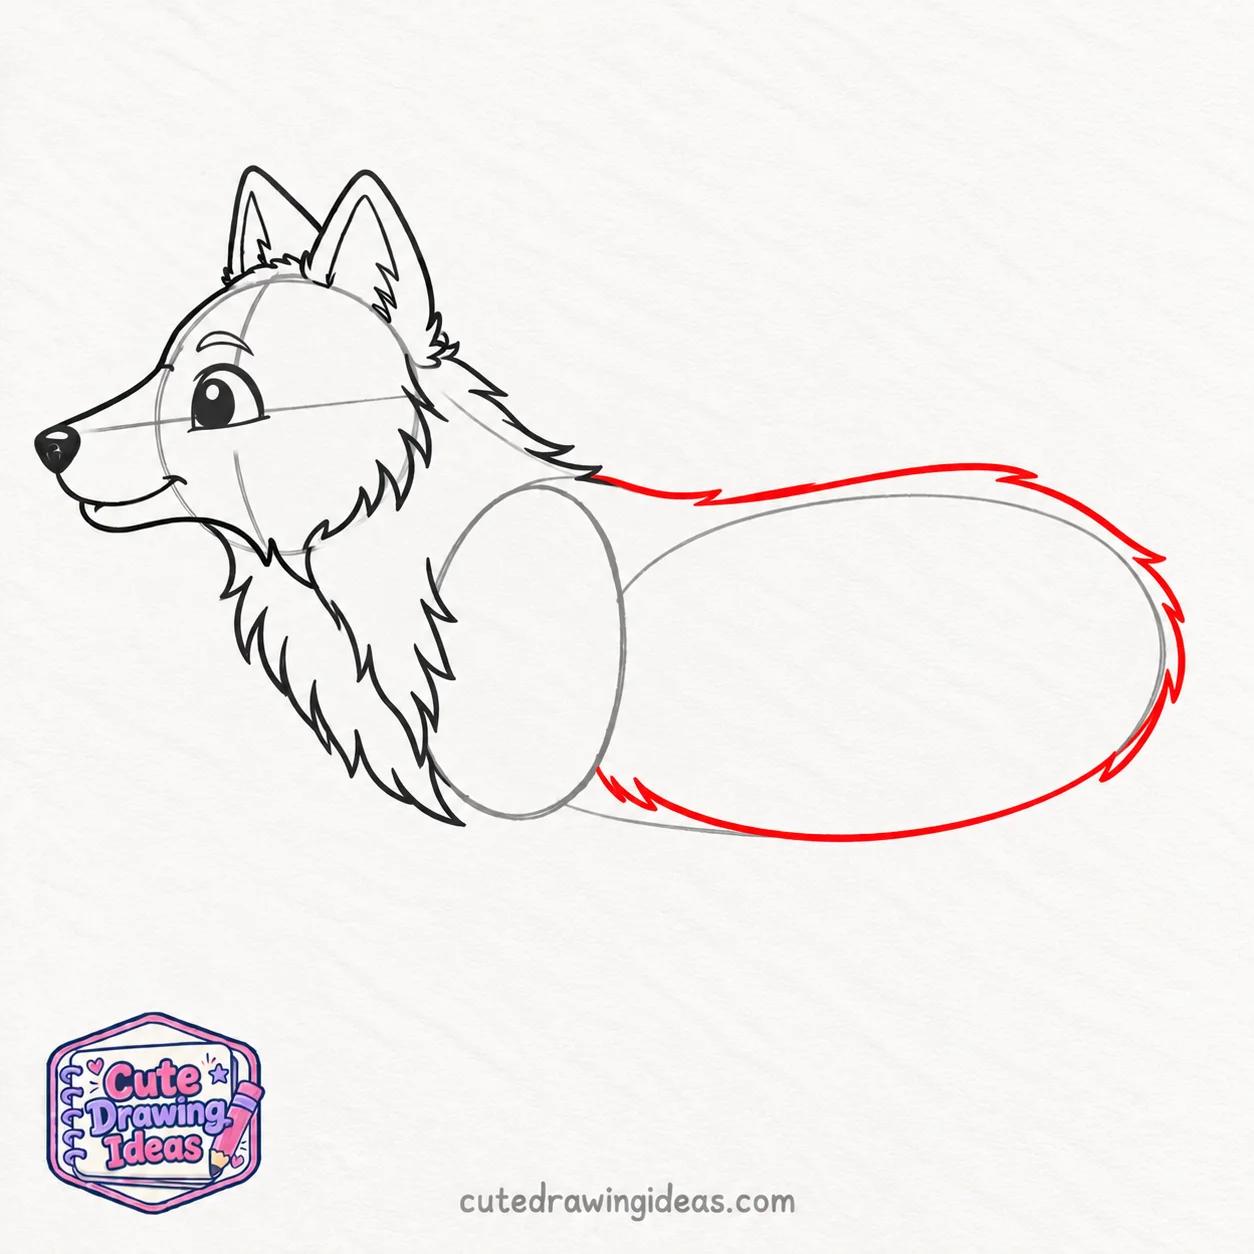
Now let’s shape the wolf’s body using the large horizontal oval from Step 1.
Start at the end of the fluffy neck fur and follow the upper curve of the oval toward the right. Draw a gently curved line along the back, keeping it fairly level before rounding it downward at the hips. Add a few small fur tufts near the hindquarters to soften the outline.
Next, move to the lower edge of the body oval. Starting just behind the chest, draw a smooth belly line toward the hindquarters. Curve it slightly upward as it approaches the hips to create a natural waist.
Round out the rear of the body, leaving enough space underneath for the hind legs we’ll draw later. Keep the hips slightly fuller than the waist to suggest the wolf’s muscular build.
Leave the original torso and chest guidelines lightly visible for now. They’ll help us position the legs correctly in the next steps.
Check the proportions. The back should flow naturally from the neck toward the hips, while the belly curves gently upward near the rear. Avoid making the body too narrow or overly rounded, as we want our cute wolf to have a balanced, natural shape.
Step 7: Draw the Front Legs and Paws
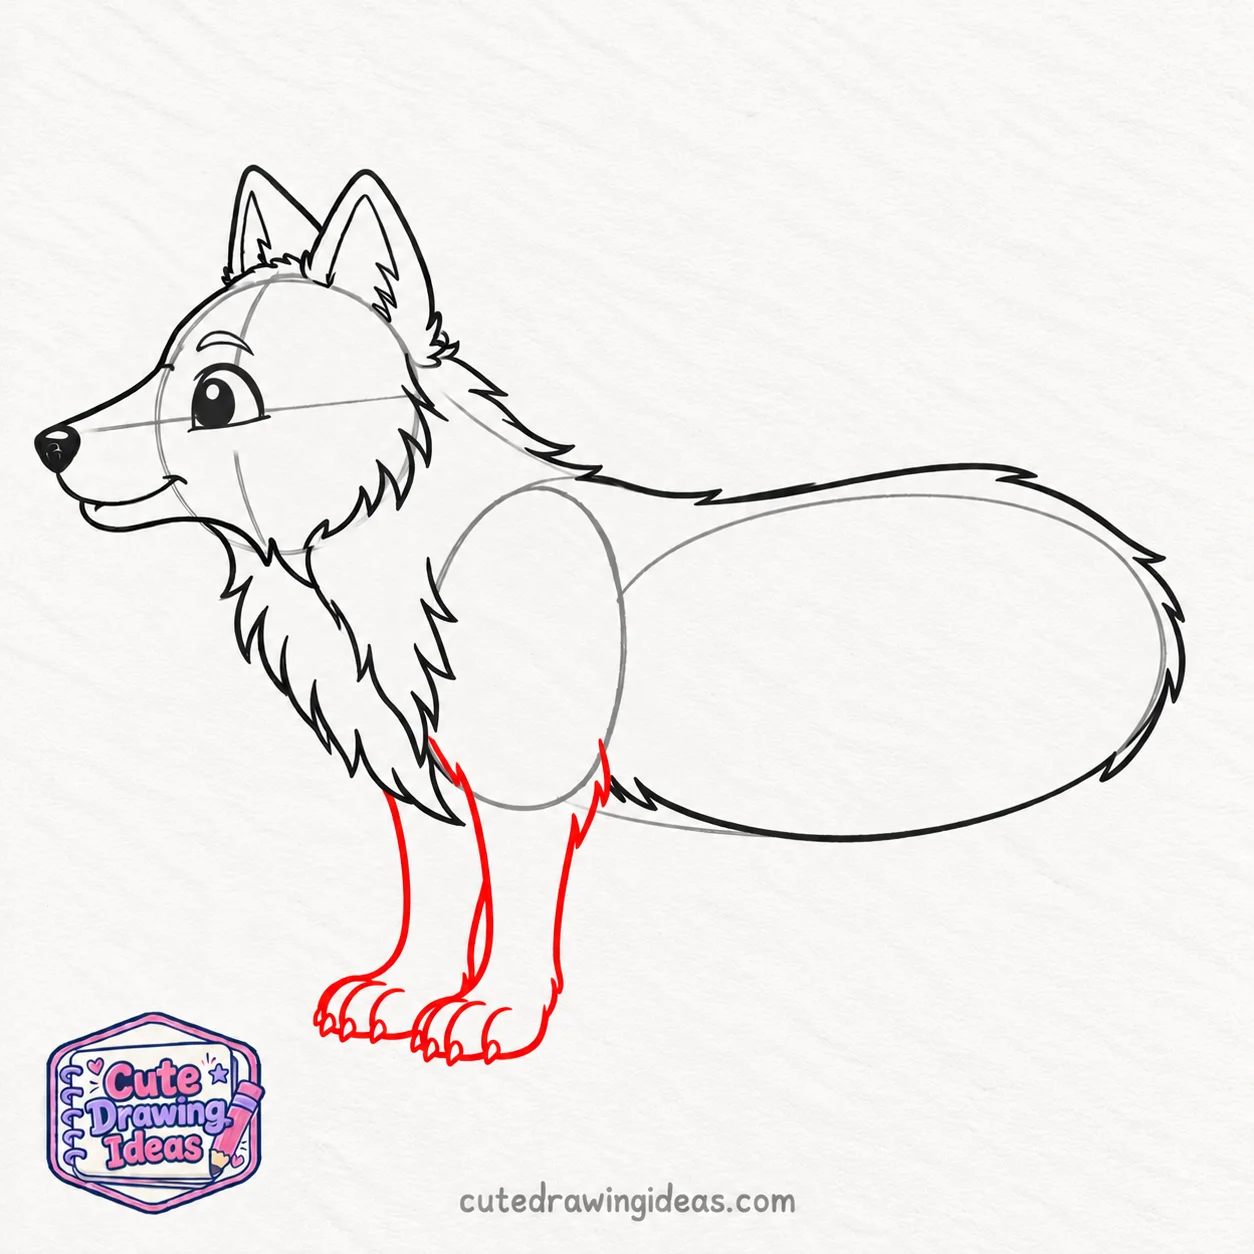
Now let’s draw our wolf’s front legs. Start at the bottom of the upright chest oval and draw two slightly curved lines downward to form the first leg. Keep it sturdy near the shoulder and gradually narrow it toward the wrist.
At the bottom, draw a rounded paw extending slightly forward. Add three short curved lines to separate the toes, followed by tiny pointed claws.
Next, draw the second front leg just behind the first, starting slightly farther to the right beneath the chest. Let part of this leg overlap with the first to create a natural sense of depth. Make its paw a little smaller since it’s farther away.
Keep both front legs long enough to support the wolf’s body, with a slight bend at the wrists rather than perfectly straight outlines.
Check the position. Both paws should rest at the same ground level, and the legs should connect naturally to the chest. Avoid making the paws too small, as wolves have broad paws that help give their bodies a strong, balanced appearance.
Step 8: Draw the Hind Legs and Paws
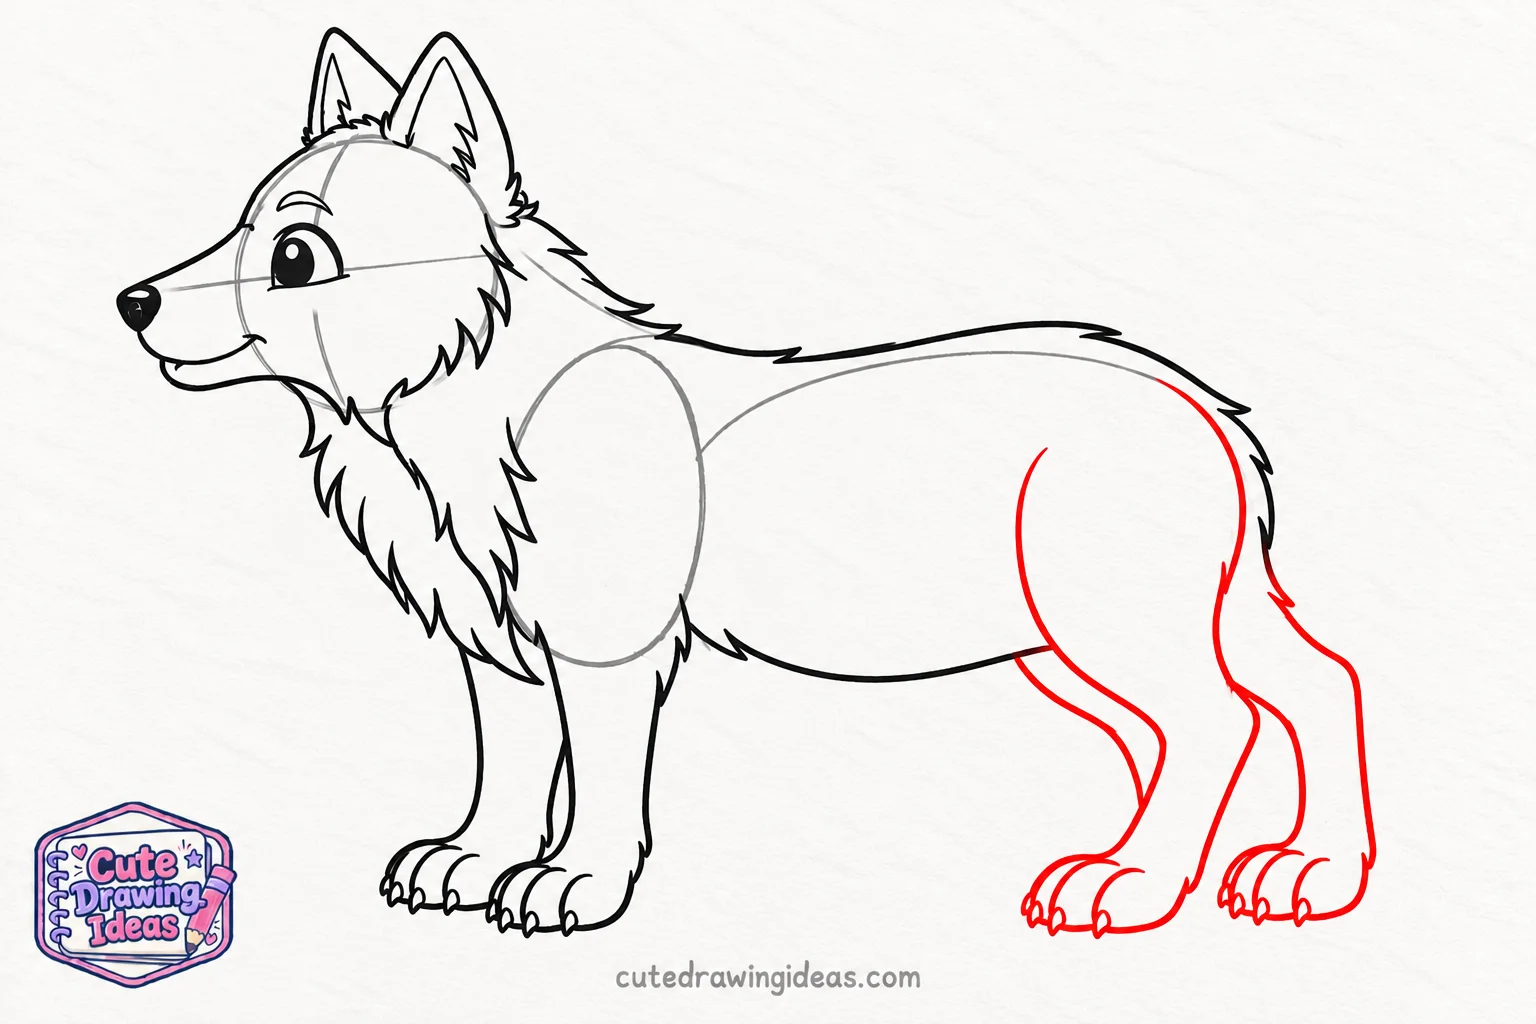
Now let’s add the wolf’s hind legs. Start near the rounded hip on the right side of the body. Draw a curved line downward and slightly forward to shape the first thigh, making it wider at the top to show the wolf’s strong hindquarters.
Next, angle the line backward toward the hock, which is the joint above the rear paw. From there, bring the lower leg downward to the ground. Keep the ankle narrower than the thigh to give the leg a natural shape.
Draw a broad, rounded paw at the bottom, pointing slightly forward. Add three short curved lines to separate the toes, followed by tiny claws, just as we did with the front paws.
Now add the second hind leg slightly behind the first. Let part of it overlap with the nearer leg, and make its outline a little less prominent to create depth. Finish with another rounded paw and small toe details.
Check the balance. All four paws should rest on the same ground level. The hind legs should have fuller thighs and more noticeable bends than the front legs, giving our cute wolf a natural, balanced standing pose.
Step 9: Draw the Thick, Bushy Tail

Now let’s add the wolf’s bushy tail. Start at the upper-right side of the hindquarters, just behind the back legs. Draw a gently curved line extending backward and downward to form the top of the tail.
At the end, add several pointed, uneven fur tufts to create a soft, tapered tip. Then draw the lower edge of the tail curving back toward the body, making it slightly fuller near the base.
Use a few short, curved strokes along the outer edges to give the tail a thick, fluffy appearance. Keep the fur tufts pointing toward the tip so they follow the natural direction of the coat.
The tail should hang behind the hind legs without touching the ground. Make sure it remains separate from the back paws so its outline is easy to see.
Check the proportions. The tail should be thick near the body and gradually narrow toward the tip. Avoid making it too thin or curling it upward, as we’re giving our cute wolf a relaxed, natural standing pose.
Step 10: Refine the Outline and Add Fur Details

Our cute wolf is ready for its final pencil details. Start by carefully erasing the light construction circles inside the head, chest, and body. Remove the facial guidelines too, but keep the finished outlines of the ears, muzzle, legs, paws, and tail unchanged.
Next, add a few short, tapered fur strokes along the forehead and beneath the ears. Draw small, curved strokes inside the cheek fur, following its outward direction. Along the neck and chest, use slightly longer, downward-pointing strokes to make the thick coat look more natural.
Move to the body and add a few short fur marks near the shoulders, along the lower belly, and around the upper legs. Leave the middle of the torso mostly clear so the fur doesn’t look overcrowded.
For the bushy tail, draw several longer, gently curved strokes inside its outline. Start near the base and follow the tail’s downward direction toward the pointed tip.
Finally, refine the existing outlines around the paws, muzzle, and legs. Keep the main contours darker than the smaller fur details to give the drawing a clean finish.
Check your drawing. The construction guidelines should be gone, all four paws should remain in their original positions, and the new fur strokes should follow the wolf’s body shape. Leave the coloring and shading for Step 11.
Step 11: Color and Shade Your Cute Wolf
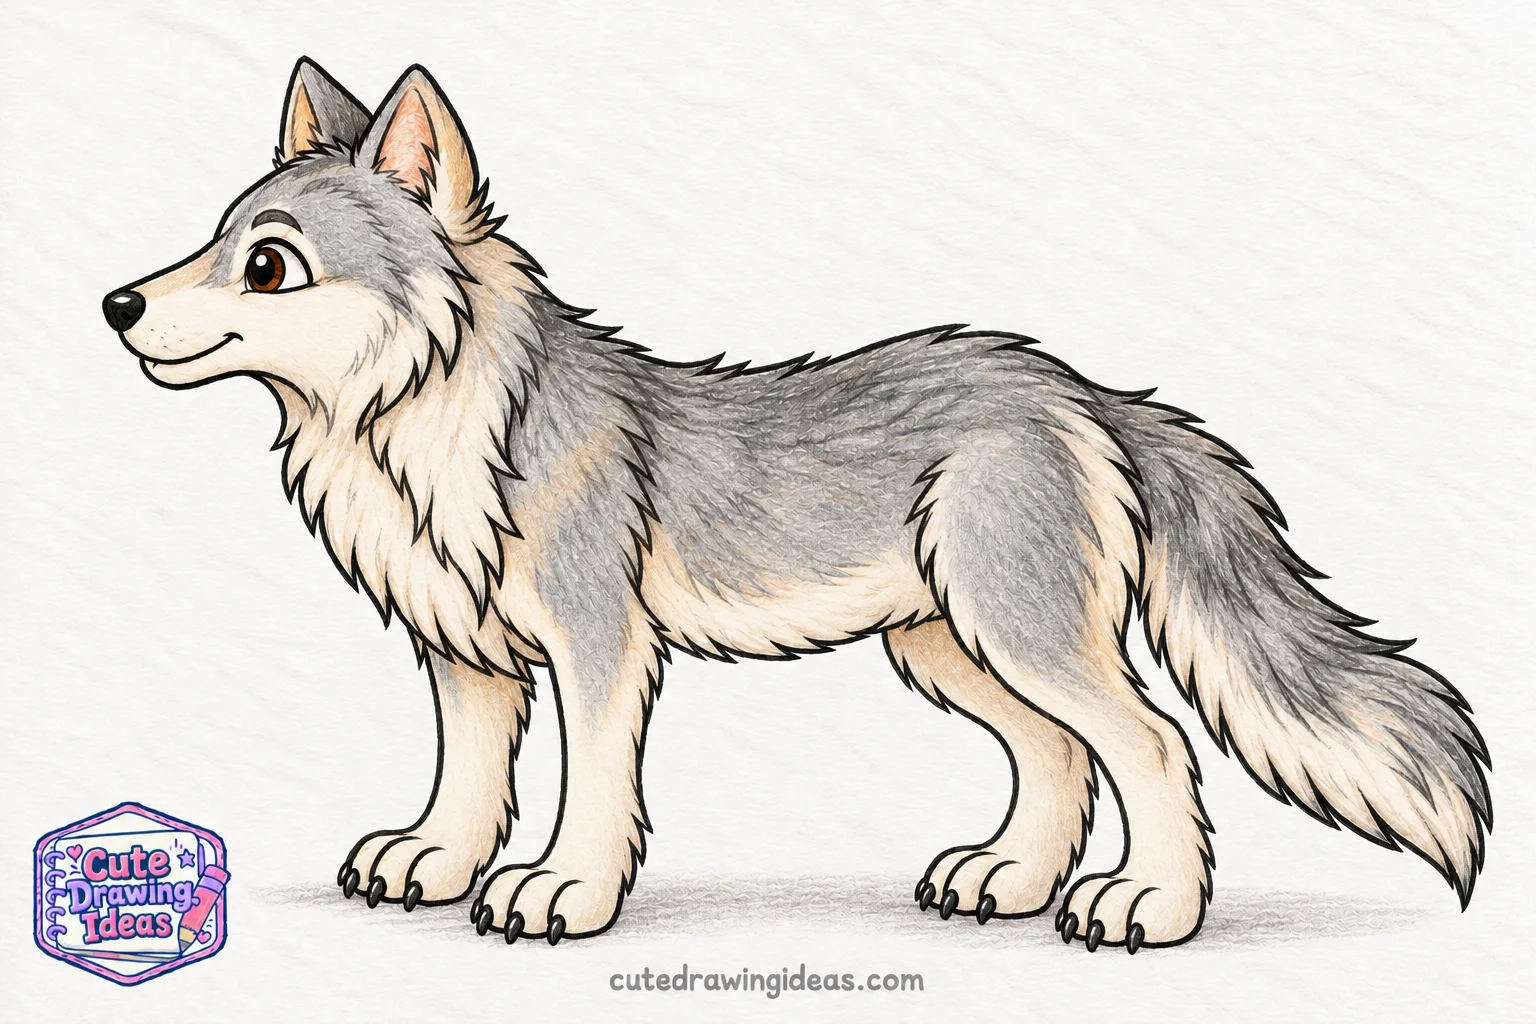
Our cute wolf drawing is ready for color! I like using a mix of grey, cream, and soft brown to give the fur a natural appearance while keeping the face bright and friendly.
Start by coloring the top of the head, back, shoulders, and outer legs with light grey. Add a slightly darker grey along the upper back and around the hindquarters. Keep your pencil strokes following the direction of the fur we drew in Step 10.
Next, use cream or off-white for the muzzle, cheeks, chest, belly, and inner parts of the legs. Add a little warm brown around the ears, shoulders, and sides of the body to create subtle changes in the coat.
Now, build the shading with a darker grey pencil. Gently deepen the areas beneath the chin, inside the ears, under the belly, and where the legs overlap. Use short, layered strokes rather than pressing too hard, so the fur retains its soft texture.
Finish by coloring the nose black and giving the eye a warm amber-brown shade, keeping its small white highlight visible. Add a light grey shadow beneath all four paws to make the wolf look grounded.
Check your finished drawing. The darker fur should define the wolf’s back and tail, while the lighter areas around the face and chest keep its expression gentle. Blend the colours softly, but leave some individual fur strokes visible to give your cute wolf a fluffy, detailed finish.
Your Finished Cute Wolf Drawing
And there we have it! Our cute wolf now has a fluffy coat, pointed ears, a friendly face, and a thick, bushy tail.
I particularly like how the cream-colored chest stands out against the darker grey fur. The little details around the eyes and cheeks also help give the wolf its gentle expression.
We’ve worked on body proportions, overlapping shapes, fur texture, and pencil shading throughout this drawing. These are useful skills to practice when drawing other furry animals, too.
Why I Love Drawing Cute Wolves
One thing I enjoy about drawing wolves is how much their appearance can change with a few adjustments. A wolf with upright ears and a relaxed mouth can look curious, while a lowered head and narrowed eyes can give it a more serious expression.
I also love working on their thick fur. The longer tufts around the neck and chest give me room to experiment with different pencil strokes, while the shorter fur on the face requires a more careful touch.
For me, the challenge is making a wolf look soft and approachable without losing the features that make it recognizable as a wild animal.
Tips to Make Your Cute Wolf Drawing Look Better
Balance Cuteness With Natural Proportions
A slightly rounded face and expressive eyes can make a wolf look adorable, but exaggerating every feature may turn it into a puppy-like cartoon.
I prefer keeping the muzzle long enough to look wolf-like and making only a few facial features softer. This gives the drawing personality while preserving its natural shape.
Use Different Pencil Strokes for Different Fur Areas
Try changing your pencil strokes according to the length of the fur.
Short, fine marks work well around the forehead and muzzle. Longer, tapered strokes are better for the thick coat around the chest and tail.
You can also leave small gaps between groups of strokes. This prevents the fur from looking like one solid mass.
Build Depth With Light and Dark Shading
Instead of using the same pencil pressure everywhere, think about which parts of the wolf receive less light.
Areas beneath the chin, inside the ears, and between overlapping legs can be darker. The forehead, upper muzzle, and outer chest can stay lighter.
I find that adding a few gentle layers gives me better control than trying to create dark shadows in one stroke.
Vary Your Line Thickness
Not every outline needs to be equally dark.
Use stronger lines around the main silhouette and where one body part overlaps another. Keep smaller fur marks and interior details thinner.
This helps separate the different shapes and makes the drawing easier to understand without filling it with unnecessary lines.
Common Mistakes When Drawing a Cute Wolf
Making the Head Too Large
A head that’s much too large can make the wolf resemble a chibi character rather than a semi-realistic animal.
How to fix it: Compare the head with the chest and torso before adding facial details. If it looks too large, adjust your construction circle while the pencil lines are still light.
Drawing the Legs Too Straight
Straight, tube-shaped legs can make the wolf appear stiff. The hind legs are especially easy to get wrong because their joints bend differently from the front legs.
How to fix it: Look at the angles between the thighs, hocks, and paws. Make the upper hind legs fuller and allow the lower sections to change direction naturally.
Making the Muzzle Too Short
A very short muzzle changes the wolf’s facial proportions and can make it look more like a puppy.
How to fix it: Extend the muzzle from the forehead before rounding the nose area. Keep the upper and lower edges gently tapered rather than forming a small, blunt snout.
Drawing Fur in Random Directions
If the fur strokes point in different directions without following the body, the coat can look tangled instead of fluffy.
How to fix it: Think about the surface beneath the fur. Let the cheek strokes point outward, the chest strokes fall downward, and the tail strokes follow its length toward the tip.
Fun Cute Wolf Drawing Variations to Try
Once you’ve finished your standing wolf, you can use the same drawing techniques to create a few different versions.
Cute Baby Wolf Drawing
For a cute baby wolf, begin with a rounder head, a shorter muzzle, and a smaller body.
You can change the standing pose into a sitting one by drawing the front legs upright and folding the hind legs beneath the body.
Give your little wolf pup shorter, softer fur around the cheeks and a curious expression. The different proportions will make it look younger than the wolf we drew in the main tutorial.
Cute Howling Wolf Drawing
Try giving your wolf a howling pose by tilting its head upward and lifting the muzzle toward the sky.
Adjust the neck so it stretches naturally beneath the raised head. Draw the mouth slightly open, with the lower jaw following the new angle.
For an extra challenge, you can add a moon behind your wolf. Keep the moon separate from the animal’s outline so the raised head remains the focus.
Cute Anime Wolf Drawing
If you enjoy anime-style animal characters, try drawing your wolf with more expressive eyes and slightly sharper fur shapes.
Keep the pointed ears and long muzzle, but simplify some of the natural fur texture into larger, clean sections.
You can also experiment with a more dramatic facial expression. I like this variation because it lets me change the character’s personality without rebuilding the entire body.
Fun Facts About Wolves
Here are a few interesting facts about the animals we’ve been drawing.
- Wolves live in family groups. A wolf pack commonly includes a breeding pair and their offspring.
- Wolves communicate by howling. Howls can help pack members locate one another and communicate over long distances.
- Wolves use body language. Ear positions, tail movements, and facial expressions can communicate different moods and intentions.
- Wolf coats have different layers of fur. Their thick coat includes insulating underfur and longer protective guard hairs.
- Wolf pups have different proportions from adults. Younger wolves generally have shorter muzzles and less developed neck ruffs.
I think these details are useful to remember when drawing wolves. Their coats, facial features, and body positions can tell us a lot about how to represent them on paper.
Frequently Asked Questions
How Long Does It Take to Draw a Cute Wolf?
This intermediate-level cute wolf drawing may take around 40–60 minutes. Sketching the main shapes and outlines is usually quicker than adding the fur details and coloured-pencil shading. Take more time if you want to develop the coat texture carefully.
How Can I Make My Wolf Drawing Look Cute Without Making It Too Cartoonish?
Focus on softening only a few facial features. A slightly rounded muzzle, expressive eye, and fuller cheek fur can create a friendly appearance. Keep the legs, torso, and overall head proportions close to a natural wolf shape.
How Do You Draw Fluffy Wolf Fur With a Pencil?
Use groups of short and long tapered strokes instead of covering the entire body with identical marks. Follow the direction of the coat and vary the pencil pressure. Leave some lighter spaces between darker strokes to suggest overlapping layers of fur.
What Colors Should I Use for a Cute Wolf Drawing?
Grey, cream, and brown work well together for the wolf in this tutorial. Use darker grey along the upper body and tail, cream for the muzzle and chest, and a little warm brown around the ears and legs. You can adjust the shades to create a different coat pattern.
Can I Draw a Cute Wolf Using Only a Pencil?
Yes! You can complete the whole drawing with graphite pencils. Use an HB pencil for the outlines and lighter areas, then a 2B or 4B pencil for deeper shadows. An eraser can help lift graphite to create highlights in the eyes and fur.
Keep Drawing
I hope you enjoyed creating this cute wolf as much as I enjoyed putting the drawing together. If you’d like another challenge, try sketching the same wolf in a sitting or howling pose using the proportions you’ve practiced here.

